Podcast Post Production: Gain, Limiting, and Ramifications

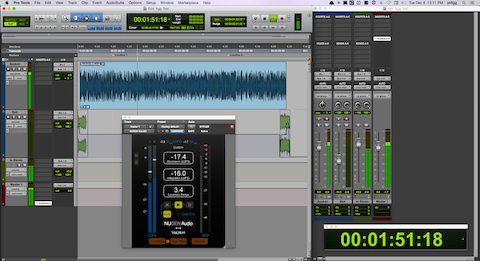
When considering best practice audio compliance guidelines for internet distribution [mobile, podcast, streaming, etc.] … processed intermediates may require significant up side gain adjustments in preparation for distribution encoding. 

If you elect to apply offline Loudness Normalization, the process is simply (after measurement) a linear gain offset + limiting if necessary.

There are several [what I refer to as] pre-gain offset issues that all producers and engineers must be aware of …

Noise Floor

This is rudimentary: adding gain will boost the audibility of preexisting broadband noise and possibly degrade audio fidelity.

A specific example where applied gain over noise is problematic ➝ post downward expansion. 

Are you under the assumption that applying downward expansion is a form of broadband noise reduction? It isn’t. The process does not remove persistent audible noise. When talent is actively speaking and the audio level is above a predefined threshold – residual noise will be audible as well. 

If you think talent transitions from silent inactive speech passages to active passages with audible noise sound bad – imagine how this will translate after adding significant gain. Terrible. 

In essence you must do whatever you can to mask [or attenuate] your noise floor prior to downstream processing. Just be careful. Heavy noise reduction will certainly introduce artifacts. Of course best case is to circumvent noise at it’s origin.

Breath Levels

Adding significant gain elevates breath amplitude. Pre and/or post gain optimization is paramount.

IMO in order to preserve natural human speech characteristics breath retention is vital. ‘Ever experience speech passages with all breaths cut and subsequent ripple edits applied? It sounds robotic and horrible. Yet there are cowboys out there that preach the technique suggesting “listeners do not want to hear breaths.” Questionable perspective in my book.

I do agree that breaths elevated in level or those exhibiting snap syndrome* may be bothersome to listeners.

There are several tools available that attempt to sense and attenuate breaths. As far as I am concerned the only way to properly optimize persistent breaths is manually, instance by instance. Sure it’s time consuming. So saddle up.

Limiting Considerations

In order to adhere to a subjective spec. or a best practice imposed [true peak] ceiling – producers must assess how added gain will impact potential limiting requirements.

Do not ignore this fact: integrated loudness ‘targets’ for internet, mobile, and podcast distribution differ from broadcast specification description. You must produce audio intermediates (or mixes) that are prepped, optimized, and capable to sustain additional gain without compromising fidelity and/or nulling adherence to best practice or subjective specs. 

Whether you are driving your mix into a limiter ceiling (I don’t necessarily recommend this) or you are applying offline loudness normalization – limiting (in most cases) will be necessary.

The key of course is proper intermediate optimization before the audio is bumped up (or limited) at the final stage. In fact the goal is to avoid excessive limiting! Encoding heavily limited audio into a lossy codec is a work place hazard. Not a good idea.

What to do? 

Assess the attributes of your audio prior to final stage processing. Be aware of available headroom. Gauge the amount of limiting that will be necessary to meet your compliance goals. If required limiting is excessive and there is even the slightest indication of audible distortion – revert and make changes.

A technique that I frequently discuss and implement for speech/podcasts is what’s referred to as “glueing.” It is achieved by using a bus modeled compressor to tame dynamic transients and/or instances of inconsistent amplitude. If a final required gain offset is significant – a moderate amount of applied bus compression before loudness normalization will help alleviate the necessity for excessive limiting. 

Example: processed/edited stereo intermediate checks in at -20.98 LUFS. Speech dynamics are far from optimized. Intent is a -16 LUFS deliverable, -2.0 dBTP ceiling. 

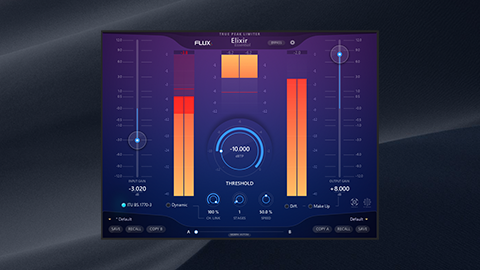
I’m using the new version of Elixir by FLUX:: Immersive. You can insert it in a DAW session or apply offline. 

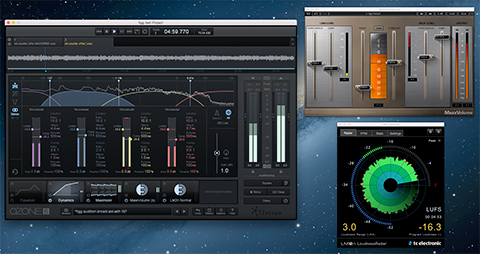
First I take the intermediate down to -24 LUFS: so input gain is set to -3.02 dB. Next the limiter threshold is set to -10 dB and the output gain is set to +8 dB. The integrated target and ceiling now comply. However notice the intermittent limiter gain reduction. 

In this scenario I would contemplate re-mastering the intermediate and attempt to tighten things up. Maybe check for asymmetry. Apply bus compression and zone in on RT Short Term loudness description [3 sec. averaging window]. Tweak as necessary.

Anyway … when teaching or discussing how to create and supply high quality deliverables, we must not forget the foundational aspects of speech based audio production. Basic gain manipulation and associated ramifications are vital aspects of professional podcast production. So dig in.

-paul. 

* What is “snap syndrome?” I’m fairly certain I coined the phrase. The anomaly occurs when talent breaths (when they inhale) exhibit a sudden snapping sound for whatever reason. I zone in and remove all audible instances. 
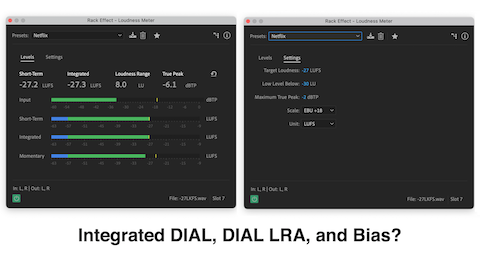
Ghost Netflix Loudness Meter Preset in Adobe Audition?

Many months ago I posted feedback on Adobe’s portal regarding what I refer to as a ghost loudness meter preset for Netflix measurement and compliance.

The Integrated Loudness submission target for Netflix referenced in “Near Field Audio Prerequisites for Mix Facilities” is -27 LKFS [+/- 2 LU tolerance] with True Peaks not exceeding -2 dBTP. They suggest setting an inserted limiter ceiling to -2.3 dBFS to “prevent false positives from minor differences in metering.” 

Netflix has reverted to the original ITU algorithm (ver.1) that supports Dialogue Intelligence. They’ve adopted the use of Dolby’s Speech Gating Reference Code. This method of measurement relies on targeted speech to serve as the measurement anchor providing the measured dialogue bias is above 15%. Note: EBU R128 and ATSC A/85 specifications utilize a threshold sensitive Relative Level Gate measurement model.

Loudness Meters capable of measuring audio slated for Netflix deliverables include supplemental descriptors such as Integrated DIAL [the speech gated dialogue], DIAL LRA [as opposed to the program LRA], and in most cases a percentage descriptor indicating the dialogue bias vs. program material. FWIW they suggest an LRA of 10 LU or less for dialogue.

What is the basis for the -27 LKFS target?

Netflix engineers felt the ITU BS.1770-4 (2,3) algorithms utilizing a relative level gate over estimate the measurement of wide dynamic range audio. In essence highly dynamic audio may exhibit compromised dialogue intelligibility.

Engineers concluded speech/dialogue typically sits approx. -3 LU below all components in a -24 LKFS mix. Since consumers typically set playback level based on dialogue, -27 LKFS establishes optimal measurement translation.

Is Adobe Audition’s new meter compatible?

The meter includes a Netflix preset. As far as I can tell Adobe has not implemented the Dolby Reference Code necessary for Netflix compliance measurements. They’ve simply implemented a standard preset with a -27 LKFS Integrated Loudness target. Lack of support is [I believe] obvious due to the absence of the previously mentioned supplemental descriptors.

I’ve executed tests with discrete audio files passed through various loudness meters that feature dialogue gated measurement. The long term Integrated DIAL description was consistent across active meters. However this was not the case when using the Adobe meter with the Netflix preset selected.

FYI any meter with coded dialogue intelligence support may be customized. E.g. – you may customize the Integrated Loudness target to conform with your platform delivery requirements.

I use Audition daily. It’s a great tool. All good. Personally I do not produce mixes intended for Netflix. However Netflix compliance is now ubiquitous in professional post production. Supported tools and presets must exhibit proper implementation and support.

-paul.

Pro Tools Aux I/O Customization

Avid’s latest Pro Tools update [2022.9] includes Aux I/O support for internal audio connections and assignments using Core Audio devices that are supplemental Extensions to the main Playback Engine. 

Extensions as such may include supported hardware plus preexisting and/or Pro Tools supplied virtual devices. Virtual Devices are referred to as Audio Bridges.

To access the Aux I/O configuration window: [Setup menu] … I/O. Press Aux I/O button under Input or Output tabs.

You will notice Pro Tools supplied Audio Bridges are listed in the Device Name column. Their attributes (e.g. channel configuration) are fixed in this window. In essence you cannot customize the noted attributes. ** See below for a workaround. 

Users can edit associated Display Name references representing the instance of any listed Device. Do this by simply activating an editable text field.

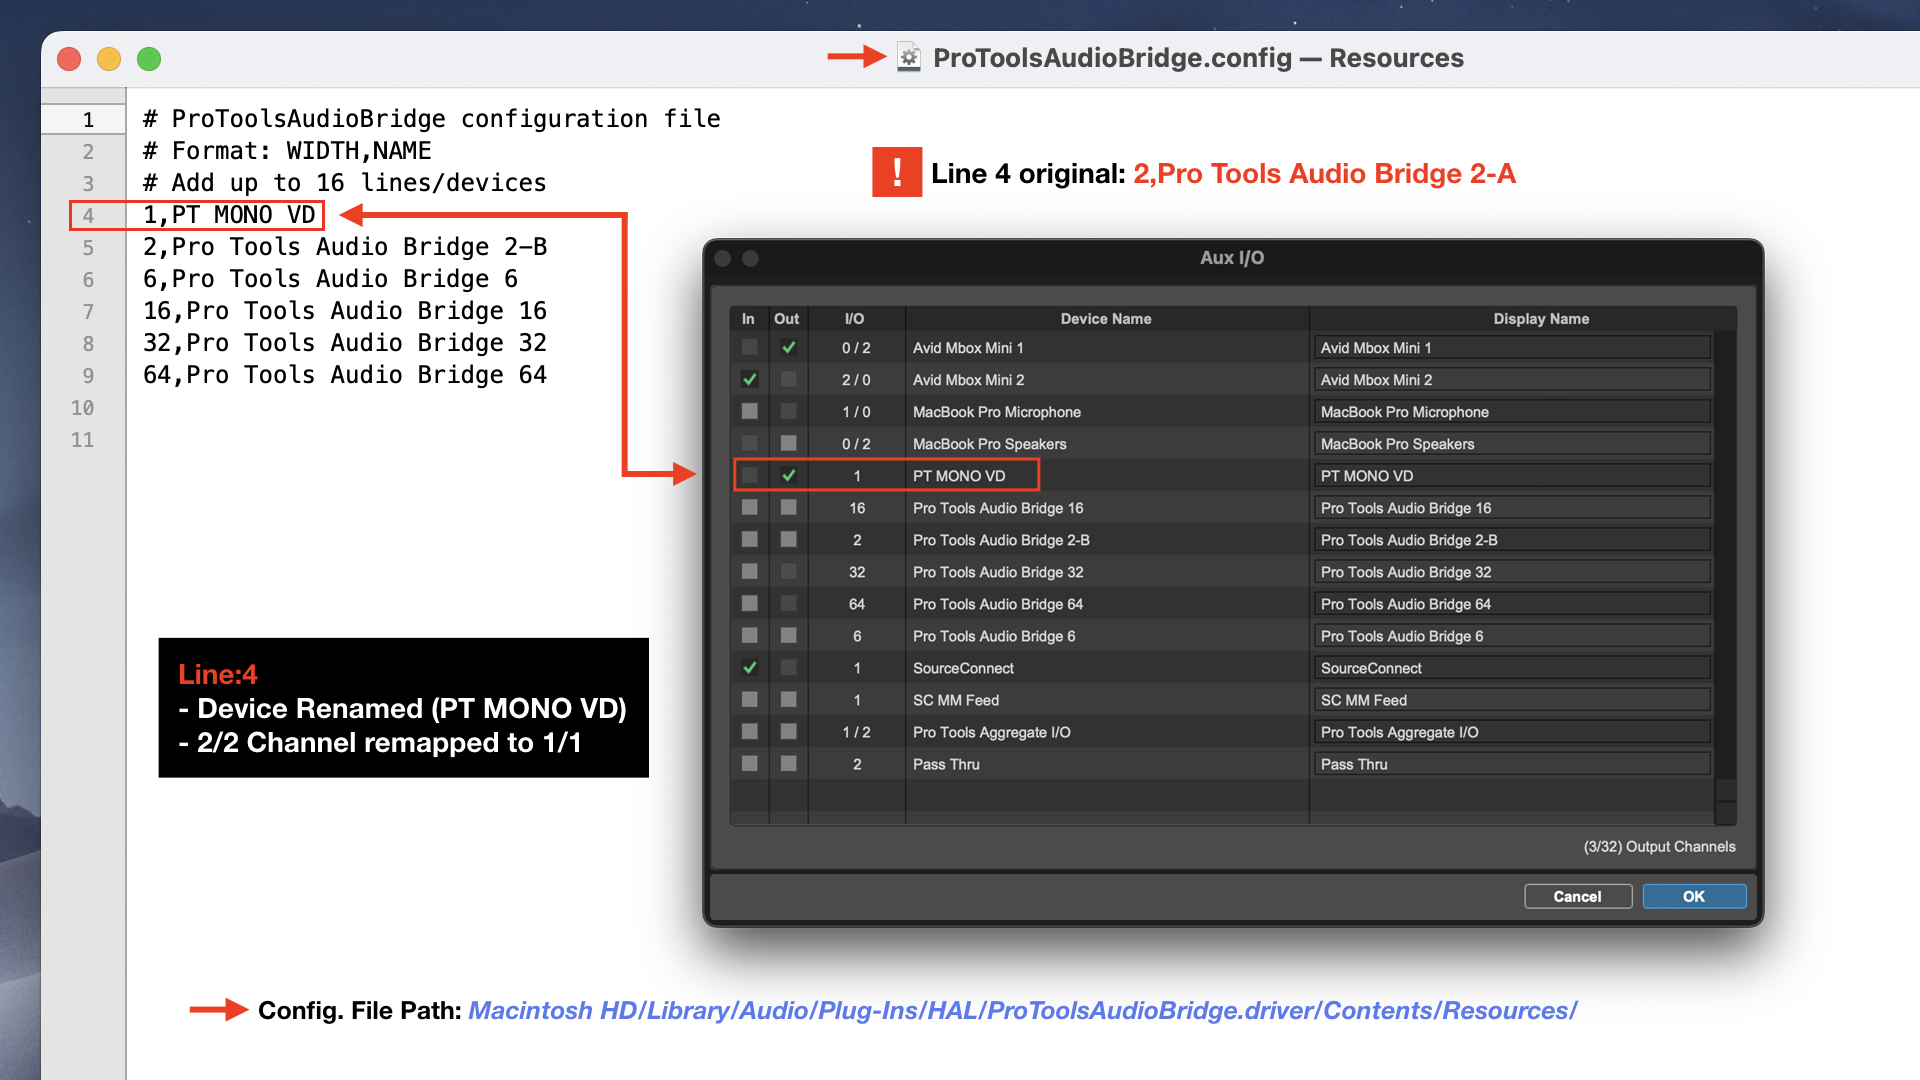
** To customize a Pro Tools Audio Bridge Device Name and channel configuration:

Access and edit the ProToolsAudioBridge.config text file:

Path: Macintosh HD/Library/Audio/Plug-Ins/HAL/ProToolsAudioBridge.driver/Contents/Resources

Example

In the displayed image the listed Audio Bridge in line 4 read by default:

2,Pro Tools Audio Bridge 2-A

That’s a 2 channel device (2/2 discrete) followed by the name of the Audio Bridge.

I edited the line 4 reference to read:

1,PT MONO VD

Results: Channel configuration is now 1×1 (discrete MONO) with a customized Device Name: PT MONO VD. It’s reference will be updated in Mac System Preferences/Sound options for possible system wide use as well.

It appears Avid is providing support to add up to 16 lines/devices in the configuration file. I concluded a full system restart is necessary in order to instantiate customized configurations.

Note Aux I/O is not available in “Pro Tools Intro.”

-paul.

Significance Of Target Based Audio Processing For Independent Podcasters

Are you producing a Podcast and hosting it on your website? Your website is essentially a proprietary distribution platform. Sound familiar? Maybe similar in concept to a broadcast network?

Regarding vague perspectives in relation to whether the “Target Loudness” post production mindset is relevant, or not … hear me out.

Broadcast networks specify audio submission Integrated Loudness targets which include tolerance margins. If an audio submission does not meet the specified requirement(s) – the work is rejected. 

In essence networks expect the submitter to properly (let’s say) manipulate prepared works in order to meet requirements prior to submission. 

Conversely most music streaming services handle this so called manipulation internally using proprietary methods. They apply perceptual loudness manipulation across submissions in order to establish playback consistency. 

For example if -14.0 LUFS is the recognized distribution Integrated Loudness for an arbitrary music streaming service and your mastered music submission checks in at -10 LUFS … the service will subtract 4 LU of gain. 

Note if the above scenario is reversed I’m not entirely sure if adding gain is now commonplace. I’ve heard this practice is not widespread. However I do believe select streaming services add gain (and possibly limiting) if necessary. 

BTW Loudness Normalization in concept is nothing more than adding/subtracting gain in order to meet a specified target. If added gain causes spec. defined True Peak overshoots – limiting may be applied. 

Music Submissions

Many music mastering engineers recommend producers simply ignore the loudness target concept. They widely suggest mastering for optimum fidelity and present streaming services with a well produced product that may be efficiently manipulated according to the service’s requirements. All good.

Podcasts

I don’t have access to valid data specifying whether ubiquitous streaming services currently manipulate spoken word Podcasts using the same methods applied to music submissions. I’ll look into it.

* * *

Back to hosting your Podcast on your personal website, or in essence – your platform …

Efficient website accessibility for your Podcast is an essential requirement. My guess is your implemented site player does not manipulate the attributes of your embedded files in order to standardize distribution Integrated Loudness across your hosted catalogue. And I doubt independent producers at large hire coders to build server side audio processing engines to establish what I previously described. 

Remember, you –  the site owner, producer, whatever – bear the responsibility to serve your listeners with let’s call it optimized audio that is perceptually consistent across all of your hosted programs. Your target may be subjective or it may adhere to published best practices. Again, all good.

Point is –  without a recognized Integrated Loudness target including acceptable tolerance margins (and an ultimate True Peak ceiling) – any standardization concept would be near impossible to efficiently implement.

How to Do It

You can certainly attempt to “mix” your programs in RT using a loudness meter thus adhering to various descriptors. However final stage off-line target processing is much more efficient. 

Of course the quality of your intermediate and/or pre-master prior to Loudness Normalization will dictate final fidelity and speech intelligibility of the processed output.

Bottom Line

Let’s not marginalize the significance of target based audio processing and Loudness Normalization with full True Peak compliance. The general concept works for proprietary broadcast platforms and it is certainly applicable for your personal website where you host your spoken word Podcast.

-paul.

Reworking a Master

It’s been a while since I last posted. The last few years have been difficult. I was compelled to tend to my Dad Sonny. He passed away on April 26. I’m obviously heartbroken. However he would have wanted me to move forward and continue to share insight …

I recently listened to a program consisting of a group of “Podcast Editors.” Group members are also business owners providing podcast production services for a wide range of clients. 

I believe a few (or all?) group members were trained by Chris Curran who runs Podcast Engineering School

The business owners disclosed they are often in a position (for various reasons) to outsource work. All good. However I thought to myself if I were to consider outsourcing work – what method(s) or criteria would I implement to assess applicant talent and/or proficiency?

A top level requirement would be obvious: the ability to effectively edit speech/dialogue and optimize intelligibility. DSP audio processing proficiency (and tool accessibility) would be prerequisites as well.

Let’s have a look at a specific “test” scenario that I might propose for applicant assessment:

A new self producing client’s podcast has been accepted by an imaginary powerhouse spoken word audio network. The network has strict audio submission compliance requirements. WAV files are to be submitted. The network will create the lossy distribution copies. 

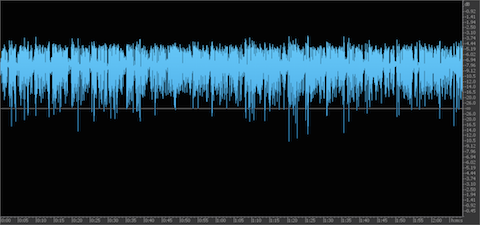
The client seeks assistance conforming the following self produced program as measured:

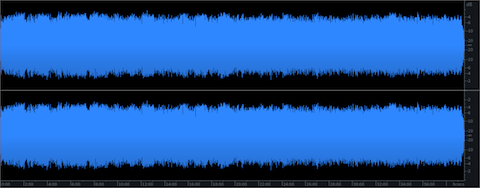
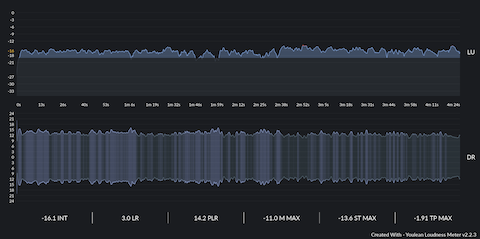
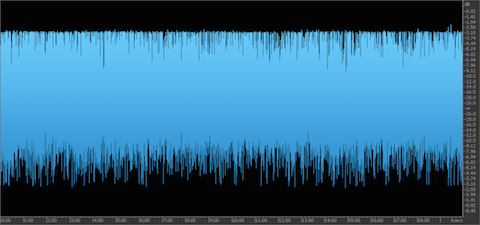
Attributes: -18 LUFS [stereo], -0.8 dBTP. LRA: 3 LU

*** In my opinion the example above visually indicates careless mastering. The narrow headroom may pose difficulties if added gain is ever necessary. It doesn’t sound inherently bad. However it’s not properly optimized for submission to our imaginary network.

Client/Network Compliance Requirements: 

-16 LUFS stereo (tolerence: +/- 1 LU). Ceiling: -2.0 dBTB. LRA < 6 LU

Client’s Specific Instructions:

• Integrated Loudness target compliance for network (source audio needs to be bumped up)

• Compliant True Peak ceiling and prevention of excessive limiting and/or induced distortion 

• Avoidance of breath elevation and noise due to gain offset requirements

• Retention of reference fidelity

For the record I’m not going to disclose the source of this audio. There are many similar examples out there.

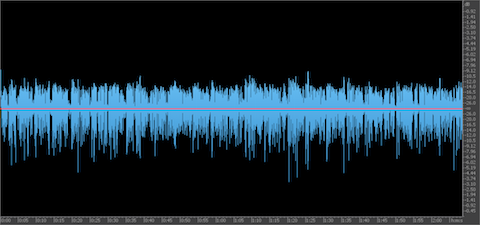
Here’s is my re-produced output as measured:

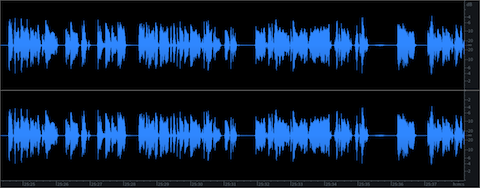
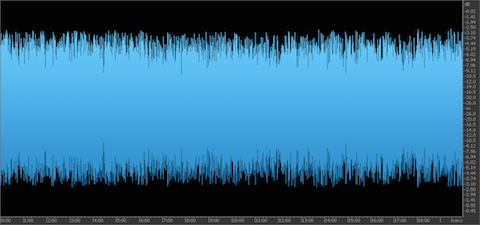
-16 LUFS, -2.2 dBTP. LRA: 2.9 LU

in the zoomed selection below notice there is no visual indication of an elevated noise floor. Also overly aggressive dynamics processing/limiting has been avoided. Fidelity is excellent.

Final Thoughts

From a general perspective the client’s original source audio is suitable for a typical podcast regardless of the visual attributes of the waveforms. However that assessment is not the purpose of this article. The question is – are you capable? Do you think you can pass my proposed test? Can you satisfy our imaginary client?

Be aware there’s allot more to this than you may assume. Compression is only one aspect of my optimization process (of course we can discuss). Also note this remastering scenario does not include accessibility to discrete mix stage audio assets.

* * *

When you add definitive compliance requirements to any workflow the level of complexity elevates. This is especially true in situations where you as an engineer may be be called upon to “fix” audio masters that my not be suitable or properly optimized for downstream program preparation and distribution.

-paul.

Monitoring and Isolation

The vast majority of producers, engineers, and/or “editors” working with typical spoken word Podcast audio are not using calibrated reference monitors in quiet work spaces with optimized acoustics.

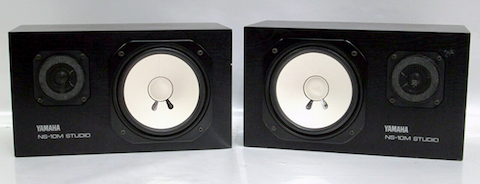
That said, there’s some chatter out there referring to producing and mixing Podcasts solely through fancy near field monitors.

Consider this: what about efficiently dealing with inherent audio clip attributes that require isolation as well as the subjective processing tasks/optimizations typically applied at the pre-mixing stage?

Without proper isolation – it would be difficult to:

(A) Establish audible awareness of (low-level) noise floor nuances

(B) Accurately capture noise profiles

(C) Evaluate S/N

(D) Execute intricate/seamless dialogue edits

(E) Recognize and eliminate subtle mouth noises

(F) Optimize breaths

(G) Replicate typical consumption methods and environments

In my view the sole use of near field monitors for Podcast post production is not your best option. Closed back headphones OTOH are paramount. They are absolutely vital for this type of audio post throughout various stages of your workflow.

Note it is certainly fine to check and/or monitor a MIX through (various types of) near field monitors *after* all of the above variables have been addressed.

And don’t forget to maintain awareness of typical consumption methods and devices, such as laptop speakers, trendy headphones, smart phones, earbuds, and vehicles.

-paul.

Podcast Dynamics: Loudness Range vs. PSR/PLR

I’ve heard a few savvy people refer to the LRA (Loudness Range) descriptor as inherent Dynamic Range. This reference is for the most part inaccurate.

LRA is a threshold gated statistical representation of measured Loudness or variations as such over time. Incorporated Absolute and Relative gating prevents potentially skewed measurements that may result when the passing audio includes sudden instances of impactful amplitude (e.g. gun shots, explosions, etc.) and/or extended periods of silence.

Correlation certainly exists between inherent LRA and Dynamics. In fact – in order to optimize audio for a particular delivery platform, an accurately measured LRA may indicate whether further dynamics manipulation across a segment of audio may be necessary .

PSR and PLR

It is commonplace to acknowledge PSR (Peak to Short Term Loudness Ratio) and PLR (Peak to Loudness Ratio) as accurate indicators of audio dynamics.

PSR is the differential between the measured (ungated) Short Term Loudness and the max. True Peak ceiling. The duration of the averaging window (3 sec.) and the resulting Short Term Loudness measurement relative to the maximum True Peak reflects a near real time representation of playback audio dynamics. High relative PSR values suggest wide dynamics. Conversely low relative PSR values suggest reduced dynamics, excessive limiting, and elevated perceived loudness.

E.g. RT Short Term Loudness: -12 LUFS. Max True Peak -2.0. PSR = 10. As the Short Term Loudness elevates, the differential between it and the True Peak max. decreases thus indicating reduced RT dynamics.

PLR is the differential between measured (gated) Integrated Loudness of (in most cases) an entire audio segment from start to stop and the max True Peak ceiling. In essence PLR represents a long term gated average of inherent dynamics over time.

E.g. measured Integrated Loudness: -16 LUFS. Max True Peak -2.0. PLR = 14. In comparison – if the measured Integrated Loudness checked in at -12 LUFS, the PLR would shift to 10, thus indicating reduced global dynamics and elevated loudness.

LRA vs. Dynamic Range

As far as this vague reference to LRA indicating Dynamic range – consider the following:

A hypothetical mastered (spoken word) Podcast checks in at -16 LUFS with a -2 dBTP max. The inherent PSR (measured in RT using a Loudness Meter) = approx. 10. The PLR = 14, and the measured LRA = 4 LU.

In this example – it is obvious the LRA (4 LU) does not reflect the theoretical dynamic range of the piece. In fact the PSR is the suitable indicator of RT audio dynamics. The PLR represents the global dynamics over the entire duration of the audio segment.

In Conclusion

The LRA descriptor is an algorithmic calculation incorporating gated thresholds. It does not indicate the measured Dynamic Range of a piece of audio. However it is certainly a viable indicator representing the statistical variation of measured Loudness over time.

An elevated spoken word LRA (> 7 LU) may indicate compromised intelligibility, and as noted – the necessity for further DSP processing and re-mastering.

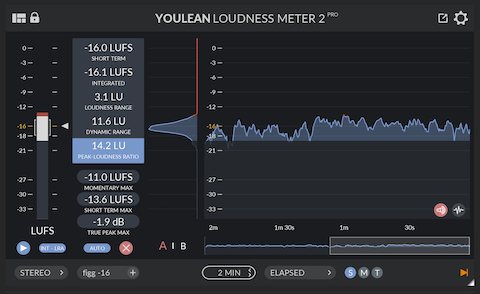
For RT measurement of inherent audio dynamics, use a supported tool to display the running PSR and PLR values. There are various third party options available, such as Dynameter by MeterPlugs, MasterCheck by Nugen Audio, and the Youlean Loudness Meter.

For a (stereo) -16.0 LUFS spoken word Podcast – PLR 15/14 is optimal. Corresponding PSR values will vary based on the attributes of applied dynamics processing.

Incidentally – if you are producing Podcasts professionally, you need to learn how to use a Loudness Meter. It is an essential tool, providing a broad scope of RT descriptors, such as  Loudness, LRA, Dynamic Range, and True Peak. A number of meters support offline measurements within certain DAW environments.

-paul.

“Loudness Leveling” Denotes a Vague Description of Two Discrete Processes

Scores of audio producers in the Podcast Production space have adopted an inaccurate term when referring to basic Loudness Normalization: Loudness Leveling.

First – what is Loudness Normalization? Actually, it’s quite simple:

Audio is measured in it’s entirety. The existing Integrated (Program) Loudness is determined. A gain offset is applied relative to a spec. based or subjective Integrated Loudness target.

For example: if the source audio measures -20 LUFS, and the Loudness Target is -16 LUFS, +4 LU of gain will be applied.

As well, a True Peak Max. Ceiling is defined, which again may be spec. based or subjective. If the required Integrated Loudness gain offset results in overshoots – limiting is applied in order to maintain compliance.

It’s important to note that Loudness Normalization does not correct wide variations in audio levels. As well – it does not guarantee optimized intelligibility for spoken word. If an audio piece (e.g. multiple participant segment) contains inconsistencies as such, the Loudness Normalization gain offset will simply elevate (or reduce) the relative perceptual loudness of the audio. The original dynamic attributes will persist.

That’s it. There’s nothing more to it unless the Loudness Normalization tool features some sort of dynamics optimization process that may or may not be active.

For the record – the Loudness Module included in iZotope’s RX 7 Advanced Audio Editor applies basic Loudness Normalization (measurement, gain, and limiting). It does not apply optimization processing.

Examples

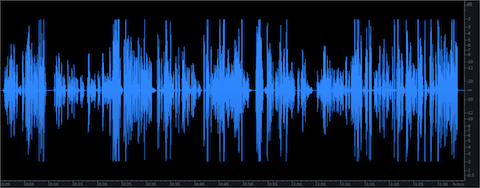
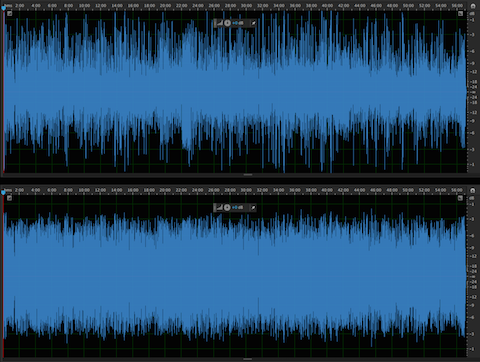
View this source clip waveform. There are two participants with noticeable level inconsistencies:

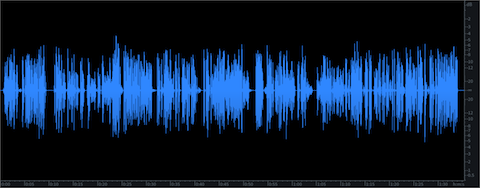
This is the same clip Loudness Normalized (to -19.0 LUFS). The perceptual loudness is higher. However the level inconsistencies persist:

Leveling is a process that addresses and corrects noted inconsistencies and level variations. It is accomplished by the use of gain riding plugins and/or specialty tools that rely on complex algorithms. One basic example is the use of an “RMS” Compressor featuring an optimal and often extended release time parameter.

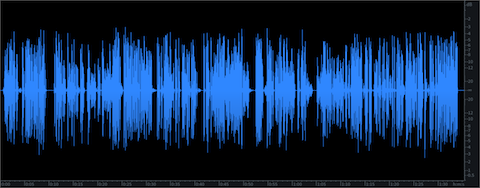
This is a “leveled” version of the original source clip displayed above. The previously persistent level inconsistencies no longer exist.

Finally, this is the leveled audio, Loudness Normalized to -19.0 LUFS. The described processes were in fact discrete.

I hope I’ve made it clear that the term Loudness Leveling is not an accurate term to describe Loudness Normalization. The key is that Loudness Normalization is gain and limiting. It does not correct inconsistent level variations. You’ll need to implement discrete Leveling processes to address any persistent inconsistencies.

-paul.

Optimizing Dialogue Levels

I was just reading Chris Curran’s Daily Goody segment, published today. The piece is titled Balancing the Levels of All Voices. Chris explains the importance of consistent dialogue levels across multiple participants, and shares various methods to achieve this.

Chris states in his second tip:

>>> “Another way to quickly balance the levels of various participants is to process each participants track to be the same LUFS level. This will make them close to level, but you will always want to adjust the levels slightly using your ears. Because even when the LUFS level of two different voices is the same, the perceived loudness of each voice can differ due to things like proximity to the mic, dynamic range, frequency response of the mic, the timbre of individual voices, etc. So it’s a handy practice to set the LUFS level of each participant to the same value, but then you still have to use your ears.” <<<

Good advise IMHO. Here’s my perspective …

The term LUFS Level is a generalization. It requires clarification.

There are 3 notable measurement descriptors that indicate perceptual Loudness in LUFS/LKFS (or LU’s when using a relative scale):

• Integrated Loudness (also referred to as Program Loudness)

• Short Term Loudness

• Momentary Loudness

Their distinguishing attributes are distinct time and/or averaging intervals: Integrated (cumulative measurement from start to finish), Short Term (3 sec.), and Momentary (400ms). It’s important to recognize the significance of each descriptor.

As well, (and Chris alludes to this in his piece) – you must recognize how a consistent Integrated Loudness measurement across multiple spoken word segments (or session participants) does not necessarily guarantee suitable matched level perception and/or optimized intelligibility.

Remember – Integrated Loudness represents a cumulative measurement from start to finish. For 100% accuracy – the piece must be measured in it’s entirety. Also, the descriptor does not reflect inherent dynamic attributes and/or inconsistencies that my in turn marginalize attempts to optimize perception.

With this in mind, if you choose to use Integrated Loudness as a perceptual Loudness matching indicator – audio optimization (compression, etc.) and target accuracy must be applied and established before relying on any common Integrated Loudness measurement.

What about Short Term/Momentary Loudness?

The 3 sec. averaging interval of the Short Term Loudness descriptor indicates an active, foreground measurement. It is highly useful when analyzing the loudness consistency of spoken word/dialogue. Momentary Loudness will provide even finer “detail” – once again due to it’s inherent averaging interval (400ms).

To summerize: “LUFS Level” is a generalization. As noted there are 3 descriptors (Integrated, Short Term, Momentary). Short Term and Momentary Loudness are useful indicators for the establishment of spoken word consistency. Learn how to use a Loudness Meter (online or offline) to closely monitor each descriptor.

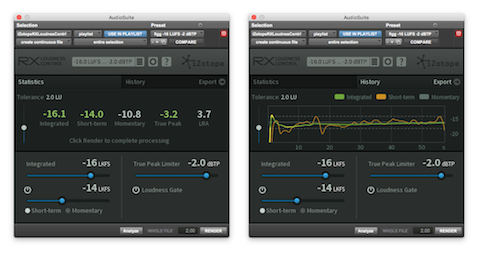
With regards to Loudness Normalization – some processing tools such as RX Loudness Control by iZotope (AAX/Pro Tools only) support user defined Short Term and Momentary Loudness targeting within a certain tolerance range.

These options, along with the ubiquitous Integrated Loudness definition (and of course subjective audio processing) should provide everything you need in your quest to achieve optimized dialogue.

-paul.

Audio Plugin for Podcast Post and Streaming

An obscure and rarely mentioned audio plugin by Waves exists that is well suited for Spoken Word processing, Live Streaming, and Podcast Post Production – MaxxVolume.

Back in 2012 I documented my initial interest and subsequent purchase of MaxxVolume. I paid $149 for the plugin, on sale at the time over at DontCrack. I believe the original selling price was $400. It’s currently available for $49.

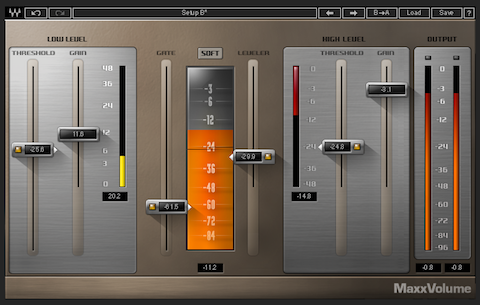
MaxxVolume is a multi-stage dynamics processor. The plugin features High/Low Level Compressor modules, a Downward Expander, a Leveler stage (aka RMS compressor/AGC), a user selectable Loud/Soft ARC flag, and a global Output Gain control.

Let’s explore the attributes of MaxxVolume …

Leveler

The Leveler fader value defines the AGC threshold and target. The inherent processing uses long attack and release times similar in attributes to an RMS compressor to effectively maintain consistent levels over time. Basically, automatic gain-riding initializes when the passing signal level exceeds the threshold and correlated target.

The Energy Meter’s internal chain placement is located after the Leveler processing and before the plugin’s remaining dynamics modules.

Gate

The included Gate is essentially a Downward Expander. When the passing signal level drops below the defined Threshold fader setting – attenuation is initialized. Note the general difference between a Gate and Downward Expander: a Gate applies a sort of hard mute. A Downward Expander applies a much more gradual transition between audibility and attenuation.

High Level Compressor

A traditional compressor applies gain reduction (dynamic range compression) when signal levels exceeds a defined threshold. In general the operator may (1) elect to work with the compressed/attenuated audio, or (2) apply makeup gain to compensate for the resulting attenuation.

The MaxxVolume High Level Compressor is controlled by a single Threshold fader. Gain reduction is indicated on the associated meter when the signal level exceeds the defined threshold. Automatic makeup gain is applied to compensate for active gain attenuation.

The Gain fader located in this module controls the maximum output signal level. This setting is NOT a ceiling based compliance limiter!

Low Level Compressor

This module basically applies upward soft-knee compression. It allows the operator to add a specific amount of gain to the passing audio when it’s level drops below the user defined threshold. The associated Gain Meter indicates the amount of makeup gain.

Note: The High and Low Level Compressor threshold settings are displayed within the previously mentioned Energy Meter.

The Soft/Loud Flag

This flag sets the attributes for the Waves proprietary ARC (Auto Release Control).

ARC, as described by Waves:

“The ARC algorithm is designed to dynamically choose the optimum release value for a wide-ranging input. ARC reacts much like a human ear, and can produce significantly increased RMS (average) levels with excellent audio clarity.”

In essence – the Loud setting uses shorter Release times resulting in elevated loudness. Conversely the Soft setting uses longer Release times resulting in a softer output.

Output Meter

This meter indicates Peak Amplitude and potential inherent clipping.

Setting it Up

(1) Disable the Downward Expander (you will use it eventually). By the way – all Threshold faders support deactivation. Simply click the encapsulated yellow indicator located on each fader.

(2) Set the ARC flag to Soft and define a Leveler threshold.

(3) Adjust the High Level Compressor to (1) compress dynamics, and (2) compensate for the attenuated signal level.

(4) Apply 5 or 6dB of Low Level Compressor module gain. Tweak the module Threshold and readjust gain accordingly. Be cautious when applying excessive gain at levels above the defined threshold. Pay close attention to the noise floor.

(5) Lastly, adjust the High Level Compressor Gain to optimize the output.

If you are running Adobe Audition – use the Preview Editor to reflect the results of your settings relative to the source. The updated waveform will indicate the results of the applied settings. Observe the processed dynamics and evaluate the audible consistency of the average loudness over time.

Of course visual attributes of any waveform are meaningless if the sound quality is compromised. Use those ears to achieve optimum results.

Notes

It’s important to establish a clear understanding of each processing module and the interactive processing results.

If necessary – apply Broadband Noise Reduction and/or Phase Rotation before MaxxVolume in your signal processing chain.

Remember – the High Level Compressor Gain does not establish a hard limited compliance ceiling! You will need to Insert a post compliance limiter. I recommend the following limiters: ISL by Nugen Audio and Elixir by Flux. TrackLimit by DMG Audio is also a worthy consideration.

Specialized Use Cases for MaxxVolume

• Intelligibility optimization

• Pre-Loudness Normalization dynamics processing

• Live Streaming

• Live Venue processing

Personal Perspective

– -> On multiple occasions I’ve expressed how it can be difficult working with non-scalable audio plugins on high-resolution monitors. I am a proponent of defining specific numerical setting values on supported plugins in order to fine tune parameters. Legacy UI designs offered by various developers generally exhibit fuzzy text and difficult to read values. These difficulties are prevalent when running monitor resolutions higher than 1920×1080 (I run a 4k compatible monitor at 2560×1440). In essence, viewing MaxxVolume’s fader values and additional indicators can be visually challenging.

– -> Be careful when using the Low Level Compressor. Excessive gain will elevate breaths and boost the audible noise floor.

– -> An integrated compliance limiter would be useful. As it stands, the insertion of a down-stream limiter is vital.

-paul.

16 bit Audio

The vast majority of Podcast producers are not using multi- thousand dollar Neumann mics and/or highly efficient preamps in acoustically treated environments …

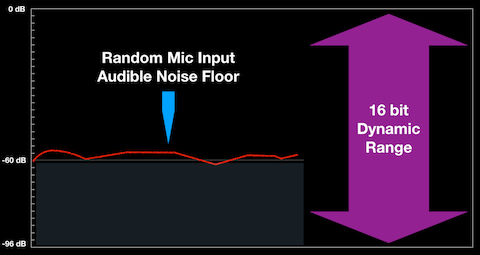
When recording (spoken word) audio via mic input, the noise floor is perceived as the level of ambient noise and residual preamp noise – NOT the system noise. Any such mic input will exhibit a higher perceived noise floor with a reduced SNR compared to a much more efficient DI or electronic instrument.

Consider the quantified theoretical dynamic range of 16 bit audio (96 dB). When recording with a mic in a typical environment – your system is incapable of effectively utilizing the full dynamic range of 16 bit audio due to the noted (elevated) perceived noise.

When producing Podcast audio, wide dynamics capabilities are irrelevant. In fact persistent wide dynamics in spoken word audio intended for Internet/Mobile/Podcast distribution will compromise intelligibility.

With all this in mind, what is the advantage of recording 24 bit (spoken word) Podcast audio with a theoretical dynamic range of 144 dB vs.16 bit audio? In my view there is no advantage, especially when proper down conversion techniques such as Dithering are for the most part ignored. An omission as such will compromise the sonic attributes of down converted audio derived from higher resolution source masters.

Are you striving for an efficient Podcast production workflow with excellent fidelity and adequate frequency response? 44.1 kHz (or 48 kHz) • 16 bit audio will be sufficient. Of course there will be optimization variables and requirements such as quality of gear, optimal recording levels, and ample headroom.

Notes:

– If you are producing highly dynamic episodic dramas, fine arts content, or complex narratives with music and sound effects elements – and you prefer to work with 24 bit media … by all means do so.

– When down converting from 24 bit to 16 bit in preparation for distribution, recognize the significance of Dithering.

– Be aware of MP3 codec filtering attributes, inherent frequency response limitations, artifacts, and the consequences of low bit rate encoding.

– Applying a low-pass filter to lossless audio prior to lossy encoding is recommended. Such a roll-off will effectively supply the lossy encoder with managed high frequency activity that is below the codec’s filtering threshold.

-paul.

SSL 4000 Series

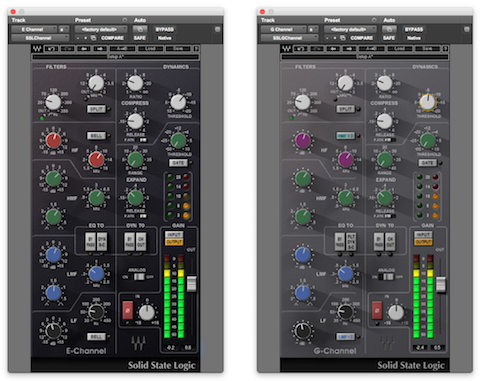
Waves has sporadically released the SSL 4000 Series Channel Strip plugins independently and free from previous bundle restrictions. This is great news. What’s even better is their limited time pricing of $29.

On the surface both channel strips feature various equalization stages and dynamics processing modules. There are a few discernible differences between the E-Channel and G-Channel versions. Also, certain shared and/or unique parameters and features are worth discussing.

Equalization

The main difference between the two versions is how certain gain settings within two specific EQ modules affect bandwidth (aka “Q” values).

For instance, the E-Channel’s HMF and LMF module bandwidth remains constant at all gain levels. Conversely, the G-Channel’s HMF and LMF module bandwidth will vary based on the gain level settings. Specifically, as a filter’s gain level is increased or decreased, the bandwidth narrows and potentially becomes more surgical.

Both versions include a Split option within the High-Pass/Low-Pass filter modules. When activated, the filters are placed before the dynamics modules.

The E-Channel’s HF and LF eq modules are (by default) Shelving Filters. Pressing the BELL selector changes their attributes as described.

The G-Channel’s HF and LF eq modules feature fixed Shelving Filters. As well, the HMFx3 option multiples the HMF frequency by three. The LMF /3 option divides the LMF frequency by 3.

The E-Channel’s Dyn S-C option inserts the filters and EQ into the dynamics sidechain for frequency sensitive processing. The G-Channel’s FLT Dyn S-C option inserts the filters into the dynamics sidechain (Note: “filters” refers to high-pass/low-pass modules).

Dynamics

The Compressor features soft-knee processing with automatic makeup gain. The default attack time is slow and program dependent. Activating F.ATK sets the attack time to 1 ms. The Compressor will function as a limiter when it’s ratio is set to infinity (Note: attack time attributes are the same in the Expander/Gate module).

The following in-depth Compressor and Expander/Gate attributes are listed in the native SSL Duende Plugin documentation:

Both versions of the plugin include two DYN To options:

Bypass: This deactivates all dynamics modules
CH Out: This inserts the dynamics processing at the output (post EQ)

Additional Features

Both versions include a switchable Analog Emulation stage, Phase Reverse, Input Trim, and Output Fader. The Level Meters are switchable for Input and/or Output level monitoring.

The plugins are aligned as follows: -18 dBFS = 0dBu

-paul.

References:
Waves Audio Plugin User Guide
SSL Duende Documentation

Aphex 320D Compellor

What is a Compellor? In short it is a Compressor-Leveler-Limiter. The device is specifically designed for the transparent control of audio levels.

It operates as a stereo processor or as a two-channel (mono) processor supporting independent channel control.

The device includes 3 interactive gain controllers:

– Frequency Discriminate Leveler
– Compressor
– Limiter

Additional features include a Dynamic Release Computer (DRC), Dynamic Verification Gate (DVG), and a Silence Gate.

The original device (model 300 Stereo Compellor) was released in 1984. The product line evolved and culminated in 2003 with the release of the 320D. Through the years the Compellor has been widely used in professional broadcast, post houses, recording studios, and live venues.

In 2004 I purchased a used model 320A from a radio station. The “A” reference indicates it’s analog circuitry. I’ve used the 320A for countless audio file and tape transfers, post production processing, Telephone/Skype recording sessions, and monitoring. The device provides three selectable Operating Levels … +8dBu, +4dBu, and -10dBV.

Recently the complex level and gain reduction metering for the right channel failed. I replaced the faulty 320A with a 320D. This version features digital and analog I/O with common selectable (analog) Operating Levels (+4dBu, and -10dBV).

At some point my faulty 320A will be shipped out to Burbank California for authorized service.

320D – Automatic Processing and Detection

As noted Aphex classifies the Compellor as a Frequency Discriminant Leveler. It responds slower and less aggressively to low frequencies. In essence low frequency energy will not initiate gain reduction.

A Dynamic Release Computer (DRC) instantiates program dependent compression release times.

The Dynamic Verification Gate (DVG) computes the historical average of peak values and verifies whether measured values exceed or are equal to the historical value. When the signal level is below the average, leveling and compression gain reduction is frozen.

Controls

The device Drive control sets the preprocessed VCA gain. Higher settings yield a higher level of gain reduction (VCA refers to Voltage Controlled Amplifier).

The Process Balance control allows the operator to fine tune the Leveling and/or Compression balance and weighting. Leveling is a slow method of gain reduction. It maintains transient retention and wider dynamics. The Compression stage works faster and acts more aggressively on inherent dynamics. The key is by combining both modes, the processed output will be very consistent

A Rate (speed) toggle option is provided: Fast, suitable for speech/voice, or Slow, suitable for program material such as produced TV and/or Radio programs.

The device Output control normalizes the processed audio to 0VU.

Silence Gate: Aphex stresses – this is not an audio gate! It is a user defined threshold parameter. When the signal drops below the threshold for 1 sec. or longer, the Silence Gate freezes the VCA gain. This prevents the buildup of noise during pauses and/or extended passages of silence.

The device Limiter features a very fast attack and high threshold. It is designed to prevent occasional high transient activity and overshoots.

A Stereo Enhance mode is available on the 320A and 320D models. When activated it widens the stereo image. It’s effect is dependent upon the amount of applied compression.

Metering

The 320D Compellor features three, bi-color (red, green) LED metering modes: Input, Output, and Gain Reduction. For Input/Output metering – the red LED’s indicate VU/average. Green LED’s indicate peak level.

When the meter is set to display gain reduction (“GR”), the green LED’s indicate total gain reduction. Depending on the Process Balance control weighting – a floating red LED may appear within green LED instances. The floating red LED indicates Leveling gain reduction. If Leveling gain reduction is in fact occurring, the total gain reduction will be indicated by the subsequent green LED(s).
Below are 4 examples:

Example 1 displays Input or Output metering with an average (red) level of 0VU and a peak (green) level of +6dB. This translates to a +4dBu average level and a +10dB peak level (analog OL set to +4dBu).

Example 2 displays 4dB of Leveling Gain Reduction and 8dB of Total Gain Reduction.

Example 3 displays 12dB of Leveling Gain Reduction.

Example 4 displays 10dB of Compression Gain Reduction.

**Notice the position of the Process Balance control for examples 2, 3, and 4.

320D I/O

The 320D is essentially an analog processor utilizing standard XLR I/O jacks. The device also includes AES/EBU XLR jacks along with an internal DAC for digital I/O. The Input mode and/or Sample Rate is user selectable.

When implementing digital I/O – the Incoming audio is converted to analog as it passes through the device. The audio is then converted back to digital and output accordingly.

The digital input is calibrated internally and matches -20dBFS to 0VU on the Compellor’s meter. The +4dBu/-10dBV Operating Level options only affect the analog I/O.

Notes:

The Aphex Compellor is a long standing, highly regarded, and ubiquitous audio processor. It has been an integral multipurpose tool for me for 12+ years. My newly purchased (used) 320D is in near mint condition. In fact it looks and feels as if it was hardly used by the previous owner.

My system includes additional Aphex audio processors (651 Compressor, 109 EQ, 622 Expander/Gate, and a 720 Dominator II Multiband Peak Limiter). As well, a Mackie Onyx 1220i Mixer, Motu I/O, dbx 160A Compressor, dbx 286A Mic Processor, Marantz CF Recorder, and a Telos One Digital Hybrid. All components, with the exception of the 286A – are interfaced through a balanced Patchbay.

A typical processing/monitoring chain will pass system audio through the Compellor, followed by the 720 Peak Limiter. The processed audio is ultimately routed to the system’s Main Output(s). This chain optimizes playback of poorly produced Podcasts, VO’s, live streams, or videos. The routing is implemented via Patchbay.

A typical audio processing chain will route Pro Tools audio out via hardware insert (or bus, alternative output, etc.) through the Compellor (or a more complex chain) and returned in Pro Tools. In this scenario I use a set of assignable interface line inputs/outputs. The routing is implemented via Patchbay. I document the setup and use of hardware inserts here.

-paul.

LevelView by Grimm Audio

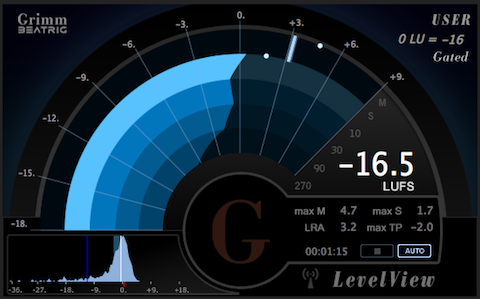
LevelView by Grimm Audio is a highly functional and well designed real time Loudness Meter.

Here are the details:

LevelView features a unique multifaceted Rainbow Meter. Clicking the Rainbow display toggles the Meter scale (EBU +9 or EBU +18).

There are three compliance modes: EBU R128, ATSC A/85, and a custom User specification (Gated or Ungated). The Rainbow Meter displays a Relative Scale. Consequentially the defined target will be equivalent to 0 LU.

The upper blue Rainbow arc represents Short Term Loudness measured within a 3 sec. time frame. The inward blue arcs indicate slower time frame variances (10, 30, 90, and 270 seconds).

The arced needle meter located above the Rainbow Meter represents the Momentary Loudness measured within a 400ms time frame.

Visual dots displayed (and held) on both the Momentary and Short Term Loudness indictor plots represent the maximum values for each descriptor. Both indicators will shift to orange when their values exceed recognized guidelines (+8 max M, and +6 Max S).

The numerical descriptor table features a large Integrated Loudness value. This may display an Absolute Scale value in LUFS, or a Relative Scale value in LU’s. Clicking the descriptor text toggles it’s view.

Additional numerical descriptors include maximum Momentary Loudness (max M), maximum Short Term Loudness (max S), LRA (Loudness Range), PLR (Peak to Loudness Ratio), and maximum True Peak (max TP). Clicking the max TP descriptor text will toggle the measurement algorithm and display max TP or max SP (Sample Peak). Descriptors will shift to orange when a displayed value exceeds recognized or specification guidelines.

The graph located at the lower left is the Loudness Range histogram. It displays the distribution of the measured Loudness over time. The data will indicate whether further dynamic range compression may be necessary.

LevelView supports Manual start and stop measurements. Setting the meter to Auto will force it to follow the host DAW’s transport. In essence the meter will automatically start/stop and reset based on the status of the transport.

Link mode records and stores data continuously. This allows the operator to revert back in time and re-measure a passage without resetting the stored measurements. In the event a passage is skipped, a gap warning will appear in orange. Re-measurement of a skipped segment will clear the gap warning. The Stop button resets the memory. Note the LevelView documentation indicates that the host “must provide time code for the Link function to work.”

It is possible to run various connected (Host and Client) instances of LevelView on a network or over the Internet. I will be testing these options in the near future.

LevelView is available as an AU, VST, or AAX Plugin. The AU and VST versions support (5.1) Surround Sound measurement. The meter conforms to the SMPTE/ITU channel matrix standard (L-R-C-LFE-Ls-Rs).

The meter may also run in a stand-alone mode with no DAW dependency. I/O configuration options are provided.

My Assessment:

I like this meter and I appreciate it’s unique design and accuracy. The networking options, support for Surround Sound, and stand-alone capability make it highly flexible and well worth it’s reasonable cost ($70 U.S. at Don’tCrack). I’m happy to recommend it.

Improvements I’d like to see:

– Scaleable UI
– Option to define a custom Maximum True Peak in the User mode (currently it defaults to -1.0 dBTP)

-paul.

Loudness Compliance Summarization

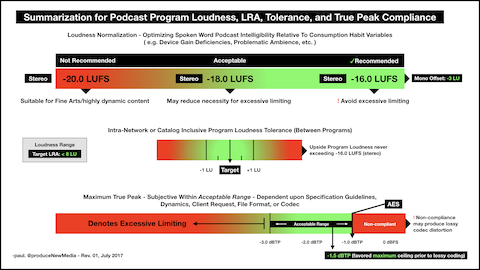
– I continue to endorse -16.0 LUFS for (stereo) Podcast distribution. If meeting this target requires an excessive amount of limiting, a slightly lower target is a viable option. However from my perspective a -20.0 LUFS spoken word piece consumed in a less than ideal environment on a mobile device would be problematic. I’m comfortable supporting upwards of a -2.0 LU deviation from the recommended -16.0 LUFS target (when applicable).

**Note mono files require a -3 LU offset to establish perceptual equivalence to stereo file targets.

– Loudness Range (LRA) is a statistical representation of Loudness distribution and/or the Loudness measurement. An LRA no higher than 8 LU will help optimize intelligibility by restricting dynamics and/or wide variations in Loudness over time.

– Networks and Catalog based program sets managed by indie producers must institute Program Loudness consisctency across all distributed media. This will free listeners from making constant playback volume adjsutments when listening to several programs in succession. Up to 1.0 LU tolerance (+/-) is reasonable. However upside Program Loudness should never exceed -16.0 LUFS.

– Without sufficient headroom – lossy, low bitrate encoding may generate peak levels that exceed a compliance ceiling and/or introduce distortion. -1.5 dBTP is the favored maximum ceiling prior to lossy coding. Of course a lesser value (e.g -2.0 dBTP) is appropriate. However, a peak ceiling below -3.0 dBTP may indicate excessive limiting. This should be avoided.

-paul.

Intelligibility Optimization

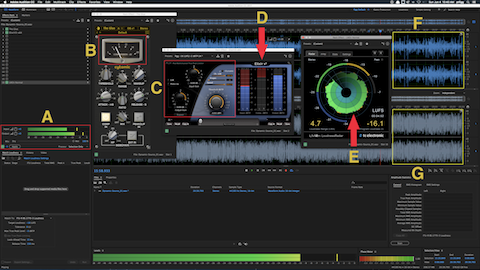
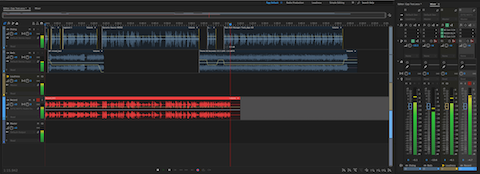
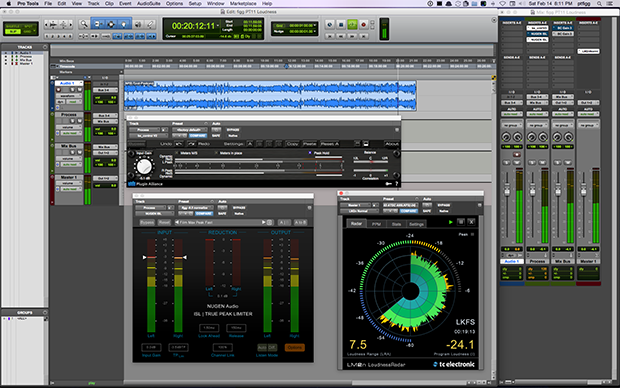
The attached image displays a processing workflow designed to optimize Spoken Word intelligibility. The workflow also demonstrates a realtime example of Integrated Loudness compliance targeting.

There are 7 reference point Sections worth noting:

Section A includes the Adobe Audition Effects Rack Signal Level Meters indicating the source (Input) level and the (Output) level. The Output level reflects the results of the workflow’s inserted plugins. The chain includes a Compressor, a Limiter, and a Loudness Meter. Note the level meters indicate signal level. They do not indicate or represent perceptual Loudness.

Section B displays the gain reduction applied by the Compressor at the current position of the playhead. For the test/source audio I determined an average of 6dB of gain reduction would yield acceptable results. The purpose of this stage is to reduce the dynamic range and/or dynamic structure of the Spoken Word resulting in optimized intelligibility AND to prevent excessive down stream limiting. This is an important workflow element when preparing Spoken Word audio for Internet/Mobile, and Podcast distribution.

Section C includes my subjective limiting parameters. The Limiter will add the required amount of gain to achieve a -16.0 LUFS deliverable while adhering to a -1.5 dBTP (True Peak Max). If the client, platform, or workflow requires an alternative Loudness target and/or Maximum True Peak ceiling – the parameters and their mathematical relationship may be altered for customized targeting. Please note the Maximum True Peak referenced in any spec. is more of a ceiling as opposed to a target. In essence the measured signal level may be lower than the specified maximum.

Section D indicates the amount of limiting that is occurring at the current position of the playhead.

Section E displays the user defined Integrated Loudness target located above the circular Momentary Loudness LED (12 o’clock position). The defined Integrated Loudness target is also visually represented by the Radar’s second concentric circle. The Radar display indicates the Short Term Loudness measured over time within a 3 sec. window. The consistency of the Short Term Loudness is evident indicating optimized intelligibility.

Section F displays the unprocessed source audio that lacks optimization for Internet/Mobile, and Podcast distribution. Any attempt to consume the audio in it’s current state in a less than ideal listening environment will result in compromised intelligibility. Mobile device consumption in like environments will exacerbate compromised intelligibility.

Section G displays the processed/optimized audio suitable for the noted distribution platform. The Integrated Loudness, True Peak, and LRA descriptors now satisfy compliance targets. Notice there is no indication of excessive limiting.

-paul.

Real Time Print To Track

Logic and Audition users will be familiar with the term Bounce to Track. This process allows the user to perform an Off-line Mixdown of a selected group of Session Tracks without physically exporting. In most cases the Mixdown appears on a supplemental target Track.

Bouncing Off-line is a time saver. However it can be precarious. It would be irresponsible to submit a finished piece of audio to a client without 100% conformation the bounced delivery file (most likely slated for distribution) is glitch free. In essence it is imperative to throughly check your piece prior to submission.

Off-line Bounce (aka Bounce to Disk) was once notoriously absent from Pro Tools. Avid finally implemented support a few years ago.

In professional Post Production, engineers may perform a real time (On-line) Bounce of a mix Session. The process is commonly referred to as Printing. It requires the operator to sit through the Session in it’s entirety.

Besides glitch detection capabilities, it is possible to edit clips before the playhead reaches their location. As well, you can edit clips and/or sub-segments within a previously completed Print and only re-Print the manipulated segment.

So how is this done? Simple – if the DAW or Interface supports it.

For instance in Pro Tools the user can assign Bus outputs to the input of a standard Audio Track. The key is you can ARM a standard Audio Track to record any signal that is passing through it. This would be the Print Track.

Adobe Audition CC does not support direct Bus Output —>> Audio Track assignments. However, it is still possible to implement a Print workflow (see attached image). You will need a supported Audio Interface with a Mix Return. Simply assign all Session Tracks and Buses to the Main Output. Then add a supplemental Audio Track. Set it’s input to Mix Return. ARM the Track to record and fire away.

-paul.

Loudness Meter Scale Variations

I thought I’d revisit various aspects of Loudness Meter Absolute/Relative Scale correlation, and provide a visual representation of a real time processing Session with both Scales active.

Descriptors and Scales

Modern Loudness Meters display various descriptors including Program Loudness – also referred to as Integrated Loudness. There are two scales that can be used to display measured Program or Integrated Loudness over time …

The most common is an Absolute Scale, displayed in LUFS or LKFS. LUFS refers to Loudness Units relative to Full Scale. LKFS refers to Loudness Units K-Weighted relative to Full Scale. There is no difference in the perceptual measured loudness between both descriptor references.

It is also possible to measure and display Integrated/Program Loudness as Loudness Units (or LU’s) on a Relative Scale where 1LU == 1 dB.

When shifting to a Relative Scale, the 0 LU increment is always equivalent to the Meter’s user defined or spec. defined Absolute Loudness target.

For example, in an R128 -23.0 LUFS Absolute Scale workflow, setting the Meter to display a Relative Scale changes the target to 0 LU.

So – if a piece of measured audio checks in at -23.0 LUFS on an Absolute Scale, it would be perceptually equal to measured audio checking in at 0 LU on a Relative Scale.

Likewise if the Meter’s Absolute Scale target is set to -16.0 LUFS, it will correlate to 0 LU on a Relative Scale. Again both would reflect perceptual equivalence.

All broadcast delivery specifications suggest Absolute Scale Integrated Loudness targets. However, for any number of subjective reasons – many operators prefer to use the alternative Relative Scale and “mix or master to 0 LU.”

Please note Loudness Units are also the proper way in which to describe Loudness differentials between two programs. For instance, “Program (A) is +2 LU louder than Program (B).” One might also describe gain offsets in LU’s as opposed to dB’s.

LU Meter

Hornet Plugins recently released Hornet LU Meter. This tool is a Loudness Meter plugin designed to measure and display Integrated/Program Loudness within a 400ms time window. This measurement represents the Momentary Loudness descriptor.

The Meter is indeed nifty and affordable. However there is one sort of caveat worth noting: As the name suggests, it is an LU Meter. In essence Integrated (Momentary) Loudness measurements are solely displayed on a Relative Scale.

Session

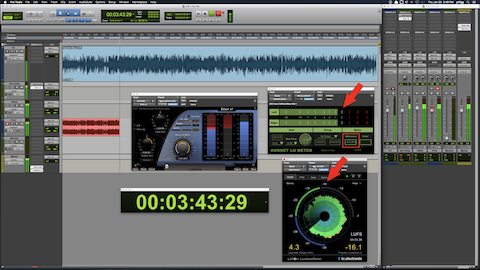
The displayed Session (image) consists of a single mono VO clip. The objective is to print a processed stereo version in RT checking in at -16.0 LUFS with a maximum True Peak no higher than -2.0 dBTP.

The output of the mono VO track is routed to a mono Auxiliary Input track titled Normalize. If you are not familiar with Pro Tools, an Auxiliary Input track is not the same as an Auxiliary Send. Auxiliary Input tracks allow the user to pass signal using buses, insert plugins, and adjust level. They are commonly used to create sub-mixes.

I’ve inserted a Compressor and a Limiter on the Normalize Auxiliary Input track. The processed audio is passing through at -19.0 LUFS (mono).

The audio is then routed to a second (now stereo) Auxiliary Input track titled Offset. I use the track fader to apply a +3 dB gain offset, This will reconstitute the loss of gain that occurs on center panned mono tracks. The attenuation is a direct result of the Pro Tools Pan Depth setting.

The signal flow/output is now passing -16.0 LUFS audio. It is routed to a standard audio track titled Print. When this track is armed to record, it is possible to initiate a realtime bounce of the processed/routed audio.

The Meters

Notice the instances of the Hornet LU Meter and TC Electronics Loudness Radar. Both Meters are inserted on the Master Bus and are measuring the session’s Master Output.

I set the Reference (target) on the Hornet LU Meter to -16.0 LUFS. In essence 0 LU on it’s Relative Scale represents -16.0 LUFS.

Conversely the TC Electronic Meter is configured to display Absolute Scale measurements. The circular LED that borders the Radar area indicates Momentary Loudness. The defined Integrated Loudness target is displayed under the arrow at the 12 o’clock position.

Remember the Hornet LU Meter solely displays Momentary Loudness. If you compare it’s current reading to the indication of Momentary Loudness on the TC Electronic Meter, the relationship between Relative Scale and Absolute Scale measurement is clearly indicated. Basically the Hornet Meter registers just below 0 LU. The TC Electronic Meter registers just below -16.0 LUFS.

I will say if you are comfortable monitoring real time Momentary Loudness and understand Relative/Absolute Scale correlation, the Hornet tool is quite useful. In fact it contains additional features such as Grouping, auto/manual Gain Compensation, and auto-Maximum Peak protection.

Additional insight on the K-weighting Curve or K-weighted filtering:

K-weighting suggests de-emphasized low frequencies by way of a high-pass filter. A high-shelving filter is applied to the upper frequency range, and the measured data is averaged.

TC Electronic describes applied K-weighting on audio channels as a “method to build a bridge between subjective impression and objective measurement.”

-paul.

Elixir ITU True Peak Limiter

Certain ISP/True Peak Limiters provide added compliance processing flexibility. Case in point: Elixir by Flux.

Preparation

Before processing or Loudness Normalizing, execute an offline measurement on an optimized source clip.

An optimized audio clip may exhibit the benefits of various stages of enhancement processing such as noise reduction and dynamic range compression.

The displayed clip (see attached image) checks in at -19.6 LUFS. It requires +3.6 dB of gain to meet a -16.0 LUFS Integrated Loudness target. Based on the pre-existing peak ceiling approximately 1.5 dB of limiting will be necessary to establish a -2.0 True Peak maximum.

Processing Example

We use the Limiter’s Input Gain setting to take the clip down to -24.0 LUFS (-4.4 dB for the measured displayed clip).

The initial -24.0 LUFS target will restore headroom and establish a consistent starting point for downstream limiting accuracy. This will allow the Threshold and Output Gain settings to be recognized and implemented as static parameters for all -16.0 LUFS/-2.0 dBTP (stereo) processing. The Input Gain setting however will be variable based on the measured attributes of the optimized source.

Set the Threshold to -10 dB(TP) and the Output Gain to +8dB. The processing may be implemented offline or in real time. The output audio will reflect accurate targets (-16.0 LUFS/-2.0 dBTP) and the applied limiting will be transparent.

Note:

The proprietary functional parameters included on the Elixir Limiter are not necessarily included on Limiters designed by competing developers. In essence the described workflow may need to be customized based on the attributes of the Limiter.

The key is the “math” and static parameters never change, unless of course you decide to alter the referenced targets.

Let me know if you have questions …

-paul.

Programmatic Ads and Loudness Standardization

This is a re-post of an article that I published in October, 2015 …

In a recent Midroll article titled “Why Programmatic Ads Aren’t Necessarily Great for Podcasting,” the staff writer states:

“A number of players in the Podcasting and advertising industries are making bets on programmatic Ad delivery — dynamically inserting Ads into a Podcast as the episode is downloaded. It’s an understandable temptation, but we at Midroll see some tradeoffs.”

I wonder how networks will handle potential perceived Loudness inconsistencies between produced Ads and new or preexisting programs?

minus-sixteen-small

I’ve mentioned my past affiliation with IT Conversations and The Conversations Network, where I was the lead post audio engineer from 2005-2012. Executive Director Doug Kaye built a proprietary content management system and infrastructure that included an automated component based Show Assembly System. Audio components were essentially audio clips (Intros, Outros, Ads, Credits. etc.) combined server side into Podcasts in preparation for distribution.

One key element in this implementation was the establishment of perceived Loudness consistency across all submitted audio components. This was accomplished by standardizing an average Loudness Target using a proprietary software RMS Normalizer to process all server side audio components prior to assembly. (Loudness Normalization is now the recommended process for Integrated Loudness targeting and consistency).

Due to this consistency, all distributed Podcasts were perceptually equal with regard to Integrated or Program Loudness upon playback. This was for the benefit of the listener, removing the potential need to make constant playback volume adjustments within a single program and throughout all programs distributed on the network.

Regarding Programmatic Ad insertion, I have yet to come across a Podcast Network that clearly states a set Integrated Loudness Target for submitted programs. (A Maximum True Peak requirement is equally important. However this descriptor has no effect on perceptual Loudness consistency).

Due to the absence of any suggested internal network guidelines or any form of standardized Loudness Normalization, dynamic Ad insertion has the potential to ruin the perceptual consistency within single programs and throughout the contents of an entire network.

Many conscientious independent producers have embraced the credible -16.0 LUFS Integrated Loudness Target for stereo Internet/ Mobile/Podcast audio distribution (the perceptual equivalent for mono distribution is -19.0 LUFS). It’s far from a requirement, and nothing more than a suggested guideline.

My hope is Podcast Networks will begin to recognize the advantages of standardization and consider the adoption of the -16.0 LUFS Integrated Loudness Target. Dynamically inserted Ads must be perceptually equal to the parent program. Without a standardized and pre-disclosed Integrated Loudness Target, it will be near impossible to establish any level of distribution consistency.

-paul.

Adobe Audition CC Productivity

Below I’ve listed a few Adobe Audition CC (ver.2015.2.1) features/options that may be obscure and perhaps underutilized.

aud_small

Usability

1- Maximize Active Frame (⌘↓). This command toggles full screen display accessibility of the active (blue outlined) UI Panel.

2- Lock In Time (Multitrack). When activated, selected clips are pinned to their current location. I mapped ⌥⌘L for this function.

3- Group (⌘G) (Multitrack). Multiple clips will be congregated and may be repositioned cumulatively.

4- Suspend Groups (⏎⌘G) (Multitrack). This function temporarily deactivates the Group. Actually, this command toggles the behavior between deactivate and activate. There are also options to Remove Focus Clip from Group and Ungroup Selected Clips. They both support custom shortcut mapping,

5- Right + Click on any Clip’s Fade Handle (Multitrack) to display the following customization menu:

– No Fade
– Fade In/Out
– Crossfade
– Symmetrical
– Asymmetrical
– Linear
– Cosine
– Automatic Crossfade Enabled

6- Bounce to New Track (Multitrack). This feature will process and combine multiple clips located on a single track or multiple tracks. This will free up system resources. The following options support custom shortcut mapping:

– Selected Track
– Time Selection
– Selected Clips In Time Selection
– Selected Clips Only

7- Convert To Unique Copy (Multitrack). This function creates a sub clip derived from the original trimmed source clip. Media Handles are no longer accessible in the converted copy (Multitrack and/or Waveform Editor environments). I mapped ⌥⌘C for this function.

Editing

1- Time Selection in all Tracks (Multitrack). This is a Ripple Delete variation (⏎⌘⌦) that will retain clip relevant Marker position(s).

2- Split All Clips Under Playhead (Multitrack). I mapped ⌥⌘R for this function.

3- Merge Clips (remove thru edits) (Multitrack). I mapped ⌥⌘J for this function.

Mixer/Track Inserts and Sends

1- Individual Track supplied buttons will designate Sends and Inserts as Pre or Post Fader.

Markers

1- Markers implemented in the Waveform Editor may be Merged thus allowing easy selection of encapsulated audio.

2- Selected Range Markers present in the Waveform Editor may be exported as individual clips.

3- Selected Range Markers present in the Waveform Editor may be added to a Playlist where they may be reordered for auditioning.

Exporting

1- The (Multitrack) Session Export Dialog includes user defined Mixdown options:

– Master: Stereo, Mono, or 5.1
– Signal present on individual Tracks
– Signal present on individual Busses

2- Export with Adobe Media Encoder (Multitrack). This Export option runs Media Encoder and requires the user to select a predefined Media Encoder preset. Routing options are available as well.

-paul.

CNN and Program Loudness Tolerance

I recently analyzed a few of the internal Podcasts produced by CNN. One particular installment is yet another example of a major media outlet distributing audio that is in my view unsuitable for this particular platform.

Let’s discuss file attributes and measured specs. for one of CNN’s distributed Podcasts:

The distributed audio is mono, 64kbps, with music elements. I’ve stated how I feel about this. I’m not a proponent of 64 kbps MP3 audio PERIOD (mono or stereo). In general audio in this format sounds horrible. Feel free to disagree.

Secondly, the Integrated (Program) Loudness for this particular program is just about -23.0 LUFS with a Maximum True Peak of +0.40 dBTP. From my perspective the perceptual Loudness misses the mark. And, the audio is clipped.

Lastly, the produced audio is way too dynamic for spoken word. The perceptual inconsistency of the delivery by the participants is inadequate when considering how (for the most part) this program will be consumed (mobile devices, problematic ambient spaces, etc.).

I decided to sort of showcase this particular program because it is a good candidate for flexible Target considerations. What do I mean by “flexible Target considerations?” Let me explain …

Again, the distributed file is mono. The recommended Integrated Loudness Target for mono Podcasts is -19.0 LUFS. This is the perceptual equivalent of -16.0 LUFS stereo. If I were to apply a +4 db gain offset to Loudness Normalize this audio to -19.0 LUFS, there would be very little change in the original dynamic structure of the audio. However without some form of aggressive limiting, the maximum amplitude or Peak Ceiling would be driven into oblivion. In fact audible distortion may occur with or without limiting. This is obviously not recommended.

There are two options to consider: 1) apply Dynamic Range Compression before Loudness Normalization, or 2) shoot for a lower Integrated Loudness target. For this particular example I chose to implement both options.

First, in my view optimizing the dynamics in this program for Podcast distribution is unavoidable. It’s just way too choppy and it lacks delivery consistency for spoken word. Also, by lowering the L.Normalized Target, the necessary added gain offset will be reduced resulting in less aggressive limiting. In addition, the reduced amount of added gain will curtail noise floor elevation and other variables such as exaggerated breaths.

As noted the distributed Podcast (displayed in the attached upper waveform example) checks in at -23.0 LUFS and it is clipped. My optimized version (displayed in the lower waveform example) checks in at -20.2 LUFS with a Maximum True Peak of -1.23 dBTP. It is well within a reasonable level of Program Loudness tolerance for Podcast L.Normalization. In fact the perceptual difference between the processed -20.0 LUFS audio and a -19.0 LUFS version would be pretty much undetectable. In essence the audio has been optimized and it exhibits improved intelligibility. It is now well suited for Podcast distribution.

cnn_small

(If you are interested in the tools that I use, they are listed under Available Services).

It is no secret that I am a staunch proponent of the -16.0 LUFS/-19.0 LUFS recommendations for Podcasts. However, in certain situations – tolerance for slightly reduced Program Loudness Targets is acceptable.

For the record – my remaster is much easier to listen to. CNN can do better.

-paul.

Loudness Measurement and Silence

Consider this: Two extended segments of audio, Loudness Normalized (or mixed in real time) to the same Integrated Loudness Target.

Segment (A) is fairly consistent, with a very limited amount of intermittent silence gaps.

Segment (B) is far less consistent, due to a multitude of intermittent silence gaps.

When passing both segments through a Loudness Meter (or measuring the segments offline), and recognizing Integrated Loudness is a reflection of the average perceptual Loudness of an entire segment – how will inherent silence affect the accuracy of the cumulative measurements?

In theory the silence gaps in Segment (B) should affect the overall measurement by returning a lower representation of average Integrated Loudness. If additional gain is added to compensate, Segment (B) would be perceptually louder than Segment (A).

Basically without some sort of active measurement threshold, the algorithms would factor in silence gaps and return an inaccurate representation of Integrated Loudness.

The Fix

In order to establish perceptual accuracy, silence gaps must be removed from active measurements. Loudness Meters and their algorithms are designed to ignore silence gaps. The omission of silence is based on the relationship between the average signal level and a predefined threshold.

Loudness Meter (G10) Gate

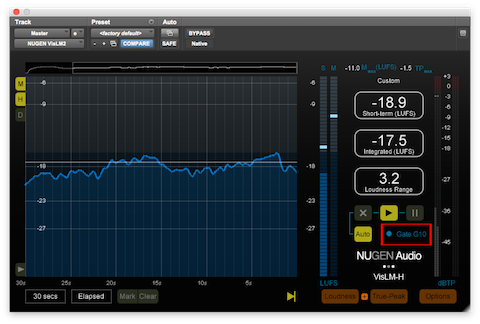
The specification Gate (G10) is an aspect of the ITU Loudness Measurement algorithms included in compliant Loudness Meters. It’s function is to temporarily pause Loudness measurements when the signal drops below a relative threshold, thus allowing only prominent foreground sound to be measured.

The relative threshold is -10 LU below ungated LUFS. Momentary and Short Term measurements are not gated. There is also a -70 LUFS Absolute Gate that will force metering to ignore extreme low level noise.

Most Loudness Meters reveal a visual indication of active gating (see attached image) and confirm the accuracy of displayed measurements.

Gate-(480)

Additional “Gate” Generalizations and Nomenclature

A Downward Expander and it’s applied attenuation is dependent on signal level when the signal drops below a user defined threshold. The Ratio dictates the amount of attenuation. Alternatively a Noise Gate functions independent of signal level. When the level drops below the defined threshold, hard muting is applied.

Silence Gate

This is a somewhat proprietary term. It is a parameter setting available on the Aphex 320A and 320D Compellor hardware Leveler/Compressor.

Compellor

When a passing signal level drops below the user defined Silence Gate threshold for 1 second or longer, the device’s VCA (Voltage Controlled Amplifier) gain is frozen. The Silence Gate will prevent the Leveling and Compression processing from releasing and inadvertently increasing the audibility of background noise.

-paul.

Understanding Pan Mode Options

Adobe Audition and Logic Pro X include Pan Mode preference options that determine track output gain for center panned mono clips included in stereo sessions. These options are often the source of confusion when working with a combination of mono and stereo clips, especially when clips are pre-Loudness Normalized prior to importing.

In Audition, the Left/Right Cut (Logarithmic) option retains center panned mono clip gain. The -3.0 dB Center option, which by the way is customizable – will attenuate center panned mono clip gain by the specified dB value.

For example if you were targeting -16.0 LUFS in a stereo session using a combination of pre-Loudness Normalized clips, and all channel faders were set to unity – the imported mono clips need to be -19.0 LUFS (Integrated). The stereo clips need to be -16.0 LUFS (Integrated). The Left/Right Cut Pan Mode option will not alter the gain of the center panned mono clips. This would result in a -16.0 LUFS stereo mixdown.

Conversely the -3.0 dB Center Pan Mode option will apply a -3 dB gain offset (it will subtract 3 dB of gain) to center panned mono clips resulting in a -19.0 LUFS stereo mixdown. In most cases this -3 LU discrepancy is not the desired target for a stereo mixdown. Note 1 LU == 1 dB.

As stated Logic Pro X provides a similar level of Pan Mode flexibility. I’ve also tested Reaper, and it’s options are equally flexible.

Pro Tools

Pro Tools Pan Mode support (they call it Pan Depth) is somewhat restricted. The preference is limited to Center Pan Mode, with selectable dB compensation options (-2.5 dB, -3.0 dB, -4.5 dB, and -6.0 dB).

There are several ways to reconstitute the loss of gain that occurs in Pro Tools when working with center panned mono clips in stereo sessions. One option would be to duplicate a mono clip and place each instance of it on hard-panned discrete mono tracks (L+R respectively). Routing the mono tracks to a stereo output will reconstitute the loss of gain.

A second and much more efficient method is to route all individual instances of mono session clips to a stereo Auxiliary Input, and use it to apply the necessary compensating gain offset before the signal reaches the stereo Master Output. The gain offset can be applied using the Aux Input channel fader or by using an inserted gain trim plugin. Stereo clips included in the session can bypass this Aux and should be directly routed to the stereo Master Output. In essence stereo clips do not require compensation.

Example Session

Have a look at the attached Pro Tools session snapshot. In order to clearly display the signal path relative to it’s gain, I purposely implemented Pre-Fader Metering.

pt-pan_small

Notice how the mono spoken word clip included on track 1 is routed (by way of stereo Bus 1-2) to a stereo Auxiliary Input track (named to Stereo). Also notice how the stereo signal level displayed by the meters on the Stereo Auxiliary Input track is lower than the mono source that is feeding it. The level variation is clear due to Pre-Fader Metering. It is the direct result of the session’s Pan Depth setting that is subtracting -3dB of gain on this center panned mono track.

Next, notice how the signal level on the Master Output has been reconstituted and is in fact equal to the original mono source. We’ve effectively added +3dB of gain to compensate for the attenuation of the original center panned mono clip. The +3dB gain compensation was applied to the signal on the Auxiliary Input track (via fader) before routing it’s output to the stereo Master Output.

So it’s: Center Panned mono resulting in a -3dB gain attenuation —>> to a stereo Aux Input with +3dB of gain compensation —>> to stereo Master Output at unity.

In case you are wondering – why not add +3dB of gain to the mono clip and bypass all the fluff? By doing so you would be altering the native inherent gain structure of the mono source clip, possibly resulting in clipping. My described workflow simply reconstitutes the attenuated gain after it occurs on center panned mono clips. It is all necessary due to Pro Tool’s Pan Depth methods and implementation.

-paul.

Utilizing Multiple Outputs for Recording

The vast majority of audio industry professionals use DAWS running on proficient computer systems to record audio directly to secondary hard disks. For some reason direct to disk recording is not widely endorsed in the Podcasting space. Many consultants (for various reasons) advise against this recording method. Instead, they recommend the use of inexpensive hand-held solid state Recorders.

For instance I’ve heard a few people state “computers cause ground loops”, hence the widespread Portable Recorder recommendation. In my opinion that is a half-baked assertion. In fact, ANY electronic component in a signal chain (including your electrical system) is capable of producing inherent noise. Often the replacement of cheaply manufactured components (interfaces, mixers, processors, cables, etc.) will solve audible noise problems. The key is to isolate the source and correct or replace it.

Portable Recorders are well suited for location interviews and video shoots. For in-studio sessions I feel direct to disk recording on a proficient system is much more flexible compared to the use of an external device. More so, the sole use of a Portable Recorder without a proper backup strategy is flat out risky.

That being said I thought I would document a basic Skype Recording session that I implemented in Pro Tools using a multi-output Motu Audio Interface. The incoming audio will be recorded on a secondary hard disk installed (or interfaced) on the host system. The real time session audio will also be routed to an alternate Interface Output, feeding an external Recorder for backup purposes.

Recording_Session_small

Note a multi-output Mixer can be used in place of an Audio Interface. As far as software you can use any modern DAW to replicate the described session. If you are using a Mac, Rogue Amoeba’s distinctive Audio Hijack application is also highly capable.

Objectives:

1-Record Studio Host and Skype Participant on discrete mono tracks in real time.

2-Combine the discrete recordings and create a split-stereo clip with independent dynamics processing applied to each channel, all in real time.

3-Use a Pre-Fader Send to independently control the level of the split-stereo discrete recording, and patch the real time signal to the Interface S/PDIF Output. This will feed the external Recorder’s S/PDIF Input.

4-Monitor the session through Headphones and play out through Desktop near-field Monitors.

Please review the displayed Pro Tools session snapshot.

• The Input for the mono Host track is the Interface connected mic. The Input for the mono Skype track is “Mix 1 Return.” This is an Interface supported feature, allowing the operator to route the computer’s Output (in this case Skype) to an available DAW Input. This configuration effectively creates a mix-minus with discrete, unprocessed recordings on individual mono tracks.

• The mono recording tracks are routed to individual mono Aux Input tracks using Buses. The Aux Input tracks are hard-panned L+R and contain various inserted processing options, including a Gain Trim, Expander, and Compressor.

The processing applied in this session is not intended to replace what would normally occur in post. The Compressors are there just to tame dynamics in the event either participant exceeds nominal input levels. The Expander is set up to apply mild attenuation when the host is not speaking.

• The Aux Input tracks have their Outputs set to a common stereo Bus.

• Finally a third standard stereo audio track (Rec-Sum) uses the stereo Bus Output(s) as it’s Inputs. By hard panning the channels L+R we are able to maintain discrete channel separation within any printed stereo clip.

To record the discrete raw audio and the processed split-stereo audio in real time, we simply arm all session Audio tracks to record and fire away. The session can be monitored through Headphones and played out through near fields via the Main Output.

Secondary Output

The Motu Interface used for this session has a total of 8 Outputs, including a stereo S/PDIF option. I implemented Pre-Fader Send on the session’s Rec-Sum channel with it’s Output set to S/PDIF. This will route the track’s split-stereo audio to the S/PDIF stereo Input of an external Marantz CF Recorder. With the Send designated as Pre-Fader, it’s level control will be independent of the parent (Rec-Sum) channel fader, thus allowing discrete control of the real time signal being fed to the Recorder.

Note in the displayed Pro Tools session snapshot – the floating fader positioned to the left of the mixer is a user friendly and easily accessible copy of the much smaller Send fader displayed in the parent (Rec-Sum) track.

In summary, we can successfully initialize and capture 4 recordings in a single pass: the raw Host audio, the raw Skype participant audio, a split-stereo processed version of the Skype session, and a split-stereo copy of the processed Skype session stored on the Recorder.

The image below displays the completed session with the split-stereo clip playing through the Main Outputs.

Mix_small

My general recommendation:when it is feasible, use direct to disk and Portable recording options in unison on a proficient system to capture in-studio multitrack and single participant Podcast sessions.

-paul.

Bit Depth and Dither

In a professional workflow Dither will be applied to audio clips (or mixes) when reducing word length. This process will mitigate errors that occur due to the subtraction of digital audio bits. I thought I’d cover the basics.

Dither_small

Digital Audio

Digital Audio incorporates individual samples consisting of bits created by the process of Quantization. This is essentially the conversion of a continuous, linear range of values present in analog audio into a fixed range of discrete values. Bit Depth (a.k.a. Word Length or Resolution) represents the number of bits stored in a sample’s measure of amplitude. It indicates the extent of inherent vertical precision. Higher bit depths (or bits per sample) encompass improved vertical dynamic resolution resulting in an extended Dynamic Range.

1 bit = 6dB of Dynamic Range. Theoretically 16bit audio has a quantified Dynamic Range of 96 dB. 24 bit audio has a quantified Dynamic Range of 144 dB. However, in order to accurately assess Dynamic Range we must also recognize the amplitude of the highest spectral component of the inherent noise floor. Specifically, where it resides relative to the maximum Peak value that a system is capable of reproducing. Dynamic Range is the measurement of this ratio or range.

Signal to Noise Ratio (SNR) is the quantified range between the nominal average signal level and the average level of the noise floor. Audio with an extended Dynamic Range will exhibit a higher SNR compared to audio with a reduced Dynamic Range. In essence 24 bit audio will allow you to work with additional headroom without any increase in noise compared to 16 bit audio.

Word Length Reduction

Truncation is the removal of bits with no compensating replacement. The repositioning of samples after converting to a lower resolution creates Quantization Errors resulting in audible artifacts and distortion. Dither is technology that adds minimal perceived noise to audio before word length reduction. This noise will mitigate (mask/remove) the audibility of distortion caused by Quantization Errors. The process preserves fidelity and Dynamic Range of audio throughout bit-depth conversion and/or bit-depth reduction exporting.

There is a trade off: you are replacing bad noise with alternative “good” noise that is smoother, less audible, and much more consistent.

Noise Shaping is a supplemental option that pushes noise into frequency ranges that are less audible to humans, thus allowing greater Dither with reduced perceptual noise.

(Take a look at the Noise Shaped frequency response curve in the attached image. There is a clear visual indication of increased gain at higher frequencies).

Podcasting

So what does this all mean for the typical Podcast Producer? Is Dither just another obscure aspect of professional Audio Mastering and/or Post Production that can be safely ignored?

Consider the following variables:

If you are recording spoken word using properly configured gear in a reasonably quiet and optimized environment – there is no discernible advantage recording 24-bit audio in preparation for 16-bit encoding and delivery. In my opinion 16-bit audio from acquisition to distribution will be more than adequate.

If you elect to record 24 bit audio, and you are not properly implementing word length reduction to 16 bit, you are essentially nulling the advantages of the original higher resolution audio. In essence fidelity degradation (artifacts/distortion) will occur due to the absence of efficient error masking. This is not my opinion – it is a fact.

Remember, I’m specifically referring to spoken word audio slated for Podcast distribution. If you are tracking music, well then by all means make full use of the advantages of higher resolution audio recording.

Consider this: The stand-alone version of iZotope’s Ozone 8 Mastering Suite processes all imported audio to 32 bit word length. The manual specifically states:

“Ozone processes files at 32-bit so Dither is desirable for files being exported to values lower than 32-bit …

… When exporting to a bit depth lower than 32-bit, checking this (Dither option) box will apply high-quality dithering to the exported file. This allows you to preserve the sound quality and dynamic range of a higher bit depth, when exporting the audio file to a lower bit depth.”

Most DAWS include Dither options. In some cases it’s by way of a plugin. You may also notice Dither options included in application Preferences or Export dialogs.

Hopefully after reading this article you will understand what Dither is, it’s purpose, and whether you should consider implementing it. Please note: Dither must be applied at the very last stage of any processing chain.

-paul.

AES “Recommendation for Loudness of Audio Streaming & Network File Playback.”

I’d like to share my observations and views on the recently published AES Technical Document AES TD1004.1.15-10 that specifics best practices for Loudness of Audio Streaming and Network File Playback.

The document is a collection of Loudness processing guidelines for diverse platform dependent media streaming and downloading. This would include music, spoken word, and possible high dynamic audio in video streams. The document credits some of the most well respected industry leading professionals, including Bob Katz, Thomas Lund, and Florian Camerer. The term “Podcast” is directly referenced once in the document, where the author(s) state:

Network file playback is on-demand download of complete programs from the network, such as podcasts.”

I support the purpose of this document, and I understand the stated recommendations will most likely evolve. However in my view the guidelines have the potential to create a fair amount of confusion for producers of spoken word content, mainly Podcast producers. I’m specifically referring to the suggested 4 LU range (-16.0 to -20.0 LUFS) of acceptable Integrated Loudness Targets and the solutions for proper targeting.

Indeed compliance within this range will moderately curtail perceptual loudness disparities across a wide range of programs. However the leniency of this range is what concerns me.

I am all for what I refer to as reasonable deviation or “wiggle room” in regard to Integrated Loudness Target flexibility for Podcasts. However IMHO a -20 LUFS spoken word Podcast approaches the broadcast Loudness Targets that I feel are inadequate for this particular platform. A comparable audio segment with wide dynamics will complicate matters further.

I also question the notion (as stated in the document) of purposely precipitating clipping when adding gain “to handle excessive peaks.”

And there is no mention of the perceptual disparities between Mono and Stereo files Loudness Normalized to the same Integrated Loudness Target. For the record I don’t support mono file distribution. However this file format is prevalent in the space.

Perspective

I feel the document’s perspective is somewhat slanted towards platform dependent music streaming and preservation of musical dynamics. In this category, broad guidelines are for the most part acceptable. This is due to the wide range of production techniques and delivery methods used on a per musical genre basis. Conversely spoken word driven audio is not nearly as artistically diverse. Considering how and where most Podcasts are consumed, intelligibility is imperative. In my view they require much more stringent guidelines.

It’s important to note streaming services and radio stations have the capability to implement global Loudness Normalization. This frees content creators from any compliance responsibilities. All submitted media will be adjusted accordingly (turned up or turned down) in order to meet the intended distribution Target(s). This will result in consistency across the noted platform.

Unfortunately this is not the case in the now ubiquitous Podcasting space. At the time of this writing I am not aware of a single Podcast Network that (A) implements global Loudness Normalization … and/or … (B) specifies a requirement for Integrated Loudness and Maximum True Peak Targets for submitted media.

Currently Podcast Loudness compliance Targets are resolved by each individual producer. This is the root cause of wide perceptual loudness disparities across all programs in the space. In my view suggesting a diverse range of acceptable Targets especially for spoken word may further impede any attempts to establish consistency and standardization.

PLR and Retention of Music Dynamics

The document states: “Users may choose a Target Loudness that is lower than the -16.0 LUFS maximum, e.g., -18.0 LUFS, to better suit the dynamic characteristics of the program. The lower Target Loudness helps improve sound quality by permitting the programs to have a higher Peak to Loudness Ratio (PLR) without excessive peak limiting.”

The PLR correlates with headroom and dynamic range. It is the difference between the average Loudness and maximum amplitude. For example a piece of audio Loudness Normalized to -16.0 LUFS with a Maximum True Peak of -1 dBTP reveals a PLR of 15. As the Integrated Loudness Target is lowered, the PLR increases indicating additional headroom and wider dynamics.

In essence low Integrated Loudness Targets will help preserve dynamic range and natural fidelity. This approach is great for music production and streaming, and I support it. However in my view this may not be a viable solution for spoken word distribution, especially considering potential device gain deficiencies and ubiquitous consumption habits carried out in problematic environments. In fact in this particular scenario a moderately reduced dynamic range will improve spoken word intelligibility.

Recommended Processing Options and Limiting

If a piece of audio is measured in it’s entirety and the Integrated Loudness is higher than the intended Target, a subtractive gain offset normalizes the audio. For example if the audio checks in at -18.0 LUFS and you are targeting -20.0 LUFS, we simply subtract 2 dB of gain to meet compliance.

Conversely when the measured Integrated Loudness is lower than the intended Target, Loudness Normalization is much more complex. For example if the audio checks in at -20.0 LUFS, and the Integrated Loudness Target is -16.0 LUFS, a significant amount of gain must be added. In doing so the additional gain may very well cause overshoots, not only above the Maximum True Peak Target, but well above 0dBFS. Inevitably clipping will occur. From my perspective this would clearly indicate the audio needs to be remixed or remastered prior to Loudness Normalization.

Under these circumstances I would be inclined to reestablish headroom by applying dynamic range compression. This approach will certainly curtail the need for aggressive limiting. As stated the reduced dynamic range may also improve spoken word intelligibility. I’m certainly not suggesting aggressive hyper-compression. The amount of dynamic range reduction is of course subjective. Let me also stress this technique may not be suitable for certain types of music.

Additional Document Recommendations and Efficiency

The authors of the document go on to share some very interesting suggestions in regard to effective Loudness Normalization:

1) “If level has to be raised, raise until it reaches Target level or until True Peak reaches 0 dBTP, whichever occurs first. Thus, the sound quality will be preserved, without introducing excessive peak limiting.”

2) “Perform what is noted in example 1, but keep raising the level until the program level reaches Target, and apply either peak limiting or allow some clipping to handle excessive peaks. The advantage is more consistent loudness in the stream, but this is a potential sonic compromise compared to example 1. The best way to retain sound quality and have more consistent loudness is by applying example 1 and implementing a lower Target.”

With these points in mind, please review/demo the following spoken word audio segment. In my opinion the audio in it’s current state is not optimized for Podcast distribution. It’s simply too low in terms of perceptual loudness and too dynamic for effective Loudness Normalization, especially if targeting -16.0 LUFS. Due to these attributes suggestion 1 above is clearly not an option. In fact neither is option 2. There is simply no available headroom to effectively add gain without driving the level well above full scale. Peak limiting is unavoidable.

1

I feel the document suggestions for the segment above are simply not viable, especially in my world where I will continue to recommend -16.0 LUFS as the recommended Target for spoken word Podcasts. Targeting -18.0 LUFS as opposed to -16.0 LUFS is certainly an option. It’s clear peak limiting will still be necessary.

Below is the same audio segment with dynamic range compression applied before Loudness Normalization to -16.0 LUFS. Notice there is no indication of aggressive limiting, even with a Maximum True Peak of -1.7 dBTP.

2

Regarding peak limiting the referenced document includes a few considerations. For example: “Instead of deciding on 2 dB of peak limiting, a combination of a -1 dBTP peak limiter threshold with an overall attenuation of 1 dB from the previously chosen Target may produce a more desirable result.”

This modification is adequate. However the general concept continues to suggest the acceptance of flexible Targets for spoken word. This may impede perceptual consistency across multiple programs within a given network.

Conclusion

The flexible best practices suggested in the AES document are 100% valid for music producers and diverse distribution platforms. However in my opinion this level of flexibility may not be well suited for spoken word audio processing and distribution.

I’m willing to support the curtailment of heavy peak limiting when attempting to normalize spoken word audio (especially to -16.0 LUFS) by slightly reducing the intended Integrated Loudness Target … but not by much. I will only consider doing so if and when my personal optimization methods prior to normalization yield unsatisfactory results.

My recommendation for Podcast producers would be to continue to target -16.0 LUFS for stereo files and -19.0 LUFS for mono files. If heavy limiting occurs, consider remixing or remastering with reduced dynamics. If optimization is unsuccessful, consider lowering the intended Integrated Loudness Target by no more than 2 LU.

A True Peak Maximum of <= -1.0 dBTP is fine. I will continue to suggest -1.5 dBTP for lossless files prior to lossy encoding. This will help ensure compliance in encoded lossy files. What’s crucial here is a full understanding of how lossy, low bit rate coders will overshoot peaks. This is relevant due to the ubiquitous (and not necessarily recommended) use of 64kbps for mono Podcast audio files.

Let me finish by stating the observations and recommendations expressed in this article reflect my own personal subjective opinions based on 11 years of experience working with spoken word audio distributed on the Internet and Mobile platforms. Please fell free to draw your own conclusions and implement the techniques that work best for you.

-paul.

Quantifying Podcast Audio Dynamics

I’ve discussed the reasons why there is a need for revised (optimized) Loudness Standards for Internet and Mobile audio distribution. Problematic (noisy) consumption environments and possible device gain deficiencies justify an elevated Integrated Loudness target. Highly dynamic audio complicates matters further.

In essence audio for the Internet/Mobile platform must be perceptually louder on average compared to audio targeted for Broadcast. The audio must also exhibit carefully constrained dynamics in order to maintain optimized intelligibility.

The recommended Integrated Loudness targets for Internet and Mobile audio are -16.0 LUFS for stereo files and -19.0 LUFS for mono. They are perceptually equal.

In terms of Dynamics, I’ve expressed my opinion regarding compression. In my view spoken word audio intelligibility will be improved after careful Dynamic Range Compression is applied. Note that I do not advocate aggressive compression that may result in excessive loudness and possible quality degradation. The process is a subjective art. It takes practice with accessibility to well designed tools along with a full understanding of all settings.

Dynamic-480

I thought I would discuss various aspects of Podcast audio Dynamics. Mainly, the potential problematic significance of wide Dynamics and how to quantify aspects as such using various descriptors and measurement tools. I will also discuss the benefits of Dynamic Range management as a precursor to Loudness Normalization. Lastly I will disclose recommended benchmarks that are certainly not requirements. Feel free to draw your own conclusions and target what works best for you.

Highly Dynamic Audio in Noisy Environments

At it’s core extended or Wide Dynamic Range describes notable disparities between high and low level passages throughout a piece of audio. When this is prevalent in a spoken word segment, intelligibility will be compromised – especially in situations where the listening environment is less than ideal.

For example if you are traveling below Manhattan on a noisy subway, and a Podcast talent’s delivery is inconsistent, you may need to make realtime playback volume adjustments to compensate for any inconsistent high and low level passages.

As well – if the Integrated Loudness is below what is recommended, the listening device may be incapable of applying sufficient gain. Dynamic Range Compression will reestablish intelligibility.

From a post perspective – carefully constrained dynamics will provide additional headroom. This will optimize audio for further down stream processing and ultimately efficient Loudness Normalization.

Dynamic Range Compression and Loudness Normalization

I would say in most cases successful Loudness Normalization for Broadcast compliance requires nothing more than a simple subtractive gain offset. For example if your mastered piece checks in at -20.0 LUFS (stereo), and you are targeting R128 (-23.0 LUFS Integrated), subtracting -3 LU of gain will most likely result in compliant audio. By doing so the original dynamic attributes of the piece will be retained.

Things get a bit more complicated when your Integrated Loudness target is higher than the measured source. For example a mastered -20.0 LUFS piece will require additional gain to meet a -16.0 LUFS target. In this case you may need to apply a significant amount of limiting to prevent the Maximum True Peak from exceeding your target. In essence without safeguards, added gain may result in clipping. The key is to avoid excessive limiting if at all possible.

How do we optimize audio before a gain offset is applied?

I recommend applying a moderate to low amount of (global) final stage Dynamic Range Compression before Loudness Normalization. When processing highly dynamic audio this final stage compression will prevent instances of excessive limiting. The amount of compression is of course subjective. Often a mere 1-2 dB of gain reduction will be sufficient. Effectiveness will always depend on the attributes of the mastered source audio before L.Normalizing.

I carefully manage spoken word dynamics throughout client project workflows. I simply maintain sufficient headroom prior to Loudness Normalization. In most cases I am able to meet the intended Integrated Loudness and Maximum True Peak targets (without limiting) by simply adding gain.

RX Loudness Control

By design iZotope’s RX Loudness Control also applies compression in certain instances of Loudness Normalization. I suggest you read through the manual. It is packed with information regarding audio loudness processing and Loudness Normalization.

RX-LC_site

iZotope states the following:

“For many mixes, dynamics are not affected at all . This is because only a fixed gain is required to meet the spec . However, if your mix is too dynamic or has significant transients, compression and/or limiting are required to meet Short-term/Momentary or True Peak parts of the spec.”

“RX Loudness Control uses compression in a way that preserves the quality of your audio . When needed, a compressor dynamically adjusts your audio to ensure you get the 
best sound while remaining compliant . For loudness standards that require Short-term 
or Momentary compliance, the compressor is engaged automatically when loudness exceeds the specified target.”

It’s a highly recommended tool that simplifies offline processing in Pro Tools. Many of it’s features hook into Adobe’s Premiere Pro and Media Encoder.

LRA, PLR, and Measurement Tools

So how do we quantify spoken word audio dynamics? Most modern Loudness Meters are capable of calculating and displaying what is referred to as the Loudness Range (LRA). This particular descriptor is displayed in Loudness Units (LU’s). Loudness Range quantifies the differences in loudness measurements over time. This statistical perspective can help operators decide whether Dynamic Range Compression may be necessary for optimum intelligibility on a particular platform. (Note in order to prevent a skewed measurement due to various factors – the LRA algorithm incorporates relative and absolute threshold gating. For more information: refer to EBU Tech doc 3342).

I will say before I came across sort of rule of thumb (recommended) guidelines for Internet and Mobile audio distribution, the LRA in the majority of the work that I’ve produced over the years hovered around 3-5 LU. In the highly regarded article Audio for Mobile TV, iPad and iPod, the author and leading expert Thomas Lund of TC Electronic suggests an LRA not much higher than 8 LU for optimal Pod Listening. Basically higher LRA readings suggest inconsistent dynamics which in turn may not be suitable for Mobile platform distribution.

Some Loudness Meters also display the PLR descriptor, or Peak to Loudness Ratio. This correlates with headroom and dynamic range. It is the difference between the Program (average) Loudness and maximum amplitude. Assuming a piece of audio has been Loudness normalized to -16.0 LUFS along with an awareness of a True Peak Maximum somewhere around -1.0 dBTP, it is easy to recognize the general sweet spot for the Mobile platform ->> (e.g. a PLR reasonably less than 16 for stereo).

Note that heavily compressed or aggressively limited (loud) audio will exhibit very low PLR readings. For example if the measured Integrated Loudness of a particular program is -10.0 LUFS with a Maximum True Peak of -1.0 dBTP, the reduced PLR (9) clearly indicates aggressive processing resulting in elevated perceptual loudness. This should be avoided.

If you are targeting -16.0 LUFS (Integrated), and your True Peak Maximum is somewhere between -1.0 and -3.0 dBTP, your PLR is well within the recommended range.

In Conclusion

An optimal LRA is vital for Podcast/Spoken Word distribution. Use it to gauge delivery consistency, dynamics, and whether further optimization may be necessary. At this point in time I suggest adhering to an LRA < 7 LU for spoken word.

LRA Measurements may be performed in real time using a compliant Loudness Meter such as Nugen Audio’s VisLM 2, TC Electronic’s LM2n Loudness Radar, and iZotope’s Insight (also check out the Youlean Loudness Meter). Some meters are capable of performing offline measurements in supported DAWs. There are a number of stand alone third party measurement options available as well, such as iZotope’s RX7 Advanced Audio Editor, Auphonic Leveler, FFmpeg, and r128x.

-paul.

***Please note I personally paid for my RX Loudness Control license and I have no formal affiliation with iZotope.

Public Radio Loudness Compliance

PRSS (Public Radio Satellite System) recently published Loudness Standardization parameters intended for contributing producers:

[– Target Loudness: Integrated loudness shall be -24 LUFS per program segment with a variance of ±2 LU. This will apply to speech and/or music elements.

[– Maximum Peak Level: Shall be no higher than -3 dBFS for sample peaks and shall be no higher than -2 dBTP for True Peaks.

To supplement the published standards, my twitter acquaintance and fellow Loudness advocate Rob Byers posted The Audio Producer’s Guide to Loudness on Transom.org.

The article documents the basics of Loudness Meters, measurement descriptors, and mixing best practices. It’s a viable guide for anyone planning to submit compliant audio for Public Radio distribution. Incidentally Rob is the Interim Director of Broadcast and Media Operations with Marketplace at American Public Media.

Anyway … I’d like to share my personal perspective regarding the differences between real time compliance mixing vs. compliance processing. I’m confident my subjective insight will prove to be useful for Public Radio Producers targeting the PRSS spec.

Internet/Mobile vs. Broadcast

I’ve stated that targeted (Integrated/Program) Loudness for Radio/Broadcast differs from what I consider suitable for audio distributed on the Internet. This includes streaming audio, video, and Podcasts. Basically audio mixed and/or Loudness Normalized to -23.0/-24.0 LUFS, targeted to comply with a Broadcast spec. is simply not loud enough for Internet distribution. This is due to various aspects of consumption, including device deficiencies and problematic ambiance in less than ideal listening environments. The Integrated Loudness target for Internet/Mobile audio is -16.0 LUFS with allowance for a reasonable deviation. True Peaks should not exceed -1.0 dBTP in lossy files. Some institutions suggest additional headroom.

Mixing for Compliance

I rarely mix audio in real time while attempting to meet Integrated and True Peak compliance targets. This method is acceptable. However there are a few caveats.

First, in order to arrive upon an accurate representation of Integrated Loudness, audio mixes must be measured in their entirety. You cannot spot check a few passages of a mix and estimate this descriptor. Needless to say this can be a time consuming process.

Secondly, in my view real time mixing for compliance is tedious and potentially inaccurate. What I recommend is to use both the Short Term and Integrated Loudness descriptors to sort of gauge the current state of the mix as playback progresses and ends. Once the mix has concluded – simply apply a global Gain Offset to the entire mix. This will shift the Integrated Loudness to your intended target. This is essentially one way to apply Loudness Normalization.

For example if a concluded mix checks in at -20.0 LUFS, and you are targeting -24.0 LUFS, prior to bouncing, a -4LU (dB) global Gain Offset would bring the mix into spec. (The process is discussed in this video highlighting the TC Electronic Loudness Radar Meter included in Adobe Audition and Premiere Pro. Of course any compliant Loudness Meter would be suitable).

By the way let’s not forget the importance of True Peak compliance for any standard. This descriptor will also need to be monitored and dealt with accordingly while mixing.

Trust Your Ears!

This second (and preferred) method of Loudness Normalization requires proper use of the most important tool(s) available to all of us in any mixing or post production environment … our ears. Producers need to learn how to take advantage of natural perception and also apply thoughtful processing to session clips with the intent to achieve a well balanced, good sounding mix. In doing so the use of a Loudness Meter becomes much less of a distraction.

Of course the presence of an inserted meter is a necessity, and it’s descriptors will (over time) display a clear indication of the state of the mix. Trust your ears!

Off-line Loudness Normalization

The workflow that I’m about to describe will reward producers with Loudness compliance flexibility throughout a mixing session. The key is upon completion, the mixed (and exported) audio will be processed off-line resulting in 100% compliance.

As noted, the global Gain Offset method for Loudness Normalization requires knowledge of existing Integrated Loudness prior to applying the necessary adjustments. The following variation shares the same requirement. However the Integrated Loudness and True Peak of the mixed-down audio will be calculated off-line as opposed real time. Let me stress the existing Integrated Loudness must be realized before we can move forward with any form of compliance processing. We will be targeting the PRSS specifications noted above.

FFMpeg:Cross Platform Support

There are many ways to measure audio off-line. The most accessible and economical cross-platform tool is the FFmpeg binary. Indeed this is a Command Line utility. Don’t fret! It’s not that big of a deal. You can easily download a pre-complied binary compatible with your current operating system. You simply point your command line syntax to the location of the binary, key in the path to the location of the file to be measured, and fire away.

Below is example syntax for Loudness Measurement. In this particular instance I point to the binary stored in a root, system wide folder. If you are running a Mac, it may be easier to simply place the binary on your Desktop. In this case you would point to the binary like this: ~/Desktop/ffmpeg … then continue with the remaining displayed syntax, replacing yourSourceFile.wav with the actual path of the file to be measured.

ffmpeg_syntax

And here are the results. Notice the -19.9 LUFS Integrated Loudness (I), and the 1.8 dBFS (dBTP) True Peak (open the image for an extended view).

ffmpeg-small

The PRSS spec. calls for -24.0 LUFS Integrated Loudness with Sample Peaks not exceeding -3.0 dB and True Peaks not exceeding -2.0 dBTP. In this measured example the audio is roughly +4LU louder than it should be and it is obviously clipped with it’s True Peak well above 0dBFS.

Setting Up The Normalization Session

In your preferred DAW, create a new stereo session and do the following:

[– Add a Stereo Audio Track, two Stereo AUX Input Channels (primary/secondary), and a Master Fader.

[– Route the Audio Track’s output to the input of the primary Aux Input Channel.

[– On the primary Aux Input Channel – first insert a Gain Trim plugin. Then insert a True Peak Limiter.

[– Now route the output of the primary Aux Input Channel to the input of the secondary Aux Input Channel.

[– Insert a second instance of a Gain Trim plugin on the secondary Aux Input Channel.

[– Route the processed signal to the Master Fader.

[– Set the True Peak Ceiling on the Limiter to -3.5dBTP. Set the Gain Trim inserted on the secondary Aux Input Channel to +1dB. Note that these settings are static and will never change.

Save the session as a Template.

Here is an example of how I do this in Pro Tools. Note that I have additional plugins inserted on the sessions’s Aux Input Channels. They are in fact deactivated. Please disregard them. I was using this example session for testing, using duplicate sets of plugins for various parameter adjustments. (click to enlarge).

pt-(-24)_620

Making it Work

Using the measured audio displayed above, note the Integrated Loudness (-19.9 LUFS). All you need to do is calculate an initial Gain Offset. This is the difference between the measured Integrated Loudness and -25.0. Add the mixed-down audio into the session’s Audio Track, and set the Gain Trim plugin inserted on the Primary Aux Input Channel to the calculated Gain Offset.

Bounce and you’re done.

Note that the initial Gain Offset will always be determined by calculating the difference between existing Integrated Loudness and -25.0. Once the core session Template is saved, subsequent use is simple: Measure mixed-down audio – Import audio into session – Calculate Gan Offset – Apply Offset to Primary Gain Trim – Bounce.

This is the fourth paragraph …

TP-620

Additional text …

Adobe Audition Multiband Compressor

I thought I’d clear up a few misconceptions regarding the Multiband Compressor bundled in Adobe Audition. Also, I’d like to discuss the infamous “Broadcast” preset that I feel is being recommended without proper guidance. This is an aggressive preset that applies excessive compression and heavy limiting resulting in processed audio that is often fatiguing to the listener.

audition-multi-480

The Basics

The tool itself is “Powered by iZotope.” They are a well respected audio plugin and application development firm. Personally I think it’s great that Adobe decided to bundle this processor in Audition. However, it is far from a novice targeted tool. In fact it’s pretty robust.

What’s interesting is it’s referred to as a “Multiband Compressor.” This is slightly misleading, considering the processor includes a Peak Limiter stage along with it’s advertised Multiband Compressor. I think Dynamics Processor would be a more suitable name.

Basically the multi-band Compressor includes 3 adjustable crossovers, resulting in 4 independent Frequency Bands. Each Band includes a discrete Compressor with Threshold, Gain Compensation, Ratio, Attack, and Release settings. Bands can be soloed or bypassed.

There is global Peak Limiter module located to the right of the Compressor settings. This module may be activated or bypassed. Without a clear understanding of the supplied settings for the Limiter, you run the risk of generating excessive loudness when processing audio. I’m referring to a substantial increase in perceived loudness.

The Limiter Parameters

The Threshold is the limiting trigger. When the input signal surpasses it, limiting is activated. The Margin is what defines the Peak Ceiling. As you decrease the Threshold, the signal is driven up to and against the Margin resulting in an increase in average loudness. This also results in dynamic range reduction.

Activating the “Brickwall Limiter” feature in the supplemental Options module will ensure accurate Margin compliance. In essence you will be implementing Hard Limiting. Deactivating this option may result in “overs” and/or peaks that exceed the specified Margin.

The bundled Broadcast preset defaults the Limiter Threshold setting to -10.0 dB with a Margin of -0.1 dBFS. Any alternative Threshold settings are of course subjective. I’m suggesting that it may be a good idea to ease up on this default Threshold setting. This will result in less aggressive limiting and a reduction of average levels.

I’m also suggesting that the default Margin setting of -0.1 is not recommended in this context. I would set this to -1.0 dBFS or lower (-1.5 dBFS, or even -2.0 dBFS).

Please note this is not a True Peak Limiter. Your processed lossless audio file has the potential to loose headroom when and if it is converted to a lossy codec such as MP3.

At this point I suggest no changes should be made to the Attack and Release settings.

The Compressors

We cannot discount additional settings included in the Broadcast preset that are contributing to the aggressive processing. If you examine the Ratio settings for each independent compression module, 3:1 is the highest set Ratio. The predefined Ratios are fairly moderate and for starters require no adjustment.

However, notice the Threshold settings for each compression module as well as the Gain Compensation setting in Module (band) 4 (+3 dB).

First, the low Threshold settings result in fairly aggressive compression per band. Also, the band 4 gain compensation is generating a further increase in average level for that particular band.

Again the settings and any potential adjustments are subjective. My recommendation would be to experiment with the Threshold settings. Specifically, cut back by reducing all Thresholds while maintaining their relative relationship. Do this by activating the “Link Band Controls” setting located in the supplemental Limiter Options.

View the red Gain Reduction meters included in each module. Monitor the amount of attenuation that occurs with the default Threshold settings. Compare initial readings with the gain reduction that occurs after you make your adjustments. Your goal is to ease up on the gain reduction. This will result in less aggressive compression. Remember to use your ears!

Output

An area of misinformation for this processor is the purpose of the Output Gain adjustment, located at the far upper right of the interface. Please note this setting does not define the Peak Ceiling! Remember – it is the Margin setting in the Limiter module that defines your Ceiling. The Output Gain simply adds or cuts global output level after compression. Think of if it as Global Gain compensation.

To prove my point, I dug out a short video demo that I created sometime last year for a community member.

With the Broadcast preset selected, and the Output Gain set to -1.5 dBFS – the actual output Peak Amplitude surpasses -1.5 dBFS, even with the Brickwall option turned ON. This reading is displayed numerically above the Output Gain meter(s) in real time.

In the second pass of the test I set the Output Gain to 0 dBFS. I then set the Limiter Margin to -1.5 dBFS. As the audio plays through you will notice the output is limited to and never surpasses -1.5 dBTP. Just keep your eye on the numerical, realtime display.

Video Demo Link

I purposely omitted any specific references to Attack and Release settings. They are the source for a future discussion.

DeEsser?

Here’s an alternative use recommendation for this Adobe Multiband Compressor: DeEssing.

Use the Spectrum Analyzer to determine the frequency range where excessive sibilant energy occurs. Set two crossovers to encapsulate this range. Bypass the remaining associated compression modules. Tweak the remaining active band compression settings thus allowing the compressor to attenuate the problematic sibilant energy.

If you find the supplied Spectrum Analyzer difficult to read, consider using a third party option with higher resolution to perform your analysis.

Conclusion

Please note – in order to get the most out of this tool, you really need to learn and understand the basics of dynamics compression and how each setting will affect the source audio. More importantly, when someone simply suggests the use of a preset, take it with a grain of salt. More than likely this person lacks a full understanding of the tool, and may not be capable of providing clear instructional guidance for all functions. It’s a bad mix – especially when charging novices big bucks for training.

By the way, nothing wrong with being a novice. The point is paid consultants have an obligation to provide expert assistance. Boiler plate suggestions serve no purpose.

-paul.

Skype, Logic Pro X, and Aggregate Devices …

Scenario:

Studio Host and Skype participant to be recorded inside Logic Pro X on a single machine (single pass) with no additional hardware other than a Mic Input Device.

Objectives:

[– Two independent mono Host/Participant stems with no processing.

[– One processed split-stereo mixdown of the session with the Host and Guest residing on discrete (L+R) channels.

[– Real time Processing and Recording of all instances.
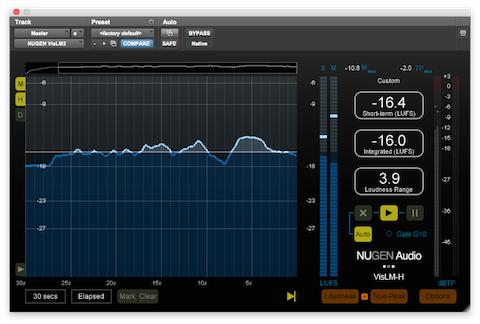
skype-waves-small

Of course the objectives noted above are easily attainable using two independent machines, with the recording box running Logic Pro X and the Skype machine handling the connection. In this case you would also need to use a mixer to set up a proper mix-minus.

You can also implement similar workflows by using two inexpensive USB audio interfaces connected to a single machine.

Considering the resourcefulness of today’s modern day Macs, I’m confident the following workflow will be successful freeing the user from complexities and added costs.

OSX Aggregate Devices

The foundation of this setup is based on a user created Aggregate Audio Device. Aggregate devices appear in the OSX System Preferences/Sound I/O options for system wide use. By wrapping supported “Subdevices” into a single Aggregate, you effectivly create a sort of cumulative Input Device that can be designated in Logic as the default. We also need a software utility that supports routing of the Skype Output to an Input in Logic.

I originally created this workflow using SoundFlower that was installed on my secondary iMac and carried over form previous versions of OSX. SoundFlower, along with the iMac’s Line Input were wrapped into a single Aggregate Device, and then designated in Logic as the default Input.

This worked well. However, I had no plans to install the now unsupported SoundFlower on my production MacPro for further testing. And so I looked around for a suitable up to date (and actively developed) replacement for SoundFlower.

Sound Siphon

Sound Siphon by Static Z Software “… makes your Mac’s Audio Output available as an Audio Input Device. It enables you to send audio from one application to another where it can be processed, streamed, or recorded.

Exactly what I needed.

Note that Sound Siphon is very diverse in terms of features. And the developer states that many useful enhancements are in the works. You can download a restricted demo. My hope is that you consider purchasing a $29.99 license. This will ensure the longevity of the application and continued development. Note that I have no affilation and I gladly purchased a license.

This is a snapshot of Sound Siphon:

ss-small

In the example above I display a user defined Device (“Capture Safari”) that is essentially a Custom Audio Input. I then associated the Safari Application with this device. This becomes a system wide option to capture Safari audio. For example QuickTime X will now display “Capture Safari” as an Input option for audio recording.

It’s important to note that this particular Sound Siphon feature is supplemental to the Skype recording implementation. In other words – it’s an entrley different use case scenario. My goal here is to disclose the flexibility of the application.

Creating the Aggregate Device

Input 1 on my Mackie Onyx 1220i Mixer receives the output from a dbx 286A Voice Processor. The studio Mic is connected to the processor for proper gain staging. I needed to wrap the Mic signal along with the Skype audio into a single Input Device and designate it in Logic’s Preferences for proper routing.

To create an Aggregate Device, open Audio MIDI Setup, located in ~/Applications/Utilities. When creating a new Aggregate, supported Subdevices appear in the right side setup table.

midi-small-44

Notice that Sound Siphon is listed as a 2 in/2 out device in the left source view. This is created when you install the application. Once installed, it will be available to be wrapped into an Aggregate Device along with pre-existing devices.

For my implementation I created “Skype Tracker” as a new Aggregate and selected my mixer (Onyx-(2528)) and Sound Siphon as Subdevices. Up top you set your Sample Rate and the Clock Source. My system seems to perform better with Sound Siphon set as the Clock Source.

It’s important to review the Input Channel matrix of the new Aggregate Device. Notice that Sound Siphon will only support Input channels (17+18). When routing Inputs in Logic, I will use Input 1 for the studio Mic and Input 17 for Skype.

Skype

Here are the Skype settings that I am using:

skype-44

The Microphone is set to the Aggregate Device. The Speakers option is set to Sound Siphon. This setting is imperative and from what I can tell non-flexiable.

Logic Pro X

The first thing we need to do is define the Input Device in Global Preferences/Audio/Devices. I set mine to the Aggregate Device:

prefs-sm-44

Next we will address setup and routing. What’s important here is that I use an Object in Logic that may not be immediately obvious in your particular installation.

Specifically, I often use Input Channel Strip Objects in my projects. They are implemented in the Environemnt (aka “MIDI Environment”). It is accessible form the Logic Window Menu.

From the Logic Docs regarding Input Channel Strips:

“The Input Channel Strip allows you to directly route and control signals from your audio hardware’s Inputs. Once an Input Channel Strip is assigned to an Audio Channel Strip, it can be monitored and recorded directly into Logic Pro, along with its effect plug-ins.

The signal is processed, inclusive of plug-ins even while Logic Pro is not playing. In other words, Input Channel Strips can behave just like external hardware processors. Aux sends can be used pre- or post-fader.

Input Channel Strips can be used as live Inputs that can stream audio signals from external sources (such as MIDI synthesizers and sound modules) into a stereo mix (by bouncing an Output Channel Strip).”

You can also create Bus Channel Strip Objects in the Environment. They are not the same as Auxiliary Channel Strips and can be quite useful in certain instances. For more information about Bus Channel Strips please refer to this article.
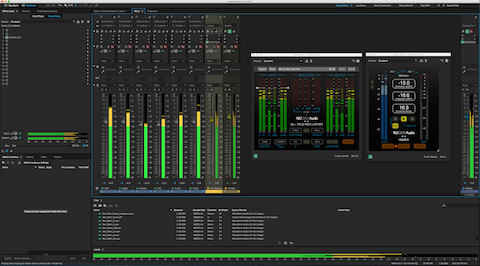
The Environment

To expose the accessibility of the Logic Environment, open global Preferences and access the Advanced options. The MIDI option needs to be selected as part of the Advanced Tools:

prefs-small

Once that setting is ticked, “Open Midi Environment” will appear as an option in the Logic Window Menu.

Channel Strip Objects are added to the Environment from the New Menu/Channel Strip. Notice how the Environment emulates the Project Mixer:

add-env-sm-55

Note that when adding Input Channel Strips in the Environment, you must define the corresponding (Aggregate) Device Inputs using the Channel Strip editor:

env-sm-77

For this particular project I created two Input Channel Strips in the Environment using Inputs 1 and 17 respectively, based on Aggregate Subdevice availability (Input 1 = Mic, Input 17 = Skype).

You will also need 4 Audio Tracks (2 Mono, 1 Stereo, 1 PreListen), and 2 (Mono) Auxiliary Channel Strips. Create Audio Tracks using the Track/New Tracks option – located in the Logic Application Menu. Add Auxiliary Channel Strips using the Mixer’s Options Menu/Create New … || Note that the Input Channel Strips created in the Environment should be designated Mono.

Here is my Project Mixer with all necessary Objects and Routing:

mixer-new-sm-44

Routing

The reddish labeled channels are the two Input Channel Strips that I created in the Environment. If you look at the text at the very top of these Channel Strips, you will see their Input designations.

The signals coming in through the Inputs are routed to their own independent Aux Channels for processing. Notice I inserted a Gain Trim on the Mic Input Channel. All processing options are of course subjective. One example would be to insert two instances of a Compressor on each Aux Channel. You would set these up to apply real time, non-aggresive dynamic range compression as you record.

Moving forward – notice the Aux Channels are Mono and hard panned L+R respectivly. This will maintain channel separation when recording the split-stereo version of the session. In this example each Aux Channel Output is routed to Audio Channel 3 (“Split Record”). This Stereo Audio Track is panned center. When armed it will record the Aux Channel Outputs to a split-stereo file.

Also study how I set up the remaining Audio Tracks – Audio Track 1 (“Rec. Mic”) and Audio Track 2 (“Rec. Skype”). Their Inputs are set to Bus 1 and 2 respectively, allowing these tracks to receive the unprocessed Outputs (“dry” audio) from the Input Channel Strips.

Keep in mind that if Effects are inserted on the Input Channel Strips, the audio routed to Audio Tracks 1+2 will be processed. In most cases I would not insert any Effects on the Input Channel Strips other than Gain. My intension here is to record dry stems.

I Grouped various aspects of these two channels, mainly Volume, Mute, Solo, and Record. This will link the faders and make it easy to control audibility of the mono stems cumulatively.

Wrap Up

That’s basicilly it. You can record/monitor all tracks in real time. And when you are done, there is no need to bounce, although you still can. You simply “Export” or “Export Region” as an individual file(s).

waves-22-small

Notes

You may have noticed the Outputs for the Auxiliary Channel Strips (1+2) and the Input for Audio Track 3 (“Split Record”) is Bus 3. This is in fact a virtual (permanent) Bus used to route the processed audio to Track 3 for recording.

When you select a permanent virtual Bus in Logic for routing, an Auxiliary Channel Strip is auto-created and will appear in the Mixer. For this particular workflow – we use two Auxiliary Channel Strips, one for Mic processing and a second for Skype processing.

Throughout this entire workflow no changes were made to my default OSX Audio I/O Settings located in System Preferences/Sound.

As I always say – Audio Tracking and Post are highly subjective arts. In fact many Logic “experts” have never heard of or utilized the options in the Environment. And your processing options are also subjective. My hope is this documentation will at the very least introduce you the creation and usage of Aggregate Devices.
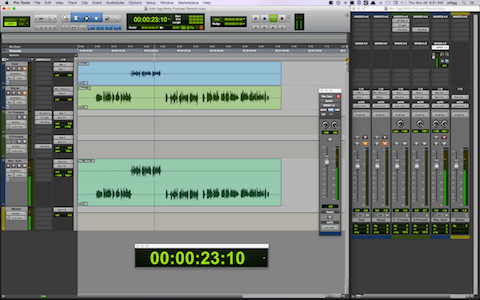
If by chance you develop a successful alternative solution, all well and good. In my tests I’ve found the documented implementation to work quite well.

Let me know if you have any questions.

I’d like to thank my friend Victor Cajiao for his help while testing this workflow.

-paul.

Asymmetric Waveforms: Should You Be Concerned?

In order to understand the attributes of asymmetric waveforms, it’s important to clarify the differences between DC Offset and Asymmetry …

Waveform Basics

A waveform consists of both a Positive and Negative side, separated by a center (X) axis or “Baseline.” This Baseline represents Zero (∞) amplitude as displayed on the (Y) axis. The center portion of the waveform that is anchored to the Baseline may be referred to as the mean amplitude.

wf-480

DC Offset

DC Offset occurs when the mean amplitude of a waveform is off the center axis due to differing amounts of the signal shifting to the positive or negative side of the waveform.

One common cause of this shift is when faulty electronics insert a DC current into the signal. This abnormality can be corrected in most file based editing applications and DAW’s. Left uncorrected, audio with DC Offset will exhibit compromised dynamic range and a loss of headroom.

Notice the displacement of the mean amplitude:

dc-offset-ex-480-png

The same clip after applying DC Offset correction. Also, notice the preexisting placement of (+/-) energy:

dc-offset-removed-480

Asymmetry

Unlike waveforms that indicate DC Offset, Asymmetric waveform’s mean amplitude will reside on the center axis. However the representations of positive and negative amplitude (energy) will be disproportionate. This can inhibit the amount of gain that can be safely applied to the audio.

In fact, the elevated side of a waveform will tap the target ceiling before it’s counterpart resulting in possible distortion and the loss of headroom.

High-pass filters, and aggressive low-end processing are common causes of asymmetric waveforms. Adding gain to asymmetric waveforms will further intensify the disproportionate placement of energy.

In this example I applied a high-pass filter resulting in asymmetry:

asymm-matural-480

Broadcast Chains

Broadcast engineers closely monitor positive to negative energy distribution as their audio passes through various stages of processing and transmission. Proper symmetry aides in the ability to process a signal more effectively downstream. In essence uniform gain improves clarity and maximizes loudness.

Podcasts

In spoken word – symmetry allows the voice to ride higher in the mix with a lower risk of distortion. Since many Podcast Producers will be adding gain to their mastered audio when loudness normalizing to targets, the benefits of symmetric waveforms are obvious.

If an audio clip’s waveform(s) are asymmetric and the audio exhibits audible distortion and/or a loss of headroom, a Phase Rotator can be used to reestablish proper symmetry.

Below is a segment lifted from a distributed Podcast (full zoom out). Notice the lack of symmetry, with the positive side of the waveform limited much more aggressively than the negative:

podcast-asymm-480

The same clip after Phase Rotation:

asymm-podcas-fixed-480

(I processed the clip above using the Adaptive Phase Rotation option located in iZotope’s RX 4 Advanced Channel Ops module.)

In Conclusion

Please note that asymmetric waveforms are not necessarily bad. In fact the human voice (most notably male) is often asymmetric by nature. If your audio is well recorded, properly processed, and pleasing to the ear … there’s really no need to attempt to correct any indication of asymmetry.

However if you are noticing abnormal displacement of energy, it may be worth looking into. My suggestion would be to evaluate your workflow and determine possible causes. Listen carefully for any indication of distortion. Often a slight EQ tweak or a console setting modification is all that may be necessary to make noticeable (audible) improvements to your audio.
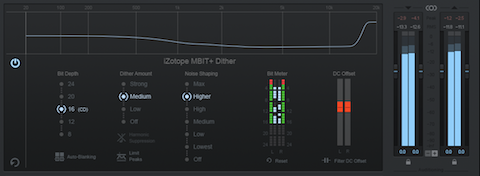
-paul.

Intermediate File Format for New Media Producers: MP2

mp2-file If you are in the audio production business or involved in some sort of collaborative Podcast effort, moving large lossless audio files to and from various locations can be challenging.

Slow internet speeds, Hotel WiFi, and server bottlenecks have the potential to cripple efficient file management and ultimately impede timely delivery. And let’s not forget how quickly drive space can diminish when storing WAV and/or AIFF files for archival purposes.

The Requirements for a Suitable Intermediate

From the perspective of a Spoken Word New Media Producer, there are two requirements for Intermediate files: Size Reduction and Retention of Fidelity. The benefits of file size reduction are obvious. File transfers originating from locations with less than ideal connectivity would be much more efficient, and the consumption of local or remote disk/server space would be minimized. The key here is to use a flexible lossy codec that will reduce file sizes AND hold up well throughout various stages of encoding and decoding.

Consider the possible benefits of the following client/producer relationship: A client converts (encodes) lossless files to lossy and delivers the files to the producer via FTP, DropBox, etc. The Producer would then decode the files back to their original format in preparation for post production.

When the work is completed, the distribution file is created and delivered (in most cases) as an MP3. Finally with a bit of ingenuity, the producer can determine what needs to be retained for archival purposes, and convert these files back to the intermediate format for long term storage.

How about this scenario: Podcast Producer A is located in L.A.. Producer B is located in NYC. Producer B handles the audio post for a double-ender that will consist of 2 individual WAV files recorded locally at each location.

DA

Upon completion of a session, the person in L.A must send the NY based audio producer a copy of the recorded lossless audio. The weekly published program typically runs upwards of 60 minutes. Needless to say the lossless files will be huge. Let’s hope the sender is not in a Hotel room or at Starbucks.

The good news is such a codec exists …

MPEG 1 Layer II (commonly referred to as MP2 with an .mp2 file extension) is in fact a lossy “perceptual” codec. What makes it so unique (by design) is the format’s ability to limit the introduction of artifacts throughout various stages of encoding and decoding. And get this – MP2’s check in at about 1/5th the size of a lossless source. For example a 30 minute (16 bit/44.1kHz) Stereo WAV file currently residing on my desktop is 323.5 megabytes. It’s MP2 counterpart is 58.7 megabytes.

Public Radio

If you look into the file submission requirements over at PRX (The Public Radio Exchange) and NPR (see requirements), you will notice MP2 audio files are what they ask for.

In fact during the early days of IT Conversations, founder and Executive Director Doug Kaye implemented the use of MP2 audio files as intermediates throughout the entire network based on recommendations by some of the most prominent engineers in the Public Radio space. We expected our show producers and content providers to convert their audio files to MP2 prior to submission to our servers using third party software applications.

Eventually a proprietary piece of software (encoder/uploader) was developed and distributed to our affilates. The server side MP2’s were downloaded by our audio engineers, decoded to lossless, produced, and then sent back up to the network as MP2 in preparation for server side distribution encoding (MP3).

From a personal perspective I was so impressed with the codec’s performance, I immediatly began to ask my clients to submit MP2 audio files to me, and I’ve never looked back. I have never experienced a noticeable degradation of audio quality when converting a client’s MP2 back to WAV in preparation for post.

Storage

In my view it’s always a good idea to have unfettered access to all previously produced project files. Besides produced masters, let’s not forget the accumulation of individual project assets that were edited, saved, and mixed in post.

On average my project folders that include audio assets for a 30 minute program may consume upwards of 3 Gigabytes of storage space. Needless to say an efficient method of storage is imperative.

Fidelity Retention

If you are concerned about the possibility of audio quality degradation due to compression artifacts, well that’s understandable. In certain instances accessability to raw, uncompressed audio will be more suitable. However I am convinced that you will be impressed with how well MP2 audio files hold up throughout various workflows.

In fact try this: (Suggested encoders listed below)

Convert a stereo WAV file to stereo MP2 (256 kbps). Compare the file sizes. Listen to the MP2 and assess fidelity retention. Then convert the stereo MP2 directly to stereo MP3 (128 kbps). Listen for any indication of noticeable artifacts.

Let me know what you think …

My recommendation would be to first experiment with converting a few of your completed project assets to MP2 in preparation for storage. I’ve found that I rarely need to dig back into old work. I have on a few occasions, and the decoded MP2’s were perfectly fine. Note that I always save a copy of the produced lossless master.

Specifications and Software

The requirements for mono and stereo MP2 files:

Stereo: 256 kbps, 16 bit, 44.1kHz
Mono: 128 kbps, 16 bit, 44.1kHz

There are many audio applications that support MP2 encoding. Since I have limited exposure to Windows based software, the scope of my awareness is narrow. I do know that Adobe Audition supports the format. In the past I’ve heard that dBPowerAmp is a suitable option.

On the Mac side, besides the cross platform Audition – there is a handy utility on the Mac App Store called Audio-Converter. It’s practically free, priced at $0.99. File encoding is also supported in FFmpeg either from the Command Line or through various third party front ends.

Here is the syntax (stereo, then mono) for Command Line use on a Mac. The converted file will land on your Desktop, named Output.mp2:

ffmpeg -i yourInputFile.wav -acodec mp2 -ab 256k ~/Desktop/Output.mp2

ffmpeg -i yourInputFile.wav -acodec mp2 -ab 128k ~/Desktop/Output.mp2

Here’s a good place to download pre-compiled FFmpeg binaries.

Many modern media applications support native playback of MP2 audio files, including iTunes and Quicktime.

In Conclusion

If you are in the business of moving around large Spoken Word audio files, or if you are struggling with disk space consumption issues, the use of MP2 audio files as intermediates is a worthy solution.

-paul.

iZotope Ozone 6

iZotope has released a newly designed version of Ozone, their flagship Mastering processor. Notice I didn’t refer to Ozone [6] as a plugin? Well I’m happy to report that Ozone [6] is now capable to run independent of a DAW as a stand-alone desktop processor.

oz6-480

Besides the stand-alone option and striking UI overhaul, Ozone’s flexibility has been greatly enhanced with the addition of support to host third party Audio Units and VST plugins. Preliminary tests here indicate that it functions very well in the stand-alone mode. More on this in moment …

I’ve been a customer and supporter of iZotope since early 2005. If I remember correctly Ozone 3 was the first version that I had access to. In fact back in the early days of Podcasting, many producers purchased an Ozone license based on my endorsement. This was an interesting scenario all due to the fact that most of the people in the community who bought it – had no idea how to use it! And so a steady flow of user support inquiries began to trickle in.

I decided the best way to bring users up to speed was to design Presets. I would distribute the underlying XML file and have the users move it to the proper location on their system’s. After doing so, the Preset would be accessible within Ozone’s Preset Manager.

The complexity of the Presets varied. Some people wanted basic Band-Pass filters. Others requested the simulation of a broadcast chain that would result in a signature sound for their recorded voice. In fact I remember one particular instance where the user requested a Preset that would make him sound like an “AM Radio DJ”. So I went to work and I think I made him happy.

As Ozone matured, it’s level of complexity increased resulting in somewhat sluggish performance (at least for me). When iZotope released Alloy 2, I bought it – and found it to be much more responsive. And so I sort of moved away from Ozone, especially Ozone 5. My guess is if my system’s were a bit more robust, poor performance would be less of an issue. Note that my personal experience with Ozone was not necessarily the general concensus. Up to this latest release, the plugin was highly regarded with widespread use in the Mastering community.

Over the past 24 hours I’ve been paying close attention to how Ozone users are reacting to this new version. Note that a few key features have been removed. The Reverb module is totally gone. Gating/Expansion has been removed from the Dynamics Module, and the Dithering options have been minimized. The good news is these particular features are not game changers for me based on how I use this tool. I will say the community reaction has been tepid. Some users are passing on the release due to the omissions that I’ve mentioned and others that I’m sure I’ve overlooked.

For me personally – the $99 upgrade was a no-brainer. In my view the stand-alone functionality and the support for third party plugins makes up for what has been removed. In stand-alone mode you can import multiple files, save your work as projects, implement processing chains in a specific order, apply head/tail cuts/fades, and export your work.

Ozone [6] will accept WAV, AIFF, or MP3 files. If you are exporting to lossless, you can convert Sample Rates and apply Dither. This all worked quite well on my 2010 MacPro. In fact the performance was quite good, with no signs of sluggish performance. I did notice some problematic issues with plugin wrappers not scaling properly. Also the Plugin Manager displayed duplicates of a few plugins. This did not hinder performance in any way. In fact all of my plugins functioned well.

And so that’s my preliminary take. My guess is this new version of Ozone is well suited for advanced New Media Producers who have a basic understanding of how to process audio dynamics and apply EQ. Of course there’s much more to it, and I’m around to answer any questions that you might have.

Look for more information in future posts …

-paul.

Podcast Loudness: Mono vs. Stereo Perception …

Consider the following scenario:

Two copies of an audio file. File 1 is Stereo, Loudness Normalized to -16.0 LUFS. File 2 is Mono, also Loudness Normalized to -16.0 LUFS.

Passing both files through a Loudness Meter confirms equal numerical Program Loudness. However the numbers do not reflect an obvious perceptual difference during playback. In fact the Mono file is perceptually louder than it’s Stereo counterpart.

Why would the channel configuration affect perceptual loudness of these equally measured files?

mono-LN-480

The Explanation

I’m going to refer to a feature that I came across in a Mackie Mixer User Manual. Mackie makes reference to the “Constant Loudness” principle used in their mixers, specifically when panning Mono channels.

On a mixer, hard-panning a Mono channel left or right results in equal apparent loudness (perceived loudness). It would then make sense to assume that if the channel was panned center, the output level would be hotter due to the combined or “mixed” level of the channel. In order to maintain consistent apparent loudness, Mackie attenuates center panned Mono channels by about 3 dB.

We can now apply this concept to the DAW …

A Mono file played back through two speakers (channels) in a DAW would be the same as passing audio through a Mono analog mixer channel panned center. In this scenario, the analog mixer (that adheres to the Constant Loudness principle) would attenuate the output by 3dB.

In order to maintain equal perception between Loudness Normalized Stereo and Mono files targeting -16.0 LUFS, we can simulate the Constant Loudness principle in the DAW by attenuating Mono files by 3 LU. This compensation would shift the targeted Program Loudness for Mono files to -19.0 LUFS.

To summarize, if you plan to Loudness Normalize to the recommend targets for internet/mobile, and Podcast distribution … Stereo files should target -16.0 LUFS Program Loudness and Mono files should target -19.0 LUFS Program Loudness.

Note that In my discussions with leading experts in the space, it has come to my attention that this approach may not be sustainable. Many pros feel it is the responsibility of the playback device and/or delivery system to apply the necessary compensation. If this support is implemented, the perceived loudness of -16.0 LUFS Mono will be equal to -16.0 LUFS Stereo. There would be no need to apply manual compensation.

-paul.