Recording Multiple Skype Clients On A Single Host System

**UPDATE 1: It appears current versions of Skype (e.g. ver.8.12.0.14) broke the capability to run multiple instances of Skype (via command line) on a Mac. I’m looking into a fix. You can use Source-Connect Now as a high quality Skype alternative. Two accounts will be necessary. Setup and Routing will be consistant with what is described in this documentation. Please contact me with questions …

**UPDATE 2: I solved the incompatability issue noted above by uninstalling Skype 8.xx for Mac and reverting back to Skype ver. 7.58 (501). Once again it is possible to run multiple instances of Skype (discrete accounts) on the host system by executing the terminal command noted in this documentation …

**UPDATE 3: It is now possible to run multiple instances of Skype 8.xx (discrete accounts) on the host system. I coded a Cocoa application capable of launching the discrete accounts. Contact me for details …

* * *

It is possible to record two (or more) independently connected Skype clients on discrete tracks on a single computer in RT. The workflow requires independent Mix-Minus feeds configured in a supported DAW such as Pro Tools or Logic Pro.

Plausible Session Senarios:

(Scenario A) Typical Podcast consisting of a Host + Skype Guest + Skype Guest. Dual Mix-Minus feeds are implemented in the Host’s DAW. All participants recorded on discrete tracks in RT utilizing two individual incoming Skype clients running simultaneously on the Host system.

(Scenario B) Engineer + Skype Session Participant + Skype Session Participant. Dual Mix Minus feeds are implemented in the Host’s DAW. Both participants recorded on discrete tracks utilizing two individual incoming Skype clients running simultaneously on the Host system.

Scenario B describes an engineering session providing support for independently located remote Skype participants who seek recording and post services. The workflow frees the participants from recording responsibilities and file management.

As noted both Scenarios require the use of two individual Skype clients running simultaneously on the Host/Engineer’s system. This concept is publicly documented using various methods.

What differentiates my workflow is the use of virtual routing within the Recording Session on a single machine. Dual Mix-Minus feeds are implemented in the Host’s DAW with zero dependency on hardware Aux Sends.

Loopback by Rogue Amoeba is used to create Virtual Devices and Pass-Thru’s. They will be encapsulated in an Aggregate Audio Device created in OSX. Additionally, my working Motu Audio Interface (8×8) will be added to the Aggregate Device for maximum flexibility.

Dual Mix-Minus

The intent of a single Mix-Minus feed is to send a Host’s audio back to a Session participant. This is commonly implemented on a hardware mixer or console using an Aux Send. It is nothing more than a discrete audio output with a level control.

When adding a second participant, the Host’s audio is routed to both participants using two Aux Sends (A), (B). The implemented Sends are also used to establish communication between the included participants.

For example:

Send (A) contains the Host + Participant 1 —-> signal is routed to Participant 2
Send (B) contains the Host + Participant 2 —-> signal is routed to Participant 1

Virtual Device Creation

The following I/O configuration is necessary for the described Host/Engineer + Skype 1 + Skype 2 scenario:

3 Mono Inputs: [Host] + [Skype Client 1] + [Skype Client 2]
2 Mono Outputs: [Host/Skype Client 1] + [Host/Skype Client 2]

Additional output routing will be necessary for monitoring and external recording. We will address this in a moment.

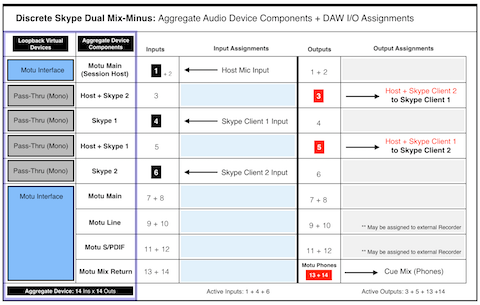
Please review the following I/O Matrix table:

Column 1 lists six Virtual Devices created in Rogue Amoeba’s Loopback application. Column 2 lists their associated user defined names.

• An initial Motu Audio Interface instance is created with inputs/outputs 1+2 mapped for use. Input 1 will represent the Host Mic.

• Four individual (Mono) Pass-Thru Devices are created:

Input 4 will be mapped to Skype Client 1
Input 6 will be mapped to Skype Client 2

Output 3 will include [Host + Skype Client 2]
Output 5 will include [Host + Skype Client 1]

• A secondary Motu instance is created with all available inputs/outputs mapped for use (8×8 by default). This will supply additional routing flexibility for monitoring and external recording. In fact the I/O Matrix table displays the use of outputs 13+14 for the Cue Monitor Mix (Phones).

Note the Inputs and Outputs are purposely alternated to prevent direct patching and subsequent feedback.

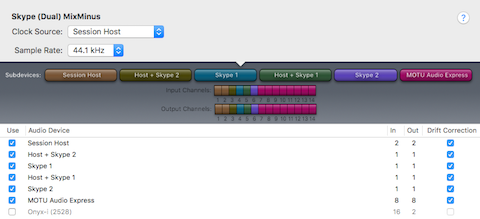
These user defined Loopback Virtual Devices will appear in the Mac OSX Audio MIDI Setup utility. They can be used individually. They can also be combined, thus creating a cumulative (Aggregate) Audio Device. We will utilize both options (individual Virtual Devices for Skype Clients + cumulative Aggregate as the DAW’s default I/O).

Aggregate Device

The image below displays a user defined Aggregate Audio Device created in OSX using the Audio MIDI Setup utility. It is named Skype (Dual) MixMinus. Notice how I’ve selected the Virtual Devices created in Loopback as Subdevices. Also notice how each Subdevice accurately displays input and output I/O mapping for a total of 14 inputs + 14 outputs. This matches the configuration displayed in the I/O Matrix table diagram above. The Aggregate Audio Device is now ready for DAW integration.

DAW Implementation

For this demonstration I will be using Pro Tools with the Skype (Dual) MixMinus Aggregate set as the Playback Engine (it’s default Session I/O). This configuration has also been successfully implemented in Logic Pro X. It has not been tested in Adobe Audition.

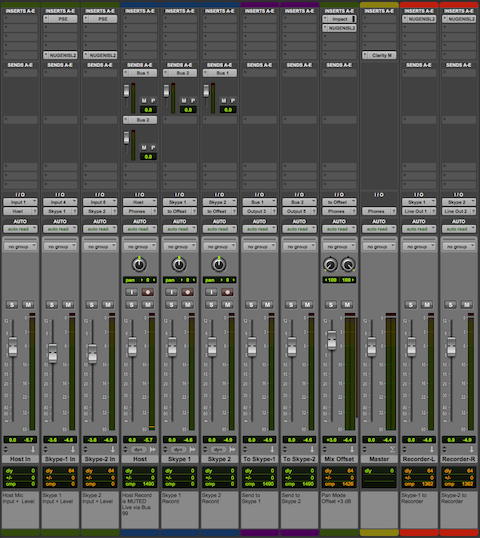
The Chanel Strip configuration will be described in sequential order. Please note the described Session configuration is more complex than what is required.

The first 3 Channel Strips (Green) are mono Auxiliary Inputs. Their assigned Inputs are the Host Mic, Skype Client 1, and Skype Client 2. Notice how the assigned inputs match the input configuration as displayed in the I/O Matrix table diagram (1 + 4 + 6).

The Faders on these Channel Strips function as input level controllers for each source input before the signals reach the pre-fader recording tracks.

Two audio plugins are inserted on each Skype Client input Channel Strip (Downward Expander and Limiter). The Expanders will transparently attenuate the inactive input. The Limiters will function as a safeguard thus preventing unexpected signal level overload. Plenty of headroom is maintained. In essence the Limiters will rarely engage.

Tracking Configuration

The outputs of the source input Channel Strips are routed (via virtual Buses) to the inputs of 3 standard mono Audio Channel Strips (Blue). When armed, they will record the source inputs discretely.

Sends

The Host Channel contains 2 active Sends passing audio to Bus 1 and Bus 2.
The Skype 1 Channel contains 1 active Send passing audio to Bus 2.
The Skype 2 Channel contains 1 active Send passing audio to Bus 1.

Returns

2 additional Auxiliary Input Channel Strips (Purple) receive signal from Send Buses 1 + 2.

Configuration as follows:

• The To Skype-1 input is set to Bus 1. This Bus includes the tapped Host audio and the tapped Skype 2 client audio. It’s output is set to Output 3.

• The To Skype-2 input is set to Bus 2. This Bus includes the tapped Host audio and the tapped Skype 1 client audio. It’s output is set to Output 5.

Notice how the assigned outputs (3 + 5) match the output configuration displayed in the I/O Matrix table diagram.

At this point we’ve created a dual Mix-Minus in the mixer…

* * *

Monitoring and Pan Offset

Pro Tools attenuates center-panned mono tracks according to a user defined Pan Depth setting. My setting is always -3 dB.

Here’s how I reconstitute the attenuation:

Notice the outputs of the Skype 1 and Skype 2 audio tracks are routed to a stereo Bus labeled to Offset. An Auxiliary Input Channel Strip (Green, labeled Mix Offset) receives the audio from the to Offset virtual Bus. I use the Channel Strip fader to add +3 dB of static gain to reconstitute the previously applied attenuation on the passing signal.

The Mix Offset Channel Strip’s output is set to Phones. This signal path represents the Interface Headphone outputs (13+14). They are referenced in the I/O Matrix table diagram.

The Master Fader’s (Yellow) output is also set to Phones. This configuration allows the engineer to monitor the Skype participants via headphones connected to the Motu Interface.

Notice the output for the Host Audio Track is set to Mute Bus. This is an unassigned virtual Bus. The Host Mic input is directly monitored (also via headphones) through the Motu Interface. Setting the Host channel output to the Session’s Phones output Bus will blend the hardware monitored mic signal with the slightly latent Session output. Using the unassigned Bus solves this. Of course in Post the hardware monitored signal will be absent. In this case the output must be reassigned to the Phones output Bus.

Skype

In preparation for recording, two independent instances of Skype (using unique accounts) must be launched on the Host System.

My Preferred method:

1) Launch Skype as normal and login to your primary account.

2) In the Skype Preferences/Audio/Video – define the Microphone (input) and Speakers (output) as displayed:

Notice we revert back to independent Virtual Devices created in Loopback for the configuration of this Skype instance. The Host + Skype 2 device is essentially output 3 in the configured DAW. It passes the Host + Skype Client 2 audio to this running instance of Skype.

[Speakers: Skype 1] is mapped to input 4, previously assigned in the DAW’s configured Session.

3) To launch the second instance of Skype – run the OSX Terminal application and execute the following command:

open -na /Applications/Skype.app –args -DataPath /Users/$(whoami)/Library/Application\ Support/Skype2

(I created an executable Shell Script that runs the displayed command. Once created, simply double click it’s icon to launch Skype).

A second instance of Skype will launch and prompt you for credentials. Login using your secondary Skype account.

4) In the Skype Preferences for this instance – define the Microphone (input) and Speakers (output) as displayed:

Once again we revert back to independent Virtual Devices created in Loopback for the configuration of this Skype instance. The Host + Skype 1 device is essentially output 5 in the configured DAW. It passes the Host + Skype Client 1 audio to this running instance of Skype.

[Speakers: Skype 2] is mapped to input 6, previously assigned in the DAW’s configured Session.

Recording in the Box

After launching and configuring the Skype instance(s), arm the DAW’s Host, Skype 1, and Skype 2 audio tracks for recording. Connect with the independent Skype participants. Both participants will be able to converse with each other + the Host. Recording the Session will supply discrete audio files for each participant on their respective tracks.

External Recording

In the I/O Matrix diagram you will notice the availability of two sets of stereo outputs (9+10 , 11+12). They represent the Line Outputs and the S/PDIF output on the Motu Interface. Remember the Interface is a Subdevice within the defined Aggregate Device. As a result the noted inputs and outputs are available within the DAW Session for patching.

Also notice the last two Channel Strips (Red) displayed in the Session mixer. They are Auxiliary Input Channel Strips. Their inputs are assigned to the Skype 1 and Skype 2 output Buses. Each Channel Strip output is mapped to corresponding Motu Interface Line Outputs and finally patched to the L+R inputs of an external solid state stereo recorder.

In this particular example only the Skype Participants will be recorded externally. My intension is to engineer Sessions containing two remote clients. In this case it’s a viable solution for out of the box Session recording.

Inserts

You will notice a few additional Audio Plugins inserted on various Channel Strips. A Mix Bus Compressor and a Limiter are inserted on the Mix Offset Channel Strip.

The Inserts located on the Master Fader are post fader. Here I’ve inserted the Clarity M routing plugin. This passes the signal to an external (hardware) Loudness Meter via USB.

Finally I’ve inserted Limiters on each of the external recorder Buses. Again they are set to maintain maximum headroom, and only exist to prevent unexpected signal level overload before the audio reaches the recorder.

Of course Plugin implementation in general will be subjective.

Notes

The complexity of the Session can be customized or even minimized to suit your needs. Basic requirements include a properly configured Aggregate I/O, 3 audio tracks capable of recording, 2 Aux Sends, and a Master Fader. The dual Skype requirement is necessary and straightforward.

It is possible to add support for additional running Skype clients. This will require additional (mono) Loopback Pass-Thru Virtual Devices, and further customization of the Aggregate Audio Device + DAW Session.

I defined custom Incoming Connection Ports for each Skype Instance. This option is available in Skype Preferences/Advanced. Port Mapping was managed in my Router’s configuration utility.

I closely monitored System Resources throughout testing and checked for potential deficiencies. Pro Tools performed well with no issues. Each running instance of Skype displayed less than 14% CPU usage. Memory consumption was equally low. Note my Quad 2.8 GHz Mac Pro has 32 gigs of RAM and four dedicated media drives.

Undoubtedly someone will state this implementation is “much too complicated for the common Podcaster,” or even “Broadcaster.” With respect I’m not necessarily targeting novices. Regardless, you will most certainly require skills and experience in DAW and I/O signal routing.

Please note a Mix-Minus feed in general is not some sort of revelation. It’s pretty basic stuff. You’ll need a full understanding of it as well.

If you have questions I am happy to help. If you would like to participate in a test, ping me. If you are overwhelmed please revert to a service such as Zencastr.

-paul.
Hardware Inserts In Your DAW

It is possible to implement support for use of external hardware processing components within your software DAW. This support is common in music recording and audio post production environments.

When properly implemented, operators have the capability to insert an instance of an external component (or chain) on a DAW audio track just like any other installed third party software plugin.

Besides potential tonal advantages, routing through a specialized external component can be less taxing on the host system’s resources.

Requirements

1 – Your Interface must have an available output (mono or stereo) for routing audio to an external component. You will also need an available input (again, mono or stereo) to accept the processed audio.

2 – Your DAW must support the routing.

Pro Tools and Logic Pro X

In the Pro Tools I/O settings you must define a set of available (and matching) Interface inputs and outputs for signal routing. In Logic Pro X, there is an I/O routing option plugin included in the Utility plugins group.

Have a look at the routing configuration options for both DAWS:

Inserts_small

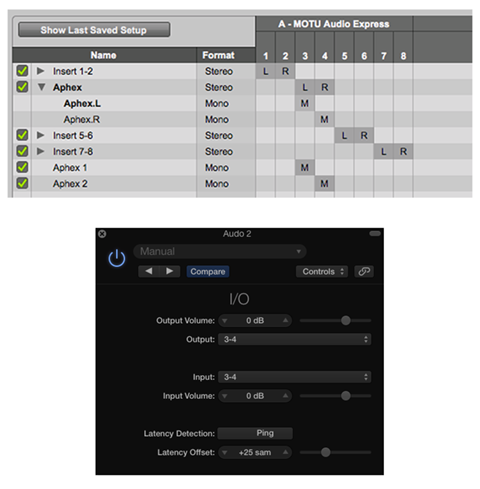
The upper image displays a Pro Tools Insert Routing matrix. The default audio interface has a total of 8 inputs and outputs available as discrete I/O mono channels. They can remain as such. Alternatively, they can be paired to create four stereo signal paths.

I’ve defined three instances or parent paths of “Aphex” inserts using interface inputs and outputs 3 + 4. My processing chain supports a stereo signal flow or discrete dual mono.

The first Aphex instance is a stereo insert. Clicking the disclosure triangle reveals two associated mono channels that make up the stereo pair. This configuration translates in Pro Tools as a stereo hardware insert or as two discrete mono inserts.

At the bottom of the list I’ve also created two custom mono paths the will pass audio to discrete mono component channels. This alternative solution is unnecessary in this particular configuration. The stereo instance above provides the same level of flexibility with support for mono accessibility. Just be aware of the configuration flexibility.

The lower image displays a Logic Pro X stereo I/O instance as it would appear when inserted on any track. Notice how I am using the same combination of interface channels (3 + 4) to output the signal to external components, and to route the processed audio back into the DAW.

Use Case

Let’s say you are the proud owner of the very affordable and recommended dbx 266xs Dynamics Processor. You would like to use it to pre-process a discrete channel Skype session in realtime. This dbx Compressor, Limiter, and Gate can function as a dual mono processor. With routing properly configured, you can insert mono instances of the hardware processor on discrete tracks in your DAW session. Simply customize settings for each dbx channel and fire away.

266xs_small

My Chain

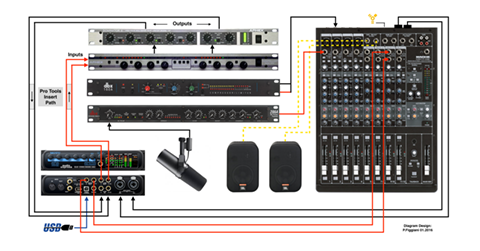
Over the years I’ve accumulated various analog audio processors by Telos, dbx, and Aphex. In the displayed diagram I disclose part of my current configuration with a few active components.

hardware_inserts-small

Before I get into the Pro Tools insert path configuration, let me explain the basic signal routing:

• I use a Mackie Onyx 1220i FW Mixer in combination with a Motu Audio Express USB/FW Interface. The Mackie controls a POTS line mix-minus using a Telos Digital Hybrid. The mixer also controls signal routing scenarios and recording on a Marantz CF Recorder. I use the mixer’s Control Room outputs to feed the inputs of a power amplifier to drive my JBL near-field monitors.

• The Motu’s Main Outputs are patched to the mixer. This audio is available on the Control Room outputs. I can easily switch back and forth between the mixer and the interface, designating one or the other as the default I/O.

• The mixer also functions as a secondary gain stage for the mic signal path. Notice how the mic is directly connected to the dbx 286A Voice Processor. It’s balanced line output feeds the channel 1 line input on the Mackie. The balanced Mackie Main Outputs are set to deliver a Mic Level signal. They feed the Mic Level inputs on the Motu interface. These inputs can be linked and routed to a single stereo DAW track. Alternatively I can designate the inputs to deliver discrete mono. This is handy when a second mic is integrated

• The dbx160a is a single channel (mono) compressor. It is connected to the Mackie’s channel 2 insert. I can use this device as a serial processor on mixer channel 2. I can also insert it on the channel that returns a telco caller’s POTS audio back to the mixer. In this scenario I can easily bypass it’s use on an insert and instead connect it in-line.

• All system connections are made with balanced XLR and TRS cables.

Not pictured: Aphex Expressor (mono) Compressor, Aphex 622 Expander/Gate, and Aphex two channel Parametric EQ.

Hardware Chain Insert

Let’s focus on the Pro Tools Insert path, instantiated on a stereo audio track:

The two (pictured) devices that I am currently using for external audio processing are by Aphex: 320a Compellor, and the 720 Dominator II. The 320a Compellor is widely used in radio broadcast facilities. This device can be configured to function as a Leveler, Compressor, or a mixture of both. A Process Balance setting controls the Leveling and Compression weighting. It supports stereo and dual mono processing. The current “D” version supports AES/EBU Digital I/O.

The Dominator II is a 3-band Peak Limiter with adjustable crossovers and zero overshoot. This device is also widely used in broadcast facilities and for live performances. The current 722 version features enhanced broadcast processing support, including Pre-Emphasis and De-Emphasis options.

With the Motu interface designated as the default I/0, it’s 3+4 Line Outputs route audio via insert from a Pro Tools audio track to the Compellor’s inputs. The Compellor’s outputs feed the Dominator II’s inputs. It’s outputs feed the Motu’s Line Inputs, routing the processed audio back to the DAW track where the hardware insert was originally instantiated.

A Skype session would be an obvious use option. In this case I would implement discrete mono hardware processing using two separate insert instances. In fact I can use this configuration when recording any audio source, or as a realtime processing option for output, playback, and streaming.

As far as playback, the Motu interface supports a Mix 1 Return option. In essence I can assign my system’s output into Pro Tools. With Input Monitoring activated, I can route the signal through the external processors and monitor the wet audio. This is a handy feature during playback of poorly produced programs.

Audition

Unfortunately Adobe Audition does not support hardware inserts. However there are various ways to integrate your external components in a multitrack session. For example you can assign a track’s output (or outputs) to an available interface output that feeds an external component’s input (or inputs). The processed audio is then routed to available interface inputs. By defining this active interface input as a track input, you essentially route processed audio back into the session.

This signal routing option will work in any DAW. Be aware you run the risk of initiating feedback loops!. To avoid this please make sure the software routing utility for the particular interface is properly configured.

In Conclusion

It is easy to integrate your analog gear in your software DAW. Use case scenarios are endless. Of course support and effectiveness will vary across all components and applications. I will say it’s a pretty cool feature, especially when software versions of coveted analog devices simply do not exist.

-paul.

Skype, Logic Pro X, and Aggregate Devices …

Scenario:

Studio Host and Skype participant to be recorded inside Logic Pro X on a single machine (single pass) with no additional hardware other than a Mic Input Device.

Objectives:

[– Two independent mono Host/Participant stems with no processing.

[– One processed split-stereo mixdown of the session with the Host and Guest residing on discrete (L+R) channels.

[– Real time Processing and Recording of all instances.

skype-waves-small

Of course the objectives noted above are easily attainable using two independent machines, with the recording box running Logic Pro X and the Skype machine handling the connection. In this case you would also need to use a mixer to set up a proper mix-minus.

You can also implement similar workflows by using two inexpensive USB audio interfaces connected to a single machine.

Considering the resourcefulness of today’s modern day Macs, I’m confident the following workflow will be successful freeing the user from complexities and added costs.

OSX Aggregate Devices

The foundation of this setup is based on a user created Aggregate Audio Device. Aggregate devices appear in the OSX System Preferences/Sound I/O options for system wide use. By wrapping supported “Subdevices” into a single Aggregate, you effectivly create a sort of cumulative Input Device that can be designated in Logic as the default. We also need a software utility that supports routing of the Skype Output to an Input in Logic.

I originally created this workflow using SoundFlower that was installed on my secondary iMac and carried over form previous versions of OSX. SoundFlower, along with the iMac’s Line Input were wrapped into a single Aggregate Device, and then designated in Logic as the default Input.

This worked well. However, I had no plans to install the now unsupported SoundFlower on my production MacPro for further testing. And so I looked around for a suitable up to date (and actively developed) replacement for SoundFlower.

Sound Siphon

Sound Siphon by Static Z Software “… makes your Mac’s Audio Output available as an Audio Input Device. It enables you to send audio from one application to another where it can be processed, streamed, or recorded.

Exactly what I needed.

Note that Sound Siphon is very diverse in terms of features. And the developer states that many useful enhancements are in the works. You can download a restricted demo. My hope is that you consider purchasing a $29.99 license. This will ensure the longevity of the application and continued development. Note that I have no affilation and I gladly purchased a license.

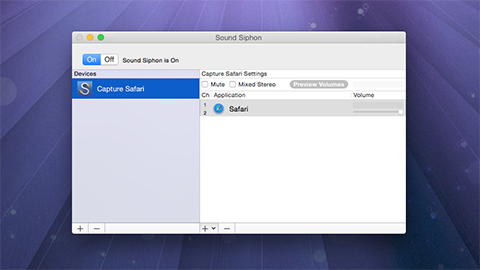
This is a snapshot of Sound Siphon:

ss-small

In the example above I display a user defined Device (“Capture Safari”) that is essentially a Custom Audio Input. I then associated the Safari Application with this device. This becomes a system wide option to capture Safari audio. For example QuickTime X will now display “Capture Safari” as an Input option for audio recording.

It’s important to note that this particular Sound Siphon feature is supplemental to the Skype recording implementation. In other words – it’s an entrley different use case scenario. My goal here is to disclose the flexibility of the application.

Creating the Aggregate Device

Input 1 on my Mackie Onyx 1220i Mixer receives the output from a dbx 286A Voice Processor. The studio Mic is connected to the processor for proper gain staging. I needed to wrap the Mic signal along with the Skype audio into a single Input Device and designate it in Logic’s Preferences for proper routing.

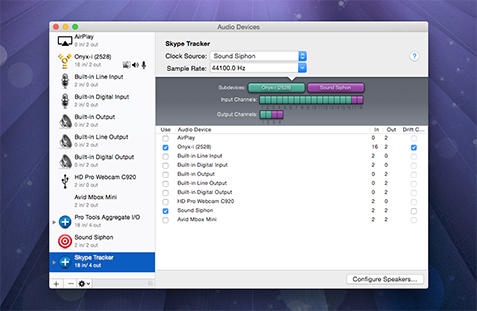
To create an Aggregate Device, open Audio MIDI Setup, located in ~/Applications/Utilities. When creating a new Aggregate, supported Subdevices appear in the right side setup table.

midi-small-44

Notice that Sound Siphon is listed as a 2 in/2 out device in the left source view. This is created when you install the application. Once installed, it will be available to be wrapped into an Aggregate Device along with pre-existing devices.

For my implementation I created “Skype Tracker” as a new Aggregate and selected my mixer (Onyx-(2528)) and Sound Siphon as Subdevices. Up top you set your Sample Rate and the Clock Source. My system seems to perform better with Sound Siphon set as the Clock Source.

It’s important to review the Input Channel matrix of the new Aggregate Device. Notice that Sound Siphon will only support Input channels (17+18). When routing Inputs in Logic, I will use Input 1 for the studio Mic and Input 17 for Skype.

Skype

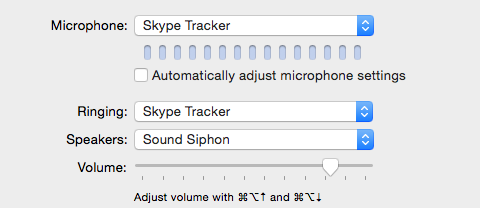
Here are the Skype settings that I am using:

skype-44

The Microphone is set to the Aggregate Device. The Speakers option is set to Sound Siphon. This setting is imperative and from what I can tell non-flexiable.

Logic Pro X

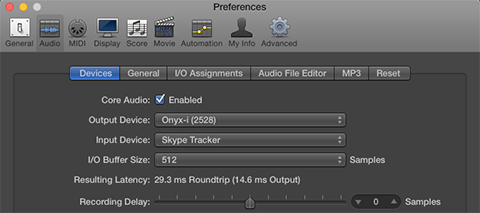
The first thing we need to do is define the Input Device in Global Preferences/Audio/Devices. I set mine to the Aggregate Device:

prefs-sm-44

Next we will address setup and routing. What’s important here is that I use an Object in Logic that may not be immediately obvious in your particular installation.

Specifically, I often use Input Channel Strip Objects in my projects. They are implemented in the Environemnt (aka “MIDI Environment”). It is accessible form the Logic Window Menu.

From the Logic Docs regarding Input Channel Strips:

“The Input Channel Strip allows you to directly route and control signals from your audio hardware’s Inputs. Once an Input Channel Strip is assigned to an Audio Channel Strip, it can be monitored and recorded directly into Logic Pro, along with its effect plug-ins.

The signal is processed, inclusive of plug-ins even while Logic Pro is not playing. In other words, Input Channel Strips can behave just like external hardware processors. Aux sends can be used pre- or post-fader.

Input Channel Strips can be used as live Inputs that can stream audio signals from external sources (such as MIDI synthesizers and sound modules) into a stereo mix (by bouncing an Output Channel Strip).”

You can also create Bus Channel Strip Objects in the Environment. They are not the same as Auxiliary Channel Strips and can be quite useful in certain instances. For more information about Bus Channel Strips please refer to this article.

The Environment

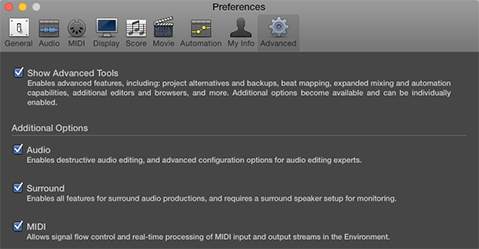
To expose the accessibility of the Logic Environment, open global Preferences and access the Advanced options. The MIDI option needs to be selected as part of the Advanced Tools:

prefs-small

Once that setting is ticked, “Open Midi Environment” will appear as an option in the Logic Window Menu.

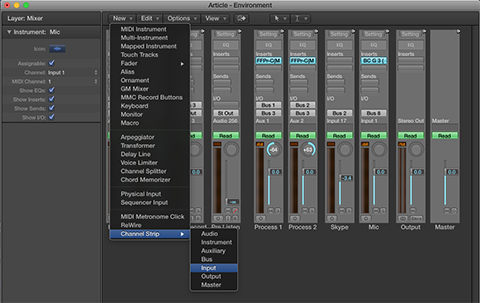
Channel Strip Objects are added to the Environment from the New Menu/Channel Strip. Notice how the Environment emulates the Project Mixer:

add-env-sm-55

Note that when adding Input Channel Strips in the Environment, you must define the corresponding (Aggregate) Device Inputs using the Channel Strip editor:

env-sm-77

For this particular project I created two Input Channel Strips in the Environment using Inputs 1 and 17 respectively, based on Aggregate Subdevice availability (Input 1 = Mic, Input 17 = Skype).

You will also need 4 Audio Tracks (2 Mono, 1 Stereo, 1 PreListen), and 2 (Mono) Auxiliary Channel Strips. Create Audio Tracks using the Track/New Tracks option – located in the Logic Application Menu. Add Auxiliary Channel Strips using the Mixer’s Options Menu/Create New … || Note that the Input Channel Strips created in the Environment should be designated Mono.

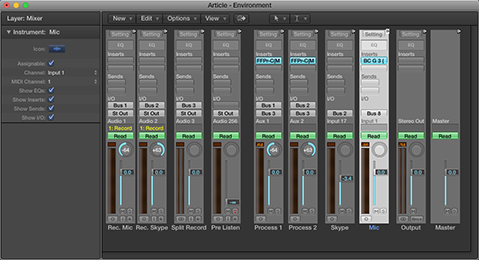
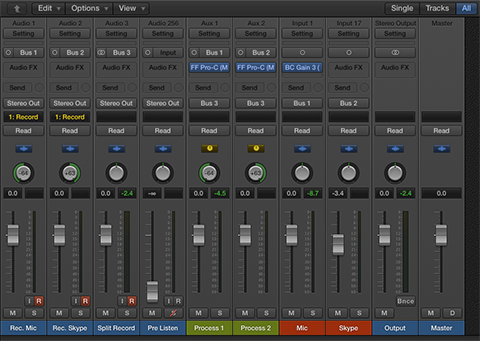
Here is my Project Mixer with all necessary Objects and Routing:

mixer-new-sm-44

Routing

The reddish labeled channels are the two Input Channel Strips that I created in the Environment. If you look at the text at the very top of these Channel Strips, you will see their Input designations.

The signals coming in through the Inputs are routed to their own independent Aux Channels for processing. Notice I inserted a Gain Trim on the Mic Input Channel. All processing options are of course subjective. One example would be to insert two instances of a Compressor on each Aux Channel. You would set these up to apply real time, non-aggresive dynamic range compression as you record.

Moving forward – notice the Aux Channels are Mono and hard panned L+R respectivly. This will maintain channel separation when recording the split-stereo version of the session. In this example each Aux Channel Output is routed to Audio Channel 3 (“Split Record”). This Stereo Audio Track is panned center. When armed it will record the Aux Channel Outputs to a split-stereo file.

Also study how I set up the remaining Audio Tracks – Audio Track 1 (“Rec. Mic”) and Audio Track 2 (“Rec. Skype”). Their Inputs are set to Bus 1 and 2 respectively, allowing these tracks to receive the unprocessed Outputs (“dry” audio) from the Input Channel Strips.

Keep in mind that if Effects are inserted on the Input Channel Strips, the audio routed to Audio Tracks 1+2 will be processed. In most cases I would not insert any Effects on the Input Channel Strips other than Gain. My intension here is to record dry stems.

I Grouped various aspects of these two channels, mainly Volume, Mute, Solo, and Record. This will link the faders and make it easy to control audibility of the mono stems cumulatively.

Wrap Up

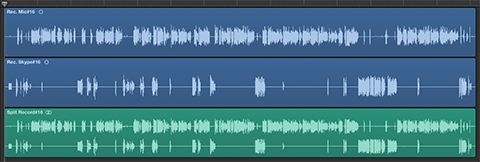
That’s basicilly it. You can record/monitor all tracks in real time. And when you are done, there is no need to bounce, although you still can. You simply “Export” or “Export Region” as an individual file(s).

waves-22-small

Notes

You may have noticed the Outputs for the Auxiliary Channel Strips (1+2) and the Input for Audio Track 3 (“Split Record”) is Bus 3. This is in fact a virtual (permanent) Bus used to route the processed audio to Track 3 for recording.

When you select a permanent virtual Bus in Logic for routing, an Auxiliary Channel Strip is auto-created and will appear in the Mixer. For this particular workflow – we use two Auxiliary Channel Strips, one for Mic processing and a second for Skype processing.

Throughout this entire workflow no changes were made to my default OSX Audio I/O Settings located in System Preferences/Sound.

As I always say – Audio Tracking and Post are highly subjective arts. In fact many Logic “experts” have never heard of or utilized the options in the Environment. And your processing options are also subjective. My hope is this documentation will at the very least introduce you the creation and usage of Aggregate Devices.

If by chance you develop a successful alternative solution, all well and good. In my tests I’ve found the documented implementation to work quite well.

Let me know if you have any questions.

I’d like to thank my friend Victor Cajiao for his help while testing this workflow.

-paul.

Intermediate File Format for New Media Producers: MP2

mp2-file If you are in the audio production business or involved in some sort of collaborative Podcast effort, moving large lossless audio files to and from various locations can be challenging.

Slow internet speeds, Hotel WiFi, and server bottlenecks have the potential to cripple efficient file management and ultimately impede timely delivery. And let’s not forget how quickly drive space can diminish when storing WAV and/or AIFF files for archival purposes.

The Requirements for a Suitable Intermediate

From the perspective of a Spoken Word New Media Producer, there are two requirements for Intermediate files: Size Reduction and Retention of Fidelity. The benefits of file size reduction are obvious. File transfers originating from locations with less than ideal connectivity would be much more efficient, and the consumption of local or remote disk/server space would be minimized. The key here is to use a flexible lossy codec that will reduce file sizes AND hold up well throughout various stages of encoding and decoding.

Consider the possible benefits of the following client/producer relationship: A client converts (encodes) lossless files to lossy and delivers the files to the producer via FTP, DropBox, etc. The Producer would then decode the files back to their original format in preparation for post production.

When the work is completed, the distribution file is created and delivered (in most cases) as an MP3. Finally with a bit of ingenuity, the producer can determine what needs to be retained for archival purposes, and convert these files back to the intermediate format for long term storage.

How about this scenario: Podcast Producer A is located in L.A.. Producer B is located in NYC. Producer B handles the audio post for a double-ender that will consist of 2 individual WAV files recorded locally at each location.

DA

Upon completion of a session, the person in L.A must send the NY based audio producer a copy of the recorded lossless audio. The weekly published program typically runs upwards of 60 minutes. Needless to say the lossless files will be huge. Let’s hope the sender is not in a Hotel room or at Starbucks.

The good news is such a codec exists …

MPEG 1 Layer II (commonly referred to as MP2 with an .mp2 file extension) is in fact a lossy “perceptual” codec. What makes it so unique (by design) is the format’s ability to limit the introduction of artifacts throughout various stages of encoding and decoding. And get this – MP2’s check in at about 1/5th the size of a lossless source. For example a 30 minute (16 bit/44.1kHz) Stereo WAV file currently residing on my desktop is 323.5 megabytes. It’s MP2 counterpart is 58.7 megabytes.

Public Radio

If you look into the file submission requirements over at PRX (The Public Radio Exchange) and NPR (see requirements), you will notice MP2 audio files are what they ask for.

In fact during the early days of IT Conversations, founder and Executive Director Doug Kaye implemented the use of MP2 audio files as intermediates throughout the entire network based on recommendations by some of the most prominent engineers in the Public Radio space. We expected our show producers and content providers to convert their audio files to MP2 prior to submission to our servers using third party software applications.

Eventually a proprietary piece of software (encoder/uploader) was developed and distributed to our affilates. The server side MP2’s were downloaded by our audio engineers, decoded to lossless, produced, and then sent back up to the network as MP2 in preparation for server side distribution encoding (MP3).

From a personal perspective I was so impressed with the codec’s performance, I immediatly began to ask my clients to submit MP2 audio files to me, and I’ve never looked back. I have never experienced a noticeable degradation of audio quality when converting a client’s MP2 back to WAV in preparation for post.

Storage

In my view it’s always a good idea to have unfettered access to all previously produced project files. Besides produced masters, let’s not forget the accumulation of individual project assets that were edited, saved, and mixed in post.

On average my project folders that include audio assets for a 30 minute program may consume upwards of 3 Gigabytes of storage space. Needless to say an efficient method of storage is imperative.

Fidelity Retention

If you are concerned about the possibility of audio quality degradation due to compression artifacts, well that’s understandable. In certain instances accessability to raw, uncompressed audio will be more suitable. However I am convinced that you will be impressed with how well MP2 audio files hold up throughout various workflows.

In fact try this: (Suggested encoders listed below)

Convert a stereo WAV file to stereo MP2 (256 kbps). Compare the file sizes. Listen to the MP2 and assess fidelity retention. Then convert the stereo MP2 directly to stereo MP3 (128 kbps). Listen for any indication of noticeable artifacts.

Let me know what you think …

My recommendation would be to first experiment with converting a few of your completed project assets to MP2 in preparation for storage. I’ve found that I rarely need to dig back into old work. I have on a few occasions, and the decoded MP2’s were perfectly fine. Note that I always save a copy of the produced lossless master.

Specifications and Software

The requirements for mono and stereo MP2 files:

Stereo: 256 kbps, 16 bit, 44.1kHz
Mono: 128 kbps, 16 bit, 44.1kHz

There are many audio applications that support MP2 encoding. Since I have limited exposure to Windows based software, the scope of my awareness is narrow. I do know that Adobe Audition supports the format. In the past I’ve heard that dBPowerAmp is a suitable option.

On the Mac side, besides the cross platform Audition – there is a handy utility on the Mac App Store called Audio-Converter. It’s practically free, priced at $0.99. File encoding is also supported in FFmpeg either from the Command Line or through various third party front ends.

Here is the syntax (stereo, then mono) for Command Line use on a Mac. The converted file will land on your Desktop, named Output.mp2:

ffmpeg -i yourInputFile.wav -acodec mp2 -ab 256k ~/Desktop/Output.mp2

ffmpeg -i yourInputFile.wav -acodec mp2 -ab 128k ~/Desktop/Output.mp2

Here’s a good place to download pre-compiled FFmpeg binaries.

Many modern media applications support native playback of MP2 audio files, including iTunes and Quicktime.

In Conclusion

If you are in the business of moving around large Spoken Word audio files, or if you are struggling with disk space consumption issues, the use of MP2 audio files as intermediates is a worthy solution.

-paul.

Internet Audio: True Peak Compliance …

Wide variations in average (Program/Integrated) Loudness are common across all forms of audio distributed on the internet. This includes audio Podcasts, Videocasts, and Streaming Media. This is due to the total lack of any standardized guidelines in the space. Need proof? Head over to Twit.tv and listen to a few minutes of any one of their programs. Use headphones, and set your playback volume to a comfortable level.

Now head over to PodcastAnswerMan.com, and without making any change to your playback volume – listen to the latest program.

I rest my case.

In fact, there is a 10 LU difference in average loudness between the two. Twit.tv programs check in at approximately -22 LUFS. PodcastAnswerMan checks in at approximately -12 LUFS. I find this astonishing, but I am not surprised. I’m not signaling them out for any lack of quality issues or anything like that. In my view both networks do a great job, and my guess is they have sizable audiences. Both shows are well produced and it simply makes sense to compare them in this case study.

With all this in mind let me stress that at this particular time I am not going to focus on discussing Program Loudness variations or any potential suggested standard. I can assure you this is coming! I will say that I advocate -16.0 LUFS (Program/Integrated Loudness) for all media formats distributed on the internet. Stay tuned for more on this. For now I would like to discuss True Peak compliance that will be a vital part of any recommended distribution standard.

What surprises me more than Program Loudness inconsistency is just how many producers are pushing files with clipped, distorted audio. In many cases Intersample Peaks are present in audio files that have been normalized to 0 dBFS. (For more information on Intersample Peaks please refer to this brief explanation). Producers need to correct this problem before their audio is distributed.

The Tools

One of the most useful features included in Adobe Audition is the Match Volume Processor. This tool includes various options that allow the operator to “dial in” specific average loudness and peak amplitude targets. After processing, the operator can examine the results by using Audition’s Amplitude Statistics analysis to check for accuracy.

mvp-1

Notice in the snapshot above I set the processor to Match To: Total RMS, with a -18.50 dB RMS average target. I’ve also selected the Use Limiting option. I’m able to dial in custom Look-Ahead and Release Time parameters as I see fit. Is there something missing? Indeed there is. Any time you push average levels you run the risk of clipping the source. In Audition the Match Volume/Use Limiting option lacks the capability for the operator to set a specific Peak Amplitude Ceiling. I’ve determined that in certain situations Peak Amplitudes reach a -0.1 dB ceiling resulting in possible clipped samples and True Peak levels that exceeded 0dBFS. Keep in mind this is not always the case. The results depend on the Dynamic Range and available Headroom of any source.

So how do we handle it?

Notice above the Match Volume Processor offers two Peak Amplitude options: Peak Amplitude and True Peak Amplitude. The European Broadcasting Union’s EBU R128 spec. dictates -1.0 dBTP (True Peak) as the ultimate ceiling to meet compliance. Here in the states ATSC A/85 dictates -2.0 dBTP. Since most, if not all audio formats distributed on the internet are delivered in lossy formats, it is important to pay close attention to True Peak Amplitude for both source (lossless) and distribution (lossy) files.

fgm

I advocate -1.0 dBTP as the standard for internet based audio file delivery. True Peak Limiters are able to detect and alleviate the possibility of Intersample Peaks from occurring. It is recommended to pass audio through a True Peak compliant limiter after loudness normalization and prior to lossy encoding. Options include ISL by Nugen Audio, Elixir by Flux, and (the best kept secret out there) TB Barricade by ToneBoosters. If you are running Audition, Match To: True Peak Amplitude and you should be all set.

The plugin developers mentioned above as well as Waves, MeterPlugs, tc electronic, Grimm Audio, and iZotope supply Loudness Meters and toolsets that display all aspects of loudness specifications including True Peak alerts. Visit this page for a list of supported Loudness Meters.

If True Peak detection and compliance is not within your reach due to the lack of capable tools, a slightly more aggressive ceiling (-1.5 dBFS) is recommended for Peak Normalization. The additional .5 dB acts as a sort of safety net, insuring maximum peak amplitude remains at or below -1.0 dBFS. One thing to keep in mind … performing Peak Amplitude Normalization after Loudness Normalization may very well result in a reduction in average, program loudness. Once again changes to the processed audio will depend on the audio attributes prior to Peak Normalizing.

Below I’ve supplied data that supports what I noted above. The table displays three iterations of a test file: Input, Loudness Normalized Intermediate, and final Output. For this test I used the ITU-R BS.1770-2 “Match To” option in Audition’s Match Volume Processor. I pushed the average target to -16.0 LUFS. As noted, this is the target that I advocate for internet and/or mobile audio. This target is +7 LU hotter than R128 and +8 LU hotter than ATSC A/85.

After processing the Input file, the average target was met in the Intermediate file, but True Peak overs occurred. The Intermediate file was then passed through a compliant True Peak Limiter with it’s ceiling set to -1.0 dBTP. Compliance was met in the Output with a minimal reduction in Program Loudness.

data-480

Producers: there is absolutely no excuse if your audio contains distortion due to clipping! At the very least you should Peak Normalize to -1.5 dBFS prior to encoding your lossy MP3. Every audio application on the planet offers the option to Peak Normalize, including GarageBand and Audacity. Best case scenario is to adopt True Peak compliance and learn how to use the tools that are necessary to get it done. If you are an experienced producer or professional, and you come across content that does not comply – reach out and offer guidance.

-paul.

colorFloat

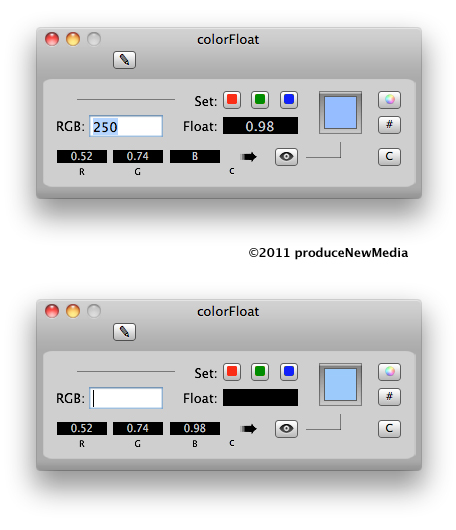
Last eve I was sifting through the Apple App Store looking for a simple utility to quickly convert RGB color values to corresponding float values (RGB integer / 255 = float). I decided to build my own Cocoa application with a few added enhancements.

High-res Image: colorFloat

Run the standard OSX Color Picker and press the second toolBar option (Color Sliders). Select the RGB Sliders option in the popup menu. Notice each RGB value changes as you move through the color spectrum. We can divide each one of the displayed values by 255 to return float values that can be used in source code authoring. In colorFloat the user adds an input RGB value (x3), converts, and appends each conversion result to the desired color channel. The final action displays the corresponding color for confirmation.

I also built in support for what I refer to as Dynamic Floats. Notice the Dynamic Floats HUD located in the high-res image. The Float value strings change dynamically as you move around the color wheel or change the values of the RGB sliders. This feature allows the user to easily sift through the color spectrum to view corresponding floats in real time.

Lastly, I added a simple Palette that consists of five Color Wells. The user can store colors for future access.

The app. turned out pretty well. I found it interesting to take a break from QTKit and explore a few unfamiliar Cocoa Classes.

Notes:

When I find the time I’ll be writing about a bunch of new stuff, mainly Adobe Audition for the Mac, Final Cut Pro X, and a new media playback application that I am finishing up with interesting support for images captured with one of my favorite iPhone apps. – Panascout. Lastly, FiRe 2 … an awesome iPhone audio recorder that supports waveform editing and audio processing.

-paul.

aspectRatio: Divisible by 16 …

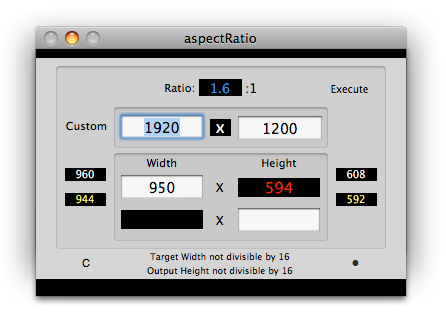
Here is a glimpse of what I have planned for the next release for aspectRatio:

At this point I’ve implemented a suggested dimensions method that displays values evenly divisible by 16. The results are triggered by the Target Width and returned Output Height calculation.

Select MPEG formats are based on 16×16 macro-blocks. Evenly divisible (by 16) output dimensions will maximize the efficiency of the encoder and yield optimum results. For example: a purist would prefer a small 16:9 distribution video to be 480×272 instead of the common 480×270

Also included in this release: a user defined output font color preference setting [orange/red], and a Menu option that re-opens the main UI window if the user inadvertently closes it while the application is still running.

A release date has yet to be determined …

-paul.

Technorati Tags:
, , , ,