Reworking a Master

It’s been a while since I last posted. The last few years have been difficult. I was compelled to tend to my Dad Sonny. He passed away on April 26. I’m obviously heartbroken. However he would have wanted me to move forward and continue to share insight …

I recently listened to a program consisting of a group of “Podcast Editors.” Group members are also business owners providing podcast production services for a wide range of clients. 

I believe a few (or all?) group members were trained by Chris Curran who runs Podcast Engineering School

The business owners disclosed they are often in a position (for various reasons) to outsource work. All good. However I thought to myself if I were to consider outsourcing work – what method(s) or criteria would I implement to assess applicant talent and/or proficiency?

A top level requirement would be obvious: the ability to effectively edit speech/dialogue and optimize intelligibility. DSP audio processing proficiency (and tool accessibility) would be prerequisites as well.

Let’s have a look at a specific “test” scenario that I might propose for applicant assessment:

A new self producing client’s podcast has been accepted by an imaginary powerhouse spoken word audio network. The network has strict audio submission compliance requirements. WAV files are to be submitted. The network will create the lossy distribution copies. 

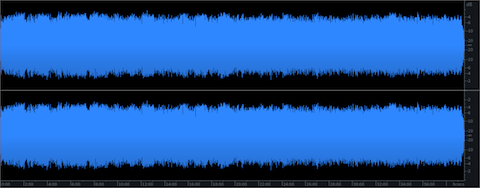
The client seeks assistance conforming the following self produced program as measured:

Attributes: -18 LUFS [stereo], -0.8 dBTP. LRA: 3 LU

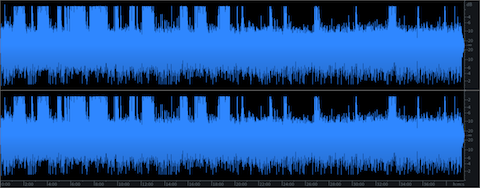
*** In my opinion the example above visually indicates careless mastering. The narrow headroom may pose difficulties if added gain is ever necessary. It doesn’t sound inherently bad. However it’s not properly optimized for submission to our imaginary network.

Client/Network Compliance Requirements: 

-16 LUFS stereo (tolerence: +/- 1 LU). Ceiling: -2.0 dBTB. LRA < 6 LU

Client’s Specific Instructions:

• Integrated Loudness target compliance for network (source audio needs to be bumped up)

• Compliant True Peak ceiling and prevention of excessive limiting and/or induced distortion 

• Avoidance of breath elevation and noise due to gain offset requirements

• Retention of reference fidelity

For the record I’m not going to disclose the source of this audio. There are many similar examples out there.

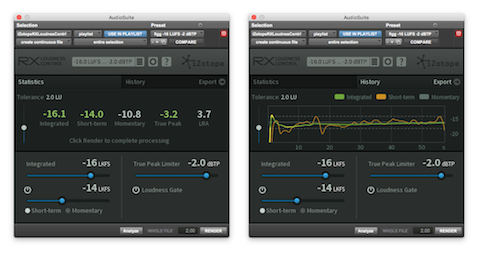
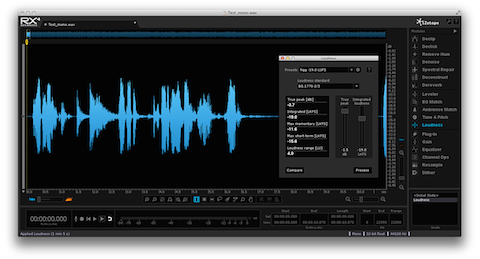
Here’s is my re-produced output as measured:

-16 LUFS, -2.2 dBTP. LRA: 2.9 LU

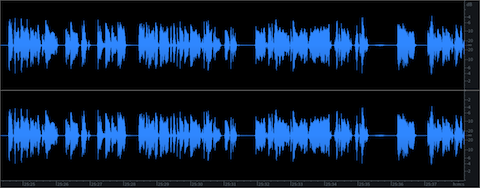
in the zoomed selection below notice there is no visual indication of an elevated noise floor. Also overly aggressive dynamics processing/limiting has been avoided. Fidelity is excellent.

Final Thoughts

From a general perspective the client’s original source audio is suitable for a typical podcast regardless of the visual attributes of the waveforms. However that assessment is not the purpose of this article. The question is – are you capable? Do you think you can pass my proposed test? Can you satisfy our imaginary client?

Be aware there’s allot more to this than you may assume. Compression is only one aspect of my optimization process (of course we can discuss). Also note this remastering scenario does not include accessibility to discrete mix stage audio assets.

* * *

When you add definitive compliance requirements to any workflow the level of complexity elevates. This is especially true in situations where you as an engineer may be be called upon to “fix” audio masters that my not be suitable or properly optimized for downstream program preparation and distribution.

-paul.
Optimizing Dialogue Levels

I was just reading Chris Curran’s Daily Goody segment, published today. The piece is titled Balancing the Levels of All Voices. Chris explains the importance of consistent dialogue levels across multiple participants, and shares various methods to achieve this.

Chris states in his second tip:

>>> “Another way to quickly balance the levels of various participants is to process each participants track to be the same LUFS level. This will make them close to level, but you will always want to adjust the levels slightly using your ears. Because even when the LUFS level of two different voices is the same, the perceived loudness of each voice can differ due to things like proximity to the mic, dynamic range, frequency response of the mic, the timbre of individual voices, etc. So it’s a handy practice to set the LUFS level of each participant to the same value, but then you still have to use your ears.” <<<

Good advise IMHO. Here’s my perspective …

The term LUFS Level is a generalization. It requires clarification.

There are 3 notable measurement descriptors that indicate perceptual Loudness in LUFS/LKFS (or LU’s when using a relative scale):

• Integrated Loudness (also referred to as Program Loudness)

• Short Term Loudness

• Momentary Loudness

Their distinguishing attributes are distinct time and/or averaging intervals: Integrated (cumulative measurement from start to finish), Short Term (3 sec.), and Momentary (400ms). It’s important to recognize the significance of each descriptor.

As well, (and Chris alludes to this in his piece) – you must recognize how a consistent Integrated Loudness measurement across multiple spoken word segments (or session participants) does not necessarily guarantee suitable matched level perception and/or optimized intelligibility.

Remember – Integrated Loudness represents a cumulative measurement from start to finish. For 100% accuracy – the piece must be measured in it’s entirety. Also, the descriptor does not reflect inherent dynamic attributes and/or inconsistencies that my in turn marginalize attempts to optimize perception.

With this in mind, if you choose to use Integrated Loudness as a perceptual Loudness matching indicator – audio optimization (compression, etc.) and target accuracy must be applied and established before relying on any common Integrated Loudness measurement.

What about Short Term/Momentary Loudness?

The 3 sec. averaging interval of the Short Term Loudness descriptor indicates an active, foreground measurement. It is highly useful when analyzing the loudness consistency of spoken word/dialogue. Momentary Loudness will provide even finer “detail” – once again due to it’s inherent averaging interval (400ms).

To summerize: “LUFS Level” is a generalization. As noted there are 3 descriptors (Integrated, Short Term, Momentary). Short Term and Momentary Loudness are useful indicators for the establishment of spoken word consistency. Learn how to use a Loudness Meter (online or offline) to closely monitor each descriptor.

With regards to Loudness Normalization – some processing tools such as RX Loudness Control by iZotope (AAX/Pro Tools only) support user defined Short Term and Momentary Loudness targeting within a certain tolerance range.

These options, along with the ubiquitous Integrated Loudness definition (and of course subjective audio processing) should provide everything you need in your quest to achieve optimized dialogue.

-paul.

CNN and Program Loudness Tolerance

I recently analyzed a few of the internal Podcasts produced by CNN. One particular installment is yet another example of a major media outlet distributing audio that is in my view unsuitable for this particular platform.

Let’s discuss file attributes and measured specs. for one of CNN’s distributed Podcasts:

The distributed audio is mono, 64kbps, with music elements. I’ve stated how I feel about this. I’m not a proponent of 64 kbps MP3 audio PERIOD (mono or stereo). In general audio in this format sounds horrible. Feel free to disagree.

Secondly, the Integrated (Program) Loudness for this particular program is just about -23.0 LUFS with a Maximum True Peak of +0.40 dBTP. From my perspective the perceptual Loudness misses the mark. And, the audio is clipped.

Lastly, the produced audio is way too dynamic for spoken word. The perceptual inconsistency of the delivery by the participants is inadequate when considering how (for the most part) this program will be consumed (mobile devices, problematic ambient spaces, etc.).

I decided to sort of showcase this particular program because it is a good candidate for flexible Target considerations. What do I mean by “flexible Target considerations?” Let me explain …

Again, the distributed file is mono. The recommended Integrated Loudness Target for mono Podcasts is -19.0 LUFS. This is the perceptual equivalent of -16.0 LUFS stereo. If I were to apply a +4 db gain offset to Loudness Normalize this audio to -19.0 LUFS, there would be very little change in the original dynamic structure of the audio. However without some form of aggressive limiting, the maximum amplitude or Peak Ceiling would be driven into oblivion. In fact audible distortion may occur with or without limiting. This is obviously not recommended.

There are two options to consider: 1) apply Dynamic Range Compression before Loudness Normalization, or 2) shoot for a lower Integrated Loudness target. For this particular example I chose to implement both options.

First, in my view optimizing the dynamics in this program for Podcast distribution is unavoidable. It’s just way too choppy and it lacks delivery consistency for spoken word. Also, by lowering the L.Normalized Target, the necessary added gain offset will be reduced resulting in less aggressive limiting. In addition, the reduced amount of added gain will curtail noise floor elevation and other variables such as exaggerated breaths.

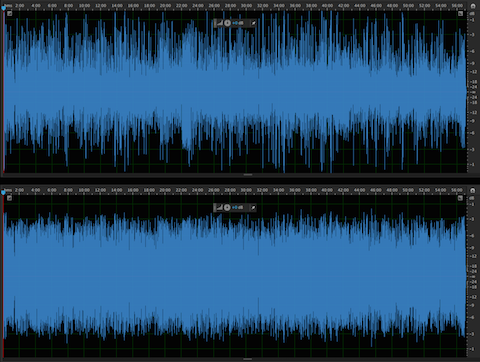
As noted the distributed Podcast (displayed in the attached upper waveform example) checks in at -23.0 LUFS and it is clipped. My optimized version (displayed in the lower waveform example) checks in at -20.2 LUFS with a Maximum True Peak of -1.23 dBTP. It is well within a reasonable level of Program Loudness tolerance for Podcast L.Normalization. In fact the perceptual difference between the processed -20.0 LUFS audio and a -19.0 LUFS version would be pretty much undetectable. In essence the audio has been optimized and it exhibits improved intelligibility. It is now well suited for Podcast distribution.

cnn_small

(If you are interested in the tools that I use, they are listed under Available Services).

It is no secret that I am a staunch proponent of the -16.0 LUFS/-19.0 LUFS recommendations for Podcasts. However, in certain situations – tolerance for slightly reduced Program Loudness Targets is acceptable.

For the record – my remaster is much easier to listen to. CNN can do better.

-paul.

Podcast Loudness: Mono vs. Stereo Perception …

Consider the following scenario:

Two copies of an audio file. File 1 is Stereo, Loudness Normalized to -16.0 LUFS. File 2 is Mono, also Loudness Normalized to -16.0 LUFS.

Passing both files through a Loudness Meter confirms equal numerical Program Loudness. However the numbers do not reflect an obvious perceptual difference during playback. In fact the Mono file is perceptually louder than it’s Stereo counterpart.

Why would the channel configuration affect perceptual loudness of these equally measured files?

mono-LN-480

The Explanation

I’m going to refer to a feature that I came across in a Mackie Mixer User Manual. Mackie makes reference to the “Constant Loudness” principle used in their mixers, specifically when panning Mono channels.

On a mixer, hard-panning a Mono channel left or right results in equal apparent loudness (perceived loudness). It would then make sense to assume that if the channel was panned center, the output level would be hotter due to the combined or “mixed” level of the channel. In order to maintain consistent apparent loudness, Mackie attenuates center panned Mono channels by about 3 dB.

We can now apply this concept to the DAW …

A Mono file played back through two speakers (channels) in a DAW would be the same as passing audio through a Mono analog mixer channel panned center. In this scenario, the analog mixer (that adheres to the Constant Loudness principle) would attenuate the output by 3dB.

In order to maintain equal perception between Loudness Normalized Stereo and Mono files targeting -16.0 LUFS, we can simulate the Constant Loudness principle in the DAW by attenuating Mono files by 3 LU. This compensation would shift the targeted Program Loudness for Mono files to -19.0 LUFS.

To summarize, if you plan to Loudness Normalize to the recommend targets for internet/mobile, and Podcast distribution … Stereo files should target -16.0 LUFS Program Loudness and Mono files should target -19.0 LUFS Program Loudness.

Note that In my discussions with leading experts in the space, it has come to my attention that this approach may not be sustainable. Many pros feel it is the responsibility of the playback device and/or delivery system to apply the necessary compensation. If this support is implemented, the perceived loudness of -16.0 LUFS Mono will be equal to -16.0 LUFS Stereo. There would be no need to apply manual compensation.

-paul.

Internet Audio: True Peak Compliance …

Wide variations in average (Program/Integrated) Loudness are common across all forms of audio distributed on the internet. This includes audio Podcasts, Videocasts, and Streaming Media. This is due to the total lack of any standardized guidelines in the space. Need proof? Head over to Twit.tv and listen to a few minutes of any one of their programs. Use headphones, and set your playback volume to a comfortable level.

Now head over to PodcastAnswerMan.com, and without making any change to your playback volume – listen to the latest program.

I rest my case.

In fact, there is a 10 LU difference in average loudness between the two. Twit.tv programs check in at approximately -22 LUFS. PodcastAnswerMan checks in at approximately -12 LUFS. I find this astonishing, but I am not surprised. I’m not signaling them out for any lack of quality issues or anything like that. In my view both networks do a great job, and my guess is they have sizable audiences. Both shows are well produced and it simply makes sense to compare them in this case study.

With all this in mind let me stress that at this particular time I am not going to focus on discussing Program Loudness variations or any potential suggested standard. I can assure you this is coming! I will say that I advocate -16.0 LUFS (Program/Integrated Loudness) for all media formats distributed on the internet. Stay tuned for more on this. For now I would like to discuss True Peak compliance that will be a vital part of any recommended distribution standard.

What surprises me more than Program Loudness inconsistency is just how many producers are pushing files with clipped, distorted audio. In many cases Intersample Peaks are present in audio files that have been normalized to 0 dBFS. (For more information on Intersample Peaks please refer to this brief explanation). Producers need to correct this problem before their audio is distributed.

The Tools

One of the most useful features included in Adobe Audition is the Match Volume Processor. This tool includes various options that allow the operator to “dial in” specific average loudness and peak amplitude targets. After processing, the operator can examine the results by using Audition’s Amplitude Statistics analysis to check for accuracy.

mvp-1

Notice in the snapshot above I set the processor to Match To: Total RMS, with a -18.50 dB RMS average target. I’ve also selected the Use Limiting option. I’m able to dial in custom Look-Ahead and Release Time parameters as I see fit. Is there something missing? Indeed there is. Any time you push average levels you run the risk of clipping the source. In Audition the Match Volume/Use Limiting option lacks the capability for the operator to set a specific Peak Amplitude Ceiling. I’ve determined that in certain situations Peak Amplitudes reach a -0.1 dB ceiling resulting in possible clipped samples and True Peak levels that exceeded 0dBFS. Keep in mind this is not always the case. The results depend on the Dynamic Range and available Headroom of any source.

So how do we handle it?

Notice above the Match Volume Processor offers two Peak Amplitude options: Peak Amplitude and True Peak Amplitude. The European Broadcasting Union’s EBU R128 spec. dictates -1.0 dBTP (True Peak) as the ultimate ceiling to meet compliance. Here in the states ATSC A/85 dictates -2.0 dBTP. Since most, if not all audio formats distributed on the internet are delivered in lossy formats, it is important to pay close attention to True Peak Amplitude for both source (lossless) and distribution (lossy) files.

fgm

I advocate -1.0 dBTP as the standard for internet based audio file delivery. True Peak Limiters are able to detect and alleviate the possibility of Intersample Peaks from occurring. It is recommended to pass audio through a True Peak compliant limiter after loudness normalization and prior to lossy encoding. Options include ISL by Nugen Audio, Elixir by Flux, and (the best kept secret out there) TB Barricade by ToneBoosters. If you are running Audition, Match To: True Peak Amplitude and you should be all set.

The plugin developers mentioned above as well as Waves, MeterPlugs, tc electronic, Grimm Audio, and iZotope supply Loudness Meters and toolsets that display all aspects of loudness specifications including True Peak alerts. Visit this page for a list of supported Loudness Meters.

If True Peak detection and compliance is not within your reach due to the lack of capable tools, a slightly more aggressive ceiling (-1.5 dBFS) is recommended for Peak Normalization. The additional .5 dB acts as a sort of safety net, insuring maximum peak amplitude remains at or below -1.0 dBFS. One thing to keep in mind … performing Peak Amplitude Normalization after Loudness Normalization may very well result in a reduction in average, program loudness. Once again changes to the processed audio will depend on the audio attributes prior to Peak Normalizing.

Below I’ve supplied data that supports what I noted above. The table displays three iterations of a test file: Input, Loudness Normalized Intermediate, and final Output. For this test I used the ITU-R BS.1770-2 “Match To” option in Audition’s Match Volume Processor. I pushed the average target to -16.0 LUFS. As noted, this is the target that I advocate for internet and/or mobile audio. This target is +7 LU hotter than R128 and +8 LU hotter than ATSC A/85.

After processing the Input file, the average target was met in the Intermediate file, but True Peak overs occurred. The Intermediate file was then passed through a compliant True Peak Limiter with it’s ceiling set to -1.0 dBTP. Compliance was met in the Output with a minimal reduction in Program Loudness.

data-480

Producers: there is absolutely no excuse if your audio contains distortion due to clipping! At the very least you should Peak Normalize to -1.5 dBFS prior to encoding your lossy MP3. Every audio application on the planet offers the option to Peak Normalize, including GarageBand and Audacity. Best case scenario is to adopt True Peak compliance and learn how to use the tools that are necessary to get it done. If you are an experienced producer or professional, and you come across content that does not comply – reach out and offer guidance.

-paul.

Waves MaxxVolume Revisited …

Back in October of 2012 I wrote about my purchase and initial impression of MaxxVolume by Waves. Let me first say I’m so glad I bought this tool. Secondly, my timing was impeccable. I was under the impression (when I purchased it) that the price of this plugin was significantly reduced on a permanent basis from $400 to $149 for the “Native” single version. Not the case. It is currently selling for $350 and discounted to $320. Like I said – my timing was impeccable.

waves-mv-478

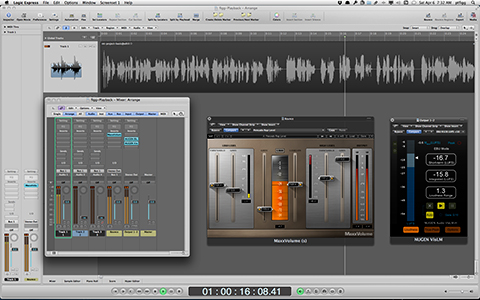
Anyway, I’ve spent many hours working with this tool. Before I discuss one instance of my workflow, let me also mention that I recently purchased a license for their Renaissance Vox Dynamics Processor. This is yet another stellar tool by Waves. It features three slider “faders”: Gate, Compressor, and Gain. The Gate (Downward Expander) is very impressive. It works well when it may be necessary to tame an elevated noise floor in something like a voice over. The Compression algorithm is what really makes this plugin shine. As expected this setting controls the amount of Dynamic Range Compression applied to the source. At the same time it applies automatic makeup gain. What’s special is as the output gain potentially increases, the plugin will automatically prevent clipping by applying peak limiting. It’s all handled by a single slider setting. It turns out the High Level Compressor included in MaxxVolume is similar to the Compression stage in Renaissance Vox …

I’ve settled in on an order in which I set up MaxxVolume to act as a leveler when processing spoken word. I load the plugin with all controls in the OFF state. First I turn on the Low Level Compressor. This is essentially an Upward Expander that increases the level of softer passages. It doesn’t take much of an increase in gain to achieve acceptable results. At this point I rely solely on my ears for the desired effect.

Next I turn on the Gate (Downward Expander) and listen for any problems with the noise floor that may have resulted from the gain I picked up with the Low Level Compressor. Since I pass all my files through iZotope RX2 before introducing them to MaxxVolume – they are pretty quiet. In most cases the Gate’s Threshold is set somewhere between -60 and -70 dB. By the way the processor is set to the LOUD mode. This setting uses a more aggressive release resulting in a slightly “louder” output signal.

Now that I’ve dealt with low level signals and any potential noise floor issues – I set the Global Gain to -1.0dB. If I am dealing with a previously (loudness) normalized file with a set average target, I almost never deviate from this -1.0dB setting.

The last stage of the processor setup affects the aggression of the Leveler and handles Dynamic Range Compression. As previously stated – the High Level Compressor also applies automatic makeup gain as it’s Threshold is decreased. What’s interesting is it also applies gain compensation to the signal where aggressive leveling may result in heavy attenuation. Here once again if I am dealing with a segment with a set average loudness target, I need to maintain it. So I turn on the Leveler and set it’s Threshold to apply the desired amount of leveling. When the audio passes (goes above) the threshold, leveling is active. The main Energy Meter displays the audio level after the leveler and before any additional dynamics processing functions.

I finish up by turning on the High Level Compressor, setting it’s Threshold to apply the necessary amount of gain compensation to maintain my average (Program/Integrated) Loudness target. I use Nugen’s VisLM Loudness Meter to monitor loudness. Finally I fine tune the Low Level Compressor and Gate.

logic-480

This particular workflow is just one example of how I use MaxxVolume. The processor does an excellent job when setup to function as a speech volume leveler. In other instances I use it to attenuate playback of audio segments, programs, etc. that have been normalized to a much higher average loudness target than I see fit. With the proper settings MaxxVolume provides a highly customized method of gain attenuation that sounds so much better than just reducing output levels with channel faders in a DAW.

MaxxVolume is now an indispensable tool in my audio processing kit …

-paul.