Utilizing Multiple Outputs for Recording

The vast majority of audio industry professionals use DAWS running on proficient computer systems to record audio directly to secondary hard disks. For some reason direct to disk recording is not widely endorsed in the Podcasting space. Many consultants (for various reasons) advise against this recording method. Instead, they recommend the use of inexpensive hand-held solid state Recorders.

For instance I’ve heard a few people state “computers cause ground loops”, hence the widespread Portable Recorder recommendation. In my opinion that is a half-baked assertion. In fact, ANY electronic component in a signal chain (including your electrical system) is capable of producing inherent noise. Often the replacement of cheaply manufactured components (interfaces, mixers, processors, cables, etc.) will solve audible noise problems. The key is to isolate the source and correct or replace it.

Portable Recorders are well suited for location interviews and video shoots. For in-studio sessions I feel direct to disk recording on a proficient system is much more flexible compared to the use of an external device. More so, the sole use of a Portable Recorder without a proper backup strategy is flat out risky.

That being said I thought I would document a basic Skype Recording session that I implemented in Pro Tools using a multi-output Motu Audio Interface. The incoming audio will be recorded on a secondary hard disk installed (or interfaced) on the host system. The real time session audio will also be routed to an alternate Interface Output, feeding an external Recorder for backup purposes.

Recording_Session_small

Note a multi-output Mixer can be used in place of an Audio Interface. As far as software you can use any modern DAW to replicate the described session. If you are using a Mac, Rogue Amoeba’s distinctive Audio Hijack application is also highly capable.

Objectives:

1-Record Studio Host and Skype Participant on discrete mono tracks in real time.

2-Combine the discrete recordings and create a split-stereo clip with independent dynamics processing applied to each channel, all in real time.

3-Use a Pre-Fader Send to independently control the level of the split-stereo discrete recording, and patch the real time signal to the Interface S/PDIF Output. This will feed the external Recorder’s S/PDIF Input.

4-Monitor the session through Headphones and play out through Desktop near-field Monitors.

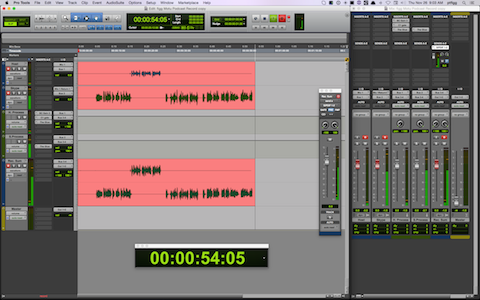
Please review the displayed Pro Tools session snapshot.

• The Input for the mono Host track is the Interface connected mic. The Input for the mono Skype track is “Mix 1 Return.” This is an Interface supported feature, allowing the operator to route the computer’s Output (in this case Skype) to an available DAW Input. This configuration effectively creates a mix-minus with discrete, unprocessed recordings on individual mono tracks.

• The mono recording tracks are routed to individual mono Aux Input tracks using Buses. The Aux Input tracks are hard-panned L+R and contain various inserted processing options, including a Gain Trim, Expander, and Compressor.

The processing applied in this session is not intended to replace what would normally occur in post. The Compressors are there just to tame dynamics in the event either participant exceeds nominal input levels. The Expander is set up to apply mild attenuation when the host is not speaking.

• The Aux Input tracks have their Outputs set to a common stereo Bus.

• Finally a third standard stereo audio track (Rec-Sum) uses the stereo Bus Output(s) as it’s Inputs. By hard panning the channels L+R we are able to maintain discrete channel separation within any printed stereo clip.

To record the discrete raw audio and the processed split-stereo audio in real time, we simply arm all session Audio tracks to record and fire away. The session can be monitored through Headphones and played out through near fields via the Main Output.

Secondary Output

The Motu Interface used for this session has a total of 8 Outputs, including a stereo S/PDIF option. I implemented Pre-Fader Send on the session’s Rec-Sum channel with it’s Output set to S/PDIF. This will route the track’s split-stereo audio to the S/PDIF stereo Input of an external Marantz CF Recorder. With the Send designated as Pre-Fader, it’s level control will be independent of the parent (Rec-Sum) channel fader, thus allowing discrete control of the real time signal being fed to the Recorder.

Note in the displayed Pro Tools session snapshot – the floating fader positioned to the left of the mixer is a user friendly and easily accessible copy of the much smaller Send fader displayed in the parent (Rec-Sum) track.

In summary, we can successfully initialize and capture 4 recordings in a single pass: the raw Host audio, the raw Skype participant audio, a split-stereo processed version of the Skype session, and a split-stereo copy of the processed Skype session stored on the Recorder.

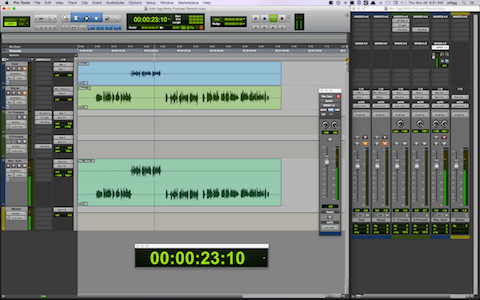
The image below displays the completed session with the split-stereo clip playing through the Main Outputs.

Mix_small

My general recommendation:when it is feasible, use direct to disk and Portable recording options in unison on a proficient system to capture in-studio multitrack and single participant Podcast sessions.

-paul.

dbx 286s: Beyond The Basics …

The dbx brand has been a favorite of mine since the late 1970’s. My first piece of dbx kit was a stand-alone noise reduction unit that I coupled with an old Teac Reel to Reel Tape Deck. Through the years I’ve owned various EQ’s and Dynamics processors, including the highly regarded 160A Compressor. I purchased mine in 2006.

160a-small

In January 2011 I was skimming through eBay listings looking for a dbx 286A Microphone Preamp Processor. At the time I had heard the original 286 model was co-designed by Bob Orban, and both models were widely used in Radio Broadcast facilities. I found it interesting that Radio Engineers would use a piece of gear that was not only cheap in terms of cost – but unconventional in terms of controls.

286A-small

One piece was available on eBay, supposedly used for 4 hours at a party in Hollywood Hills California, and then boxed for resale. The seller had a positive reputation, so I grabbed it for $115. Upon arrival it’s condition was as described, and it’s been in my rack ever since.

The 286/286A has evolved into the 286s, quite frankly an outright steal priced at $199. Due to it’s straight forward approach and affordable price, the Podcasting community has embraced it and often classifies it as “drool-worthy.” Pretty amusing.

286-small

In this article I am going to focus on the attributes of the Compressor stage and the De-Esser. I will demystify the DeEsser and discuss the importance of the Output (Gain) Compensation setting.

Unconventional

I mentioned the processor is unconventional. For example the Compressor’s Drive and Density settings essentially replace the Threshold, Ratio, Attack, and Release controls present on most Compressors.

The De-Esser requires a user defined High-Pass Frequency designation and Threshold setting to reduce excessive sibilance. Setup can be time consuming due to the lack of any visual representation of problematic energy in need of attenuation.

Compressor:Drive

Compression results depend on the level (and dynamics) of the incoming signal and corresponding settings. On a conventional compressor the Threshold monitors the incoming signal. When the signal surpasses the Threshold, processing engages and gain reduction is activated. The Ratio determines the amount of gain reduction. The Attack will affect how aggressively (or the speed at which) gain reduction initializes and ultimatly reaches maximum attenuation. The Release will control the speed of the transition from full attenuation – back to the original level

The Drive control on the 286s determines the amount of gain reduction (compression) applied to the incoming signal. Higher settings will increase the input signal level resulting in more aggressive compression (and noise).

How much gain reduction should you shoot for? Well that’s subjective. I would recommend experimenting with 6-12dB of gain reduction. Of course results will vary due to obvious variables (mic selection, preamp level, etc.)

Compressor:Density

When using a compressor to process spoken word, improper Release settings can result in choppiness, often referred to as pumping. The key is to have the gain reduction occurrences smoothly transition between instances of audible sound and natural pauses (silence).

The 286s uses a variable program dependent Release. In the event you feel (and hear) the necessity to speed up or slow down the program dependent Release – the Density control will come in handy.

Note the Density scale on the 286s is again somewhat unconventional. On a typical dynamics processor – setting the Release full counter-clockwise would result in a very fast Release. As the setting is adjusted clockwise, the Release duration is extended. The scale usually transitions from milliseconds to full seconds.

On the 286s, think of Density as a linear speed controller, where “1” (counter-clockwise) is slow and “10” (full clockwise) is fast.

For normal speech I recommend experimenting with the Density set between 3 and 5.

The De-Esser

If you check around you will notice a wide range of references regarding the frequency range where sibilance generally occurs. In reality there are many variables. Each instance of sibilance will need to be accurately identified and addressed accordingly.

The 286s De-Esser uses a variable high-pass filter. This instructs the processor where to initiate the attenuation of problematic energy. This Frequency control has a range of 800Hz-10kHz. The user manual states ” … settings between 4-8kHz will yield the best results for vocal processing.” This is good starting point. However proper setup requires time consuming arbitrary tweaking that may result in a low level of accuracy. A visual representation of the frequency range of the excessive sibilant energy will solve this problem. Once you identify the frequencies and/or range where most of the energy is present, setting the Frequency on the 286s will be demystified.

The De-Esser’s Threshold setting controls the amount of attenuation (sensitivity) and will remain constant as the input level changes.

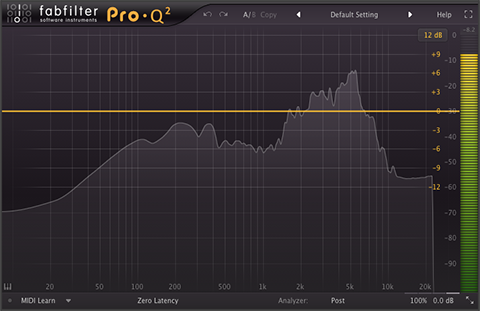
Have a look at the spectral analysis below:

sibilance-small

Notice the excessive energy in the 2-6kHz range (Frequency Range is represented on the X axis). For this particular segment of audio I would initially set the Frequency control on the 286s to 5kHz. Next I would adjust the Threshold until the sibilant energy is attenuated. I would then sweep the Frequency setting within the visual range of the sibilant energy and fine tune both settings until I achieve the most pleasing results. The key is not to over do it. Heavy attenuation will suppress vital energy and remove any hint of natural presence and sparkle.

To perform this analysis excersize – set the Threshold setting on the 286s to OFF. Pass the output of the processor to your DAW of choice and perform a real time spectral analysis of your voice using a software plugin the includes a Spectrum Analyzer. You can use any supported EQ plugin with it’s controls bypassed. You can also use something like the free (AU/VST) Span plugin by Voxengo (note that Span is CPU intensive).

Output Gain Compensation

Gain Compensation is an integral element of Audio Compression. It’s intent is to offset the gain reduction that occurs when audio is compressed. It is often referred to as Make-up Gain. When this gain offset is applied to compressed audio, the perceived, average level of the audio is increased. Excessive Make-up Gain can sometimes elevate noise that may have been previously inaudible at lower average levels.

Earlier I discussed how an elevated Drive control setting on the 286s will increase the input signal of low level source audio. In doing so you may initiate a suitable amount of compression. However you also run the risk of a noticeable increase in noise. In this particular scenario, try setting the Output Gain on the 286s to a negative value to offset the gain (and noise) that may have been introduced by the Drive setting.

Conclusion

I think it’s important to first learn the basics of Audio Compression from a conventional perspective. In doing so you will find it easier to get the most out of the unconventional controls on the dbx 286s, especially Drive and Density.

And let’s not forget that De-Essing is really nothing more than frequency band compression that will attenuate problematic energy. Establishing a visual reference to the energy will simplify the process of accurate correction.

-paul.

iZotope Ozone 6

iZotope has released a newly designed version of Ozone, their flagship Mastering processor. Notice I didn’t refer to Ozone [6] as a plugin? Well I’m happy to report that Ozone [6] is now capable to run independent of a DAW as a stand-alone desktop processor.

oz6-480

Besides the stand-alone option and striking UI overhaul, Ozone’s flexibility has been greatly enhanced with the addition of support to host third party Audio Units and VST plugins. Preliminary tests here indicate that it functions very well in the stand-alone mode. More on this in moment …

I’ve been a customer and supporter of iZotope since early 2005. If I remember correctly Ozone 3 was the first version that I had access to. In fact back in the early days of Podcasting, many producers purchased an Ozone license based on my endorsement. This was an interesting scenario all due to the fact that most of the people in the community who bought it – had no idea how to use it! And so a steady flow of user support inquiries began to trickle in.

I decided the best way to bring users up to speed was to design Presets. I would distribute the underlying XML file and have the users move it to the proper location on their system’s. After doing so, the Preset would be accessible within Ozone’s Preset Manager.

The complexity of the Presets varied. Some people wanted basic Band-Pass filters. Others requested the simulation of a broadcast chain that would result in a signature sound for their recorded voice. In fact I remember one particular instance where the user requested a Preset that would make him sound like an “AM Radio DJ”. So I went to work and I think I made him happy.

As Ozone matured, it’s level of complexity increased resulting in somewhat sluggish performance (at least for me). When iZotope released Alloy 2, I bought it – and found it to be much more responsive. And so I sort of moved away from Ozone, especially Ozone 5. My guess is if my system’s were a bit more robust, poor performance would be less of an issue. Note that my personal experience with Ozone was not necessarily the general concensus. Up to this latest release, the plugin was highly regarded with widespread use in the Mastering community.

Over the past 24 hours I’ve been paying close attention to how Ozone users are reacting to this new version. Note that a few key features have been removed. The Reverb module is totally gone. Gating/Expansion has been removed from the Dynamics Module, and the Dithering options have been minimized. The good news is these particular features are not game changers for me based on how I use this tool. I will say the community reaction has been tepid. Some users are passing on the release due to the omissions that I’ve mentioned and others that I’m sure I’ve overlooked.

For me personally – the $99 upgrade was a no-brainer. In my view the stand-alone functionality and the support for third party plugins makes up for what has been removed. In stand-alone mode you can import multiple files, save your work as projects, implement processing chains in a specific order, apply head/tail cuts/fades, and export your work.

Ozone [6] will accept WAV, AIFF, or MP3 files. If you are exporting to lossless, you can convert Sample Rates and apply Dither. This all worked quite well on my 2010 MacPro. In fact the performance was quite good, with no signs of sluggish performance. I did notice some problematic issues with plugin wrappers not scaling properly. Also the Plugin Manager displayed duplicates of a few plugins. This did not hinder performance in any way. In fact all of my plugins functioned well.

And so that’s my preliminary take. My guess is this new version of Ozone is well suited for advanced New Media Producers who have a basic understanding of how to process audio dynamics and apply EQ. Of course there’s much more to it, and I’m around to answer any questions that you might have.

Look for more information in future posts …

-paul.

No Free Pass for Podcasts …

I think it was in the mid to late 1980’s. I was still living home, totally fixated on what was happening with Television devices, programming and transmission. Mainly the advent of MTS Stereo compatible TV’s and VCR’s. I remember waiting patiently for weekly episodes of programs like Miami Vice and Crime Story to air. I would pipe the program audio through my media system in glorious MTS stereo. For me this was a game changer.

vice

I also remember it was around the same time that Cable TV became available in the area. I convinced my Mom and Dad to allow me to order it. Initially it was installed on the living room TV, and eventually made it’s way on to additional TV’s throughout our home. For the most part it was a huge improvement in terms of reception and of course program diversity.

However there was one issue that struck me from the very beginning: the wide variations in loudness between network TV Shows, Movies, and Adverts. In fact it was common for targeted, poorly produced, and exceedingly loud local commercials to air repeatedly throughout broadcast transmissions. Reaching for the remote to apply volume attenuation was a common occurrence and a major annoyance.

Obviously this was not isolated. The issue was widespread and resulted in a public outcry to correct these inconsistencies. In 2010 The CALM Act was implemented. The United States and Europe (and many other regions) adopted and now regulate loudness standardization guidelines for the benefit of the public at large.

If there is anyone out there who cannot relate to this “former” problem, I for one would be very surprised.

Well guess what? We now have the same exact problem existing on the most ubiquitous media distribution platform in existence – the internet.

I realize any expectation of widespread audio loudness standardization on the internet would be unreasonable. There’s just too much stuff out there. And those who create and distribute the media possess a wide scope of skills. However there is one sort of passionate and now ubiquitous subculture that may be ripe for some level of standardization. Of course I’m referring to the thousands upon thousands of independenlty produced Podcasts available to the masses.

In the past I’ve made similar public references to the following exercise. Just in case you missed it, please try this – at you own risk!

Put on your headphones and queue up this episode of The Audacity to Podcast. Set your playback volume at a comfortable level, sit back, and enjoy. After a few minutes, and without changing your playback volume setting – queue up this episode of the Entrepreneur on Fire podcast.

waves-1

Need I say more?

From what I gather both programs are quite popular and highly regarded. I have no intension of suggesting that either producer is doing anything wrong. The way in which they process their audio is their artistic right. On the other hand in my view there is one responsibility they both share. That would be the obligation to deliver well produced content to their subscribers, especially if the Podcast generates a community driven revenue stream. It’s the one thing they will always have in common. And so I ask … wouldn’t it make sense to distribute media following audio processing best practices resulting in some level of consistency within this passionate subculture?

I suspect that some Podcast producers purposely implement extreme Program Loudness levels in an attempt to establish “supremacy on the dial.” This issue also exists in radio broadcast and music production, although things have improved ever since Loudness War participants were called to task with the inception of mandatory compliance guidelines.

I’ve also noticed that many prolific Podcast Producers (including major networks) are publishing content with a total lack of Program Loudness consistency within their own catalogs form show to show. Even more troubling, Podcast aggregation networks rarely specify standardization guidelines for content creators.

It’s important to note that many people who consume audio delivered on the internet do so in less than ideal ambient spaces (automobiles, subways, airplanes etc.) using low-fi gear (ear buds, headphones, mobile devices, and compromised desktop near fields). Simply adopting the broadcast standards wouldn’t work. The existing Program Loudness targets are simply unsuitable, especially if the media is highly dynamic. The space needs revised specs. in order to optimize the listening experience.

Loudness consistency from a Podcast listener’s perspective is solely in the hands of the producers who create the content. In fact it is possible producers may even share common subscribers. Like I said – the space is ripe for standardization.

Currently loudness compliance recommendations are sparse within this massive community driven network. In my view it’s time to raise awareness. A target specification would universally improve the listening experience and ultimately legitimize the viability of the platform.

For the record, I advocate:

File Format: Stereo, 128kbps minimum.
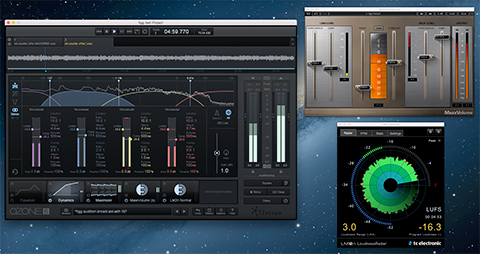
Program Loudness: -16.0 LUFS with acceptance of a reasonable deviation.
Loudness Range: 8 LU, or less.
True Peak Ceiling: -1.0 dBTP in the distribution file. Of course this may be lower.

Quick note: when I refer to Podcasts, from a general perspective I am referring to audio programs and videos/screencasts/tutorials that primarily consist of spoken word soundtracks. Music based Podcasts or cinema styled videos with high impact driven soundtracks may not necessarily translate well when the Loudness Range (and Dynamic Range) is constricted.

For further technical insight, please refer to “Audio for Mobile TV, iPad, and iPod” – Thomas Lund, TC Electronic.

-paul.

Cutting Edge Podcasting System …

It’s been a while since I’ve been called upon to design an audio system suitable for Podcasting. In 2004 I built a site that focused on all aspects of Podcast Production. I will (reluctantly) disclose that I am the person who coined the term “Podcast Rig.”

Besides a prolific user forum and gear reviews, the site included systems that I designed at various levels of price and complexity. They are still viable some 10 years later. I eventually sold the rights to the property and content, and the site was unfortunately buried beneath The Podcast Academy, a site that published audio recorded at various conferences and events. These days I’m still actively involved in the space, handling audio post for a select group of clients.

I continue to get a good amount of use out of the gear that I bought to record my own podcast (2004-2006). For instance I still have my Electrovoice RE-20 mic on my boom, with a Shure SM7B and a Heil PR-40 stored in my closet. I’m still using a Mackie Mixer (Onyx 1220i), and my rack is full of analog processors including an Aphex Compellor, a dbx mono compressor, a dbx voice processor, and a Telos One Digital Phone Hybrid. Up top in the rack I have a Marantz Solid State Compact Flash Recorder. At the very bottom I’ve integrated an NAD Power Amplifier that drives my near field monitors.

And I continue to keep a very close eye on on what’s out there with regards to suitable gear for Podcasting Systems. In fact I have a clear idea of what I would buy TODAY if I decided to replace the components in my current system. And it’s not a cheap solution intended for novices. In fact this new system is quite expensive. Relatively speaking, for the approximate cost of a custom 6-Core MacPro Tube – this is my vision for a cutting edge professional Podcasting System that I am convinced would supply a ton of flexibility and output reference quality audio.

The Console

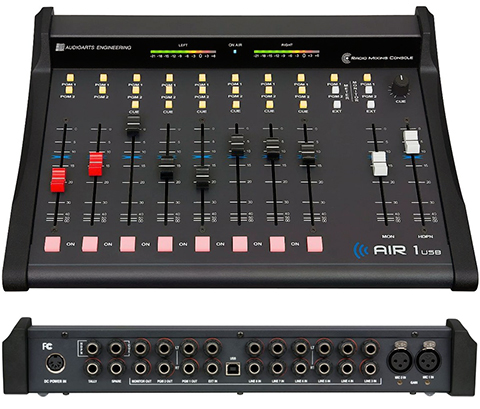
Notice I make reference to Console instead of Mixer? This is by design. For the brain of my system I’ve decided on the Air-1 USB Radio Console by Audioarts Engineering.
air_1-NEW

The Air-1 features two XLR Mic Inputs, six Balanced Stereo Input channels, USB I/O, two Program Buses, and a Cue Output. The active state of the input channels can be controlled by channel dependent On/Off push button switches. Routing to the Program Buses as well as the Cue Bus is also controlled by the use of push button switches that illuminate when active. The level of the Cue Bus is independently controlled by a dedicated pot. The console uses long-throw faders that are common on broadcast consoles, with independent faders for Monitor and Headphone outputs. By the way the Cue is a prefader Bus on the inputs that allows the operator to monitor off-air channels. It’s entirely separate from the main mix, or in this case – the Program Bus.

The USB I/O is bidirectional. It can be used to send and receive audio from a computer workstation for easy recording, playout, and automation system integration. There’s ample flexibility for Skype and easy setup for a telephone hybrid mix-minus. The device uses an external power supply that is included.

Note that many output options and routing configurations are customizable by way of Dipswitches located on the bottom of the chassis. Currently the AIR-1 retails for $1,789.00 at BSW.

The Processor

Since 2004 there have been a few audio processors that have been widely used by Podcast Producers. At first I recall the popularity of the affordable dbx 266XL (now discontinued) 2-channel Compressor Expander/Gate. Then there was the Aphex 230 Vocal Processor (also discontinued) that achieved early acceptance due to excellent marketing by Aphex and their recognition of Podcasting as a viable option for broadcasters to widen their reach. The device eventually attracted the interest of Podcast Producers who were willing to shell out upwards of $700 for this great sounding piece of gear.

These days (and much to my surprise) there is a fairly inexpensive Compressor/Limiter/Gate by Behringer that has steadily gained popularity in the space. From what I can tell this is due to a few prolific “Podcast Consultants” using the processor and recommending/selling it for whatever reason. Personally I was never a fan of the brand. But that’s just me.

For this new high end system I am selecting the Wheatstone/Vorsis M-1 Digital Mic Processor.

m-1

The processor uses sophisticated digital audio processing algorithms throughout it’s internal chain. On the back of the unit there is one AES digital output, one Mic input, and a single analog (XLR) output that can be set to pass Mic or Line Level signal. This is important in the design of this Podcasting System due to the way in which it would connect to the Air-1 Console. In essence the Mic would get connected to the processor input and the analog output switched to Mic Level would feed one of the dedicated Mic channels on the Console. There is also a Dipswitch matrix located on the back of the device that allows the operator to customize a few options and functions.

The M-1 supports variable Sample Rates, has switchable Phantom Power, Hi-Pass/Low-Pass filters, a De-Esser, Compressor, and Expander. There are independent Input and Output Gain pots and a Level Meter that can be switched to monitor Input or Output. There is also a De-Correlator function, also referred to as a Phase Rotator that will tweak waveform symmetry.

Also included is dual Parametric EQ with user defined frequencies, cut/boost control, and variable Q. In addition there are two independent Shelving filters that can be used to shape the overall frequency response of the signal. The EQ stage can be placed before or after the Compressor in the processing chain.

But that’s not all. The M-1 can be controlled and customized locally or remotely via Windows GUI software running on a PC. Note that although this feature is intriguing, it would be of no use to me based on my dependency to the Mac platform. In fact from what I can tell there may be some Windows operating system incompatibilities with the bundled software. This may very well cause difficulties running the Windows software on a Mac in an emulated environment. I’ll need to check into it. But like I said, with no native support for the Mac I would probably need to pass. Currently the M-1 Processor retails for $799.00 at BSW.

The Mic

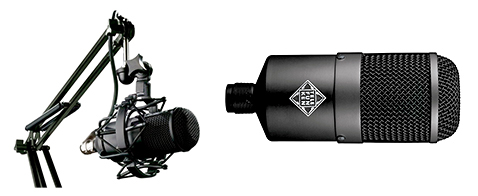
At this point it would make very little sense to even consider purchasing yet another microphone based on my current lot (EV RE-20, Shure SM7B, and Heil PR-40). But I figured what the heck – why not explore and try something new? Note that I’ve never tested the following mic. So I’m shamelessly speculating that I would even like it!. What drew me to this mic was the reputation of the manufacturer and the stellar package deal that is currently available. The mic is the Telefunken M82 Broadcast.
mic

The M82 is an end-address, large diaphragm (35mm capsule) cardioid dynamic mic (Frequency Range 25Hz – 18kHz). What’s interesting is this mic is designed to be used as a kick-drum mic, yet it is well suited for broadcast voice applications. In fact if I recall the timeless EV-RE20 was also originally designed to be used as a kick-drum mic before it was widely embraced by radio and voice professionals.

Anyway the Telefunken supplies two separate EQ Switches:Kick EQ and High Boost. The Kick EQ engages a lower mid-range cut at around 350Hz. The High Boost shifts upper mid-range and high frequencies starting around 2kHz with a 6dB boost by 10kHz. Any combination of the two switches can be used to tailor the response of the mic.

Here is what really caught my attention – the mic is available in a Broadcast Package that includes the M786 Broadcast Boom with built in XLR cable, the M700 Shock Mount, and a protective case. Currently the M82 Broadcast Package retails for $499.00 at BSW.

The Hybrid

As far as I’m concerned any serious Podcast Producer who intends to incorporate remote guests needs to implement an easy alternative to the now ubiquitous Skype. A Digital Telephone Hybrid is the obvious choice, allowing program guests to call into the host system using a standard telephone line. With proper configuration of a mix-minus by the host, seamless communication can be achieved.

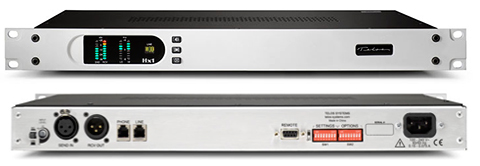
Sometime around 2010-2011, Telos Systems replaced the ubiquitous Telos One with the brand new Hx1 Hybrid. I’ve chosen this device for my system.
hybrid

The Hx1 receives an analog “POTS” (Plain Old Telephone Service) line signal and implements digital conversion resulting in excellent audio quality. This Hybrid features automatic gain control in both directions, a ducking system, feedback reduction, and a digital dynamic EQ. The device is also capable of Auto-Answer functions for unattended operation.

Using the Program 2 Bus on the Air-1 Console to feed the Hx1 input, setting up a broadcast mix-minus would be a snap. In my current system I’ve placed a single channel dbx dynamics compressor between the output of my Telos One and the input used on my Mackie Board. This works pretty well. I’d need to test this setup with the Hx1 to determine whether the compressor would even be necessary. Currently the Telos Hx1 Digital Hybrid retails for $695.00 at BSW.

The Recorder

I’ll be frank:In a studio environment I’m not a fan of using a small, handheld digital recorder. I’m aware of what’s being recommended by the experts, mainly models by Edirol and Roland. Of course these devices are perfectly capable and well suited for remote recording, ENG, and video production. I prefer a dedicated rack mounted component, just like the Marantz PMD-570 currently living in my rack.

The Marantz piece that I own has an interesting feature: Besides PCM and MP3 recording, the unit can record directly to MP2 (MPEG-1, Layer II) on the fly. This is the file format that I use to exchange large files with clients. Basically the clients will convert lossless files (WAV, AIFF) to MP2 prior to uploading to my FTP server. In doing so the file is reduced in size by approximately 70%. The key is when I take delivery and decode … most, if not all of the audible fidelity is retained. Needless to say MP2 is a viable intermediate file format and it is still used today in professional broadcast workflows.

Again it’s time for something new. For this Podcasting System I’m going with the Tascam SS-R200 Solid State Recorder.

recorder

The SS-R200 will accept Compact Flash and SD/SDHC Memory cards as well as USB Flash Drives. The device will also accept a USB keyboard that can be used for metadata editing. Supported file formats are WAV and MP3 @ 44.1/48kHz. I/O is flexible and includes XLR balanced input/output, RCA unbalanced, and coaxial S/PDIF digital. There are additional I/O support options for RS-232C and Parallel Control for external device interfacing. The display is clear, and the transport buttons are large and easily accessible.

One slight issue with the recorder – I don’t believe you can connect it directly to a computer via USB (My Marantz supports this). Of course the work around is to use USB Flash drives for recording. Compact Flash and SD/SDHC recording will require an additional device for computer interfacing. Currently the Tascam SS-R200 recorder retails for $549.00 at BSW.

The Cost

Time to tally up:

Audioarts Air-1 Console: $1,789.00
Wheatstone M-1 Processor: $799.00
Telefunken M82 Mic Kit: $499.00
Telos Hx1 Hybrid: $695.00
Tascam CF Recorder: $549.00

Total: $4,331.00 (not including applicable tax and shipping)

There you have it. Like I said this is far from a budget solution. And surely I’m not suggesting that you need to spend this kind of cash to record Podcasts. However for the serious producer with appropriate technical skills and a revenue stream, this is not unattainable. As far as me personally – at this time this system is not in my immediate plans. But you never know. I’ve always wanted to replace my mixer with a Broadcast Console, so contemplation will continue …

Notes

I’ve purposely refrained from recommending accessories including cables and headphones. And regarding headphones, after years of wearing them for hours upon hours, I’ve moved over to a moderately priced set of Shure SE215 Earphones.

Full sized headphones can be very uncomfortable when worn for extended periods of time, hence my decision. Believe me it was a major adjustment. These Shure’s are not considered a high-end option. However they do serve the purpose. Isolation is good and sound quality is perfectly suitable for dialogue editing. And I’m much more comfortable wearing them. I still use my Beyer Dynamics, AKG’s, and Sony’s for critical monitoring when necessary.

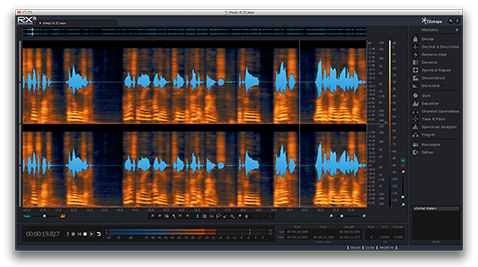
And I’ve also refrained from recommending software solutions like DAWS and plugins. This would be the source of yet another installment. However I will make one recommendation. If you are serious about high quality sound and often deal with problematic audio, you need to seriously consider RX3 Advanced by iZotope.
rx3

In my work this package is simply indispensable. I’m not going to get into the specifics. I will say that the Broadband DeNoiser, the Dialog Denoise Module, and the Dereverb features are simply spectacular. Indeed it’s an expensive package. I’m grateful that I have it, and it’s highly recommended.

And lastly, storage. Since all components are rack-mountable, the obvious solution would be a 4U enclosure by Middle Atlantic or Raxxess. I would also suggest a 1 Space Vent Panel installed between the Processor and the Hybrid. And if it’s convenient the Console can be placed on top of the enclosure due to it’s relatively small footprint.

One final note:I have no formal affiliation with BSW. I simply pointed to their listings due to price and availability.

-paul.