Information Bar Fill @2.35:1 …

I am releasing an alternative version of my Information Bar Fill Custom Lower Third Title for FCPX.

This version is designed to be used over clips with a 2.35:1 aspect ratio. Basically I’ve tweaked the default values for the initial positioning of the two lines of text as well as the graphical bar.

I’ve also reset the low value limit for the horizontal positioning of the text and bar that will prevent these elements from moving outside of the image frame.

bar-fill_cinemascope

Download

-paul.

Adobe Loudness Radar Up and Running …

With the release of the Adobe “CC” versions of Audition and Premiere Pro, users now have access to a customized version of the tc electronic Loudness Radar Meter.

LR-Banner

In this video from NAB 2013, an attendee asks an Adobe Rep: “So I’ve heard about Loudness Radar … but I don’t really understand how it works.”

I thought it would be a good idea to discuss the basics of Loudness Radar, targeting those who may not be too familiar with it’s design and function. Before doing so, there are a few key elements of loudness meters and measurement that must be understood before using Loudness Radar proficiently.

Loudness Measurement Specifications:

Program “Integrated” Loudness (I): The measured average loudness of an entire segment of audio.

Loudness Range (LRA): The difference between average soft and average loud parts of a segment.

True Peak (dBTP): The maximum electrical amplitude with focus on intersample peaks.

Meter Time Scales:

• Momentary (M) – time window:400ms
• Short Term (S) – time window:3sec.
• Integrated (I) – start to stop

Program Loudness Scales

Program Loudness is displayed in LUFS (Loudness Units Relative to Full Scale), or LKFS (Loudness K-Weighted Relative To Full Scale). Both are exactly the same and reference an Absolute Scale. The corresponding Relative Scale is displayed in LU’s (Loudness Units). 0 LU will equal the LUFS/LKFS Loudness Target. For more information please refer to this post.

LU’s can also be used to describe the difference in Program Loudness between two segments. For example: “My program is +3 LU louder than yours.” Note that 1 LU = 1 dB.

Meter Ranges (Mode/Scale)

Two examples of this would be EBU +9 and EBU +18. They refer to EBU R128 Meter Specifications. The stated number for each scale can be viewed as the amount of displayed loudness units that exceed the meter’s Loudness Target.

From the EBU R128 Doc:

1. (Range) -18.0 LU to +9.0 LU (-41.0 LUFS to -14.0 LUFS), named “EBU +9 scale”

2. (Range) -36.0 LU to +18.0 LU (-59.0 LUFS to -5.0 LUFS), named “EBU +18 scale”

The EBU +9 Range is well suited for broadcast and spoken word. EBU +18 works well for music, film, and cinema.

Loudness Compliance: Standardized vs. Custom

As you probably know two ubiquitous Loudness Compliance Standards are EBU R128 and ATSC A/85. In short, the Target Loudness for R128 is -23.0 LUFS with peaks not exceeding -1.0 dBTP. For ATSC A/85 it’s -24.0 LKFS, -2.0 dBTP. Compliant loudness meters include presets for these standards.

Setting up a loudness meter with a custom Loudness Target and True Peak is often supported. For example I advocate -16.0 LUFS, -1.5 dBTP for audio distributed on the internet. This is +7 or 8 LU hotter than the R128 and/or ATSC A/85 guidelines (refer to this document). Loudness Radar supports full customization options to suit your needs.

Pause/Reset

Loudness meters have “On and Off” switches, as well as a Reset function. For Loudness Radar – the Pause button temporarily halts metering and measurement. Reset clears all measurements and sets the radar needle back to the 12 o’clock position. Adobe Loudness Radar is mapped to the play/pause transport control of the host application.

Gating

The Loudness Standard options available in the Loudness Radar Settings designate Measurement Gating. In general, the Gate pauses the loudness measurement when a signal drops below a predefined threshold, thus allowing only prominent foreground sounds to be measured. This results in an accurate representation of Program Loudness. For EBU R128 the relative threshold is -10 LU below ungated LUFS. Momentary and Short Term measurements are not gated.

• ITU BS.1770-2 (G10) implements a Relative Gate at -10 LU and a low level Gate at -70 LU.

• Leq(K) implements a -70 LU low level Gate to avoid metering bias during 100% silent passages. This setting is part of the ATSC A/85 Specification.

Loudness Radar In Use

In Audition CC you will find Loudness Radar located in Effects/Special/Loudness Radar Meter. It is also available in the Effects Rack and in the Audio Mixer as an Insert. Likewise it is available in Premiere Pro CC as an Insert in the Audio Track Mixer and in the Audio Effects Panel. In both host applications Loudness Radar can be used to measure individual clips or an entire mix/submix. Please note when measuring an audio mix – Loudness Radar must be placed at the very end of the processing chain. This includes routing your mix to a Bus in a multitrack project.

Most loudness meters use a horizontal graph to display Short Term Loudness over time. In the image below we are simulating 4 minutes of audio output. The red horizontal line is the Loudness Target. Since the simulated audio used in this example was not very dynamic, the playback loudness is fairly consistent relative to the Loudness Target. Program Loudness that exceeds the Loudness Target is displayed in yellow. Low level audio is represented in blue.

Each horizontal colored row represents 6 LU of audio output. This is the meter’s resolution.

histrogram

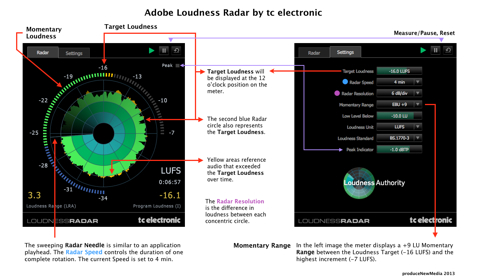
Loudness Radar (click image below for high-res view) uses a circular graphic to display Short Term Loudness. A rotating needle, similar to a playhead tracks the audio output at a user defined speed anywhere from 1 minute to 24 hours for one complete rotation.
LM-480

The circular LED meter on the perimeter of the Radar displays Momentary Loudness, with the user defined Loudness Target (or specification target) visible at the 12 o’clock position. The Momentary Range of the LED meter reflects what is selected in the Settings popup. The user can also customize the shift between green and blue colors by adjusting the Low Level Below setting.

The numerical displays for Program Loudness and Loudness Range will update in real time when metering is active. The meter’s Loudness Unit may be displayed as LUFS, LFKS, or LU. The Time display below the Loudness Unit display represents how long the meter is/was performing an active measurement (time since reset). Lastly the Peak Indicator LED will flash when audio peaks exceed the Peak Indicator setting.

If this is your first attempt to measure audio loudness using a loudness meter, focus on the main aspects of measurement:Program, Short Term, and Momentary Loudness. Also, pay close attention to the possible occurrence of True Peak overs.

In most cases the EBU R128 and ATSC A/85 presets will be suitable for the vast majority of producers. Setup is pretty straightforward:select the standardization preset that displays your preferred Loudness Unit (LUFS, LKFS, or LU’s) and fire away. My guess is you will find Loudness Radar offers clear and concise loudness measurements with very little fuss.

Notes:

You may have noticed the Loudness Target used in the above graphic is -16.0 LUFS. This is a custom target that I use in my studio for internet audio loudness measurements.

-paul.

Articles and Documentation used as Reference:

tc electronic LM2 Plugin Manual

ITU-R BS.1770-3 Algorithms to measure audio programme loudness and true peak audio level

EBU R128 Loudness Recommendation

EBU-Tech 3341 Loudness Metering
Information Bar Fill Lower Thirds …

If you look in the FCPX Titles Effects Browser under the Lower Thirds Category you will notice an Information Bar Lower Thirds. The is a bundled FCPX Title. The title itself is actually quite stylish. It’s subtle, with a semitransparent black bar and customizable text positioned on two lines.

A few days ago I was sifting through a forum and noticed a post by a member who uses this title regularly. He was asking for help regarding the opacity of the “bar.” Basically it’s opacity was not customizable. It was preset to somewhere around 50%. The forum member politely asked if someone could possibly load up the title in Motion, tweak in an Opacity slider for the bar, and make it available. I knew this would be easy, especially if the default Title supported the “Open a copy in Motion” option. It did and the rest is history.

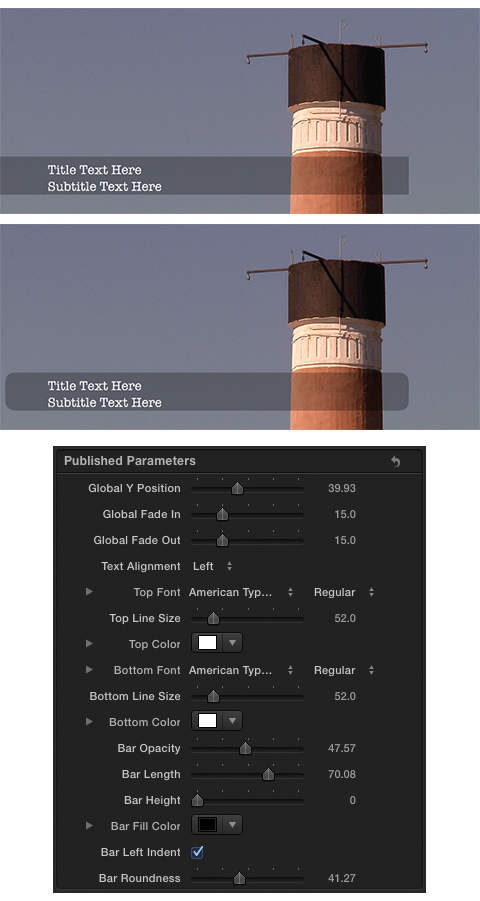
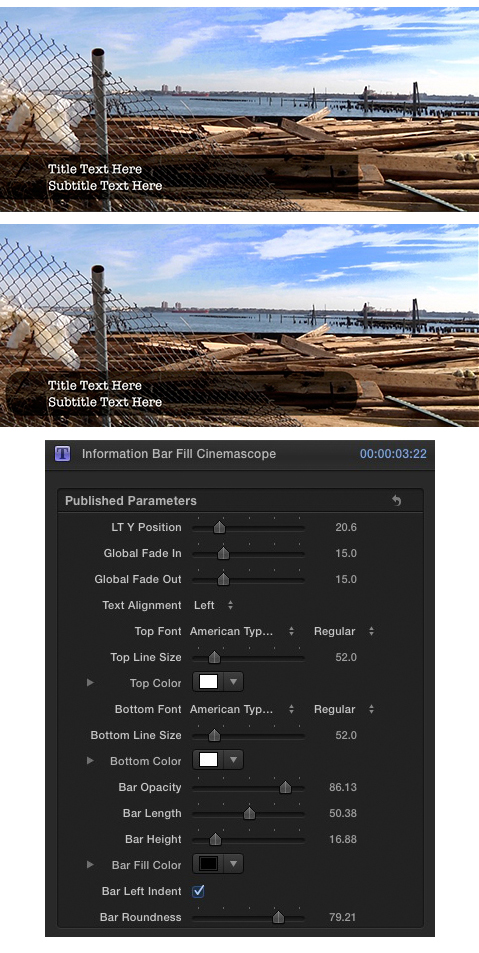
If you review the settings snapshot below you will notice I added additional options that make my version much more useful, at least for me. I added support for Global Y Positioning (more on this below), Fade In/Out Frames, Bar Opacity, Bar Left Indent, and Bar Roundness.

ib-matrix

By default the Title places the text within the 1.78:1 Title Safe Area located at the bottom left of the zone. The Global Y Position setting allows the operator to cumulatively move all Title elements up on the Y axis to 2.35:1 Title Safe positioning.

The Original version of the Title has two check boxes that control whether all elements fade in and/or out. I added Fade in and Fade Out sliders that support frame by frame customization. Setting the sliders to zero results in no fading.

Bar Opacity is now supported. I believe I set this up to default to 50% Opacity. Regardless – it’s now fully customizable.

Bar Left Indent is an interesting setting. Notice there is also a Bar Roundness setting that will change the shape of the bar. Since by default the bar is anchored to the left of the image frame, applying roundness to it results in a partially obstructed left edge. The Bar Left Indent setting moves the bar’s left edge in a few pixels to the right to compensate. In fact It can be used without any roundness applied as well for creative purposes.

There have been some reports of font change instability. In fact this behavior is also present in the original version of the Title. I found this to be not that big of a deal.

The Installer will place the Title in the FCPX Titles Browser under the Custom Lower Thirds Category/Information Bar Theme.

-paul.

Download

spotPoint Lighting Duo …

spotPoint Lighting Duo is now available for download. This version features simultaneous use and control of Spot and Point Lighting. I decided to build this out as an Effect. So there is no control for text as previously suggested.

Please read the following Notes prior to installing:

I decided to use a standard installer package as a delivery mechanism as opposed to the custom version that I wrote. I could have built a new custom installer for the Duo version and distributed it independently. Or I could have set things up to give the user the option to install one version or the other (Original / Duo) – or both. This would have required much more code. The package installer that I am using already supports this. It is easier to build and maintain, especially when multiple versions of a plugin are slated for distribution.

If you look in the Customize section of the installer you will see the original version of spotPoint Lighting as well as the new Duo version. spotPoint.1 is the same exact version as the original release. The only thing that is different is the FCPX Browser display thumbnail. If you have the previous version installed and elect to reinstall it – the existing version will be overwritten. You should not notice any difference except for the visual change of the browser thumbnail.

By the way these installer packages are easy to create. If you are developing and distributing Motion Templates and need help with creating an installer package, ping me. I’d be happy to walk you through it. I’m looking into building some sort of auto-notification system (like Sparkle) that would alert the user when new plugin versions or updates are available. The community needs something like this that is non-obtrusive to the user.

-paul.

Download

sp-duo

spotPoint Lighting – Simultaneously …

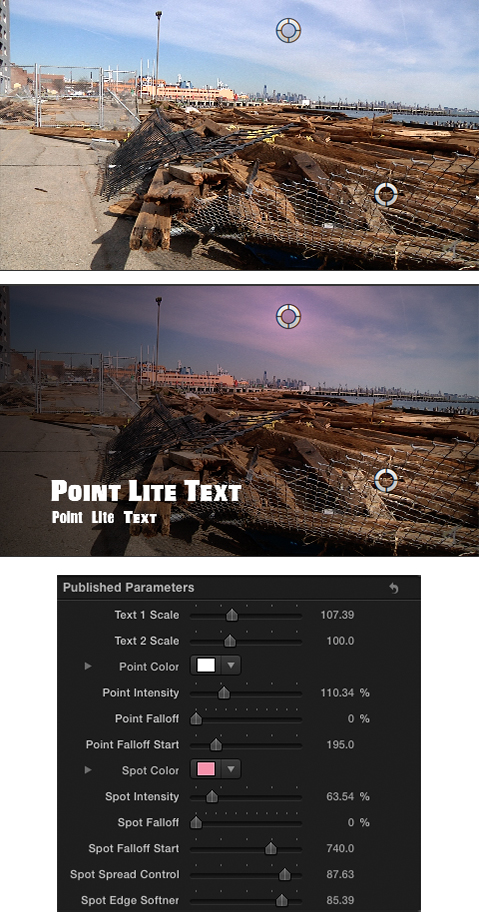
I’m working on the next version of spotPoint Lighting. The next version will include simultaneous use and control of Spot and Point Lights. The example below is actually a Title as opposed to the Effect that was initially released. I’m trying to decide which format would be more useful. Having two independent text layers right within the package is definitely a plus. OTOH Effects are much cleaner implementations, and least for me – all due to their ability to be applied to individual clips. Titles are fine for timeline compositing. They do add a bit of clutter to the mix …

Below I used the Spot Light to warm up the sky independent of the Point Light.

-paul.

spot-matrix

spotPoint Lighting for FCP X …

I’m distributing a new effect that offers some interesting control for simulated Spot and Point lighting of your video shots:

spotPoint Lighting

splight

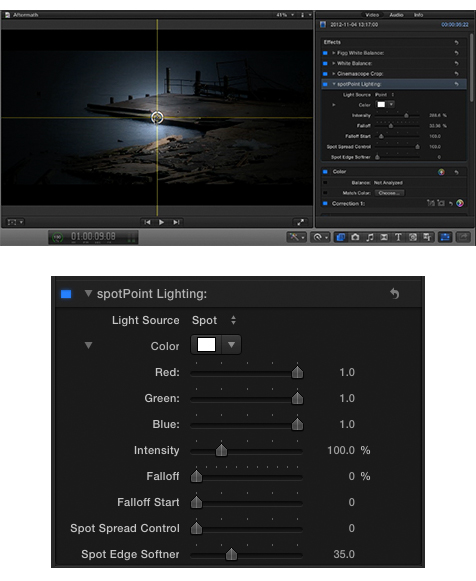
As noted there are two Light Source options:Spot and Point. You can set the color of the light to suit your needs. Global controls include Intensity, Falloff, and Falloff Start. There are two dedicated controls for the Spot source:Spread Control and Edge Softener. The positioning of the light is controlled by a Drag Target. Incidentally both light sources are flat and frontal.

I really like the Point source lighting. You can create some very interesting looks and cinematic mood lighting scenarios., especially when experimenting with different color light sources.

Check out the produceNewMedia Vimeo Page for a demo. There is also a demo for Cinemascope Toolkit on that page as well.

In case you are wondering why I didn’t embed the video – for some reason I’m having problems with the Vimeo player when it is resized to fit into the supported area of my site theme (within a blog post). I am looking into it …

The custom installer will send the effect to a new Lightsource Category located in your FCPX Effects Browser.

-paul.

spotPoint Lighting

Download

Film Zone

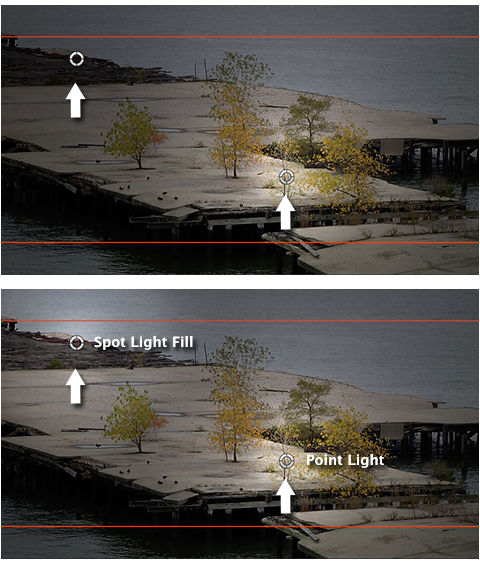
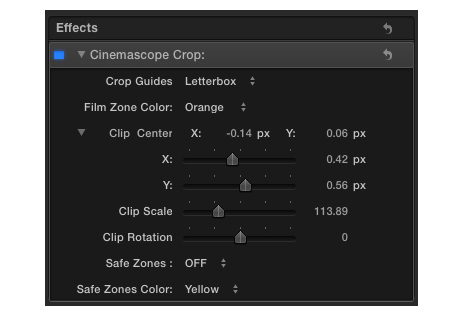
Cinemascope Toolkit ver.1.2 has been released. The Crop Guides popup now displays one of three options:Letterbox, Film Zone, Letterbox and Film Zone. The Film Zone is essentially a set of colored cropping guides less the letterbox matte(s). Viewing the underlying clip with the Film Zone displayed on it’s own makes it easy to view what is being cropped. Also, the Film Zone display works well when the underlying clip is very dark at the top and/or bottom of the frame. You can set the Film Zone color to orange (default), black, or white.

Also new in this release is the capability to reposition the clip manually by clicking and dragging the center point object (Drag Target). When doing so the clip positioning sliders in the EFX UI will update accordingly.

Here is a look at the new controls:

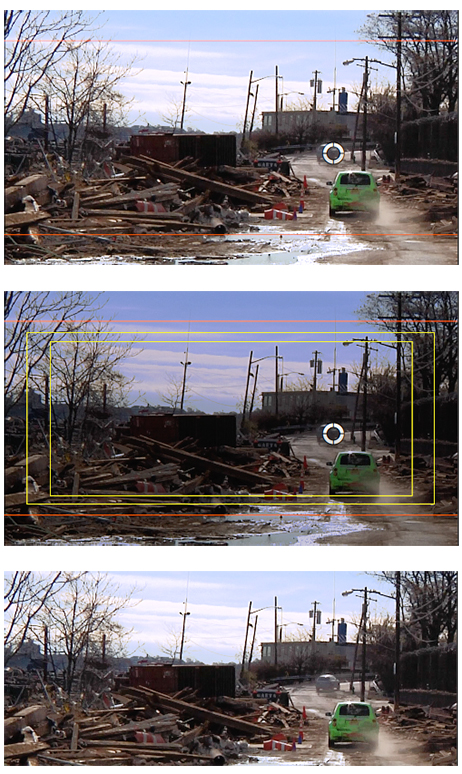
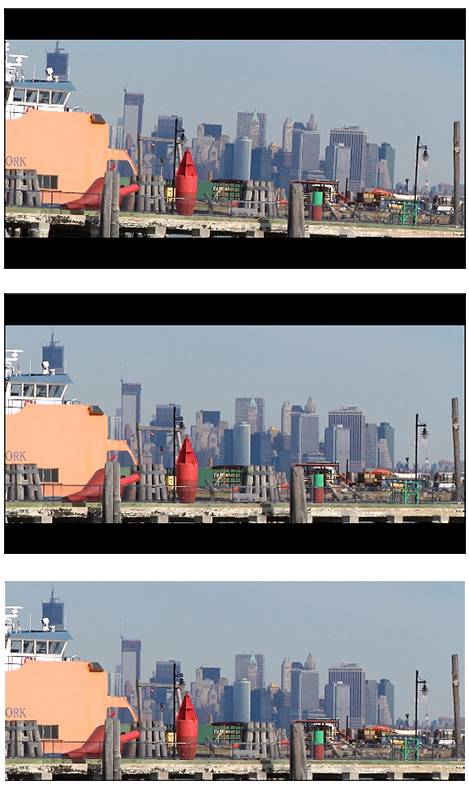
In the image matrix below you can see the top clip was repositioned (and scaled). The visible Film Zone clearly displays the 2.35:1 frame. In the middle image the 2.35:1 Safe Zones are displayed along with the Film Zone. Note the clips reduced opacity. The bottom image is the cropped output.

Please note you must set the FCP X Player Background to Black when using Cinemascope Toolkit. Do this in the application Preferences/Playback. When you switch on the Safe Zones display the clip opacity is reduced. This provides a clear view of the zones. If the player background is set to Checkerboard, there’s nothing behind the clip – it’s transparent. The clip’s opacity reduction will be prevelant and this feature will be useless.

Also – I designed the matting system to be independent of the clip’s image layer. Any agressive grading or exposure adjustments will have no effect on the visual state of the letterbox matte(s).

-paul.

Download Cinemascope Toolkit

Safe Zones

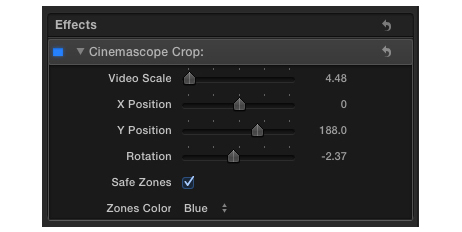
Cinemascope Toolkit ver.1.1 was released yesterday. I added the ability to display 2.35:1 Safe Zones (Yellow or Blue) to clip(s) where the filter is applied. When the Safe Zones option is switched on the underlying clips’ opacity is reduced to about 30%.

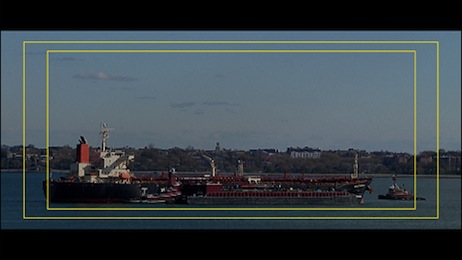
Below I use the Yellow Safe Zones for better visibility.

The Rotation parameter is also new. Instead of publishing the default Motion circular knob object to control this effect I used a slider. Moving it in either direction rotates the video image CW/CCW up to +/- 20°. Keep in mind you may need to adjust the scale of the image to compensate for the rotation of the frame. It all depends on how you decide to frame your image within the letterbox matte(s).

I needed to export a still of the shot below @2.35:1. Notice in the top example the image framing is off. Pulling the Rotation slider slightly to the left fixed the problem. The exported (cropped) image looks much better.

One slight issue with this tool is that it is an “Effect.” This means it is applied on a clip by clip basis. Not a problem. However if for example you switch on the Safe Zones and reduce the clip’s Exposure/Highlights – the visibility of the Safe Zones are equally affected. If the toolkit was built as a Title or Generator, this would not be the case. OTOH Titles and Generators add additional clutter in your timeline. Also, any image manipulation to the underlying video (scale, position, etc.) from within the Title or Generator would be applied globally to everything below it. Obviously a problem. The ability to apply this kit as an Effect makes it much more useful …

-paul.

Download Cinemascope Toolkit

Final Cut Pro Offline Edit with ProRes Proxy…

It has been documented that the newly released feature film “Eat Pray Love” staring Julia Roberts was edited entirely on a Final Cut Pro workstation.

I found this most interesting:

“The editors found an efficient solution in ProRes 422 (Proxy), a new version of the Apple ProRes codec introduced with Final Cut Pro 7. As soon as dailies arrived from EFILM, Assistant Editor Doc Crotzer would transcode the files from ProRes 422 (HQ) to ProRes 422 (Proxy), organize the footage into bins, and prepare the material for editing.”

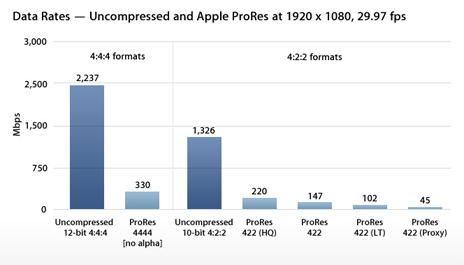
Review this chart, and notice the variations in data rates of the ProRes family of codecs:

Obviously lower data rates = smaller file sizes. The bottom line is working with ProRes Proxy files (Offline copies of original ProRes 422/HQ files) creates a much more efficient workflow that is less taxing on any system.

I’ve adopted a slick method using my iMac for rough cutting ingested AVCHD footage that has been transcoded to ProRes Proxy via Final Cut Pro’s Log and Transfer. Depending on the complexity of the finished project sequence, I can finish and output on the iMac, or – move the project and it’s assets over to my MacPro for finishing. The key is prior to outputting, the edited Proxy clips can be re-captured and replaced with higher quality ProRes versions.

The Workflow:

  • Set up the FCP Project and Sequence. My sequences are typically 1080p/24.
  • Add a new Bin in the FCP Browser and designate it as the Logging Bin.
  • Mount media and run Log and Transfer. From the Import Preferences Action Popup menu, set ProRes Proxy as the ingest transcode format.
  • Log and Transfer clips into the project. Before closing Log and Transfer, reset the ingest transcode format to ProRes 422.
  • Close Log and Transfer and edit clips into sequence.

</br

Reconnect Media

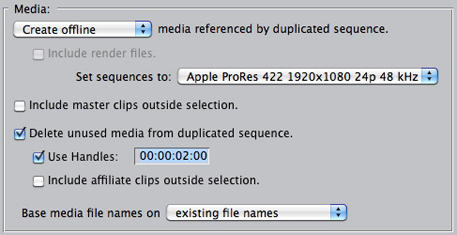
  • Select the project sequence in the Browser. From the FCP menu, run Media Manager: File/Media Manager. Create an Offline Sequence and set to ProRes 422.

  • Name and save the new Sequence. A new tab will appear in the FCP Browser that includes the duplicate sequence and it’s offline clips.
  • Select the new sequence. From the FCP Menu: File/Batch Capture.
  • Choose All Offline Items in Selection from the displayed Re-Import popup menu. Log and Transfer will run and recapture the sequence clips as ProRes 422 versions.
  • Finish and output.

If you edit on an iMac, a Mac Portable with an external FW800 hard drive, or if you are looking for a more efficient large-scale project workflow – try this method. It works well for me …

-ptfigg.

aspectRatio: New design

I’ve consolidated the design and functionality of the aspectRatio version 1 series UI.

The main (and only) program window now consists of two individual views: Fixed and Custom Calculations. The user can select a view with the Segmented Control, located at the bottom right of the application window. Additional fixed calculation actions that were previously accessible on various “sheets” are now located in a new lower drawer.

I rewired all the application objects and edited a good amount of code. I need to test the application before I release it. I think it turned out pretty well …

Update: aspectRatio ver.1.10 has been released.

-paul.

Technorati Tags:
, , ,

Pulldown

Confused by the term Pulldown, or Telecine?

Here are the facts:

24p = 23.98 fps (Progressive)

29.97 fps = 59.94 interlaced fields per second, aka 60i

• Interlaced video displays 60 half frames per second

• Progressive video takes entire video frames on the go

• Progressive video requires 2x the bandwidth of interlaced video

Pulldown (Telecine)

This is the conversion process: 24p (film or video) — 29.97 (video).

• 2:3, or 3:2 (aka 2:3:2:3): 60 fields / 24 = 2.5. So each frame of 24p material needs to last for 2.5 frames of video

• 2:3:3:2 is referred to as Advanced Pulldown

Excerpt form Videomaker Magazine:

Here’s how it works: we are transferring 24p to 60i, which means we are converting 24 frames per second into 60 fields per second. The first frame of film is transferred to the first two fields of video and the next frame of film is transferred to the next three fields – 2:3. This results in some frames of film spanning two different frames of video or, to put it another way, some frames of video that are composed of fields from two different frames of film.

-paul.

Technorati Tags:
, ,

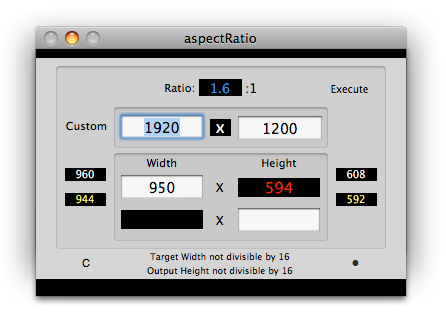
aspectRatio: Divisible by 16 …

Here is a glimpse of what I have planned for the next release for aspectRatio:

At this point I’ve implemented a suggested dimensions method that displays values evenly divisible by 16. The results are triggered by the Target Width and returned Output Height calculation.

Select MPEG formats are based on 16×16 macro-blocks. Evenly divisible (by 16) output dimensions will maximize the efficiency of the encoder and yield optimum results. For example: a purist would prefer a small 16:9 distribution video to be 480×272 instead of the common 480×270

Also included in this release: a user defined output font color preference setting [orange/red], and a Menu option that re-opens the main UI window if the user inadvertently closes it while the application is still running.

A release date has yet to be determined …

-paul.

Technorati Tags:
, , , ,