Information Bar Fill @2.35:1 …

I am releasing an alternative version of my Information Bar Fill Custom Lower Third Title for FCPX.

This version is designed to be used over clips with a 2.35:1 aspect ratio. Basically I’ve tweaked the default values for the initial positioning of the two lines of text as well as the graphical bar.

I’ve also reset the low value limit for the horizontal positioning of the text and bar that will prevent these elements from moving outside of the image frame.

bar-fill_cinemascope

Download

-paul.

LoudMax and Final Cut Pro X

One of the great features of Final Cut Pro X is the availability of Apple’s 64bit Logic audio processing plugins (aka Filters). In fact FCPX supports all 64bit Audio Units developed by third parties.

Let me first point out I’ve tested a fair amount of 64bit Audio Units in FCPX. Results have been mixed. Some work flawlessly. A few result in sluggish performance. Others totally crash the application. I can report that Nugen’s ISL True-Peak Limiter and Wave Arts Final Plug work very well in the FCPX environment.

ISL is a Broadcast Compliant True-Peak Limiter that uses standardized ITU-R B.S 1770 algorithms. Settings include Input Gain and True-Peak Limit. ISL fully supports Inter-Sample Peak detection.

Final Plug allows the operator to set a limiting Threshold as well as a Peak Ceiling. Decreasing the Threshold will result in an increase of average loudness without the audio output ever exceeding the Ceiling.

Recently Flux released a 64bit version of Elixir, their ITU/EBU compliant True-Peak Peak Limiter. Currently (at least on my MacPro) the plugin is not usable. Applying Elixir to a clip located in the FCPX storyline causes an immediate crash. I’ve reported this to the developer and have yet to hear back from them.

The plugins noted above range in price from $149 to $249.

One recommendation that often appears on discussion forums and blogs is the use of the Logic AU Peak Limiter to boost audio loudness while maintaining brick-wall limiting. This process is especially important when a distribution outlet or broadcast facility defines a specific submission target. A few audio pro’s have taken this a step further and recommended the use of the Logic Compressor instead of the Peak Limiter. In my view both are good. However proper setup can be daunting, especially for the novice user.

These days picture editors need to know how to color correct, create effects, and handle various aspects of audio processing. If you are looking for a straight forward audio tool that will brick-wall limit and (if necessary) maximize loudness, I think I found a viable solution.

lM.jpg LoudMax is an easy to use Peak Limiter and Loudness Maximizer. Operators can use this plugin to drive audio levels and to set a brick-wall Output Ceiling.

The LoudMax Output Slider sets the output Ceiling. So if you are operating in the “just to be safe mode”, or if you need to limit output based on a target spec., set this accordingly. If you need to increase the average loudness of a clip – decrease the Threshold setting until you reach the desired level. The Output Ceiling will remain intact.

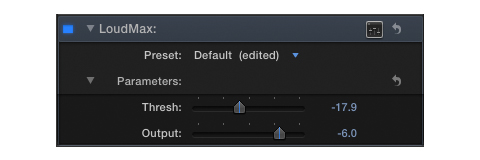
LoudMax also includes a useful Gain Reduction Meter. If viewing this meter is not important to you – there’s no need to run the plugin GUI. The Threshold and Output parameters are available as sliders, much the same as any other FCPX Filter or Template. You can also set parameter Keyframes and save slider settings as Presets.

lM-H

Using the Logic Peak Limiter and/or Compressor is definitely a viable option. Keep in mind that achieving acceptable results takes practice. Proper usage does require a bit more ingenuity due to the complexity of the settings. I’ll be addressing the concepts of audio dynamics Compression in the future. For now I urge you to take a look at LoudMax. It’s 32/64bit and available in both VST and AU formats. The AU Version works fine in FCPX. I found the processed audio results to be perfectly acceptable.

At the time of this writing LoudMax is available as Freeware.

-paul.

Information Bar Fill Lower Thirds …

If you look in the FCPX Titles Effects Browser under the Lower Thirds Category you will notice an Information Bar Lower Thirds. The is a bundled FCPX Title. The title itself is actually quite stylish. It’s subtle, with a semitransparent black bar and customizable text positioned on two lines.

A few days ago I was sifting through a forum and noticed a post by a member who uses this title regularly. He was asking for help regarding the opacity of the “bar.” Basically it’s opacity was not customizable. It was preset to somewhere around 50%. The forum member politely asked if someone could possibly load up the title in Motion, tweak in an Opacity slider for the bar, and make it available. I knew this would be easy, especially if the default Title supported the “Open a copy in Motion” option. It did and the rest is history.

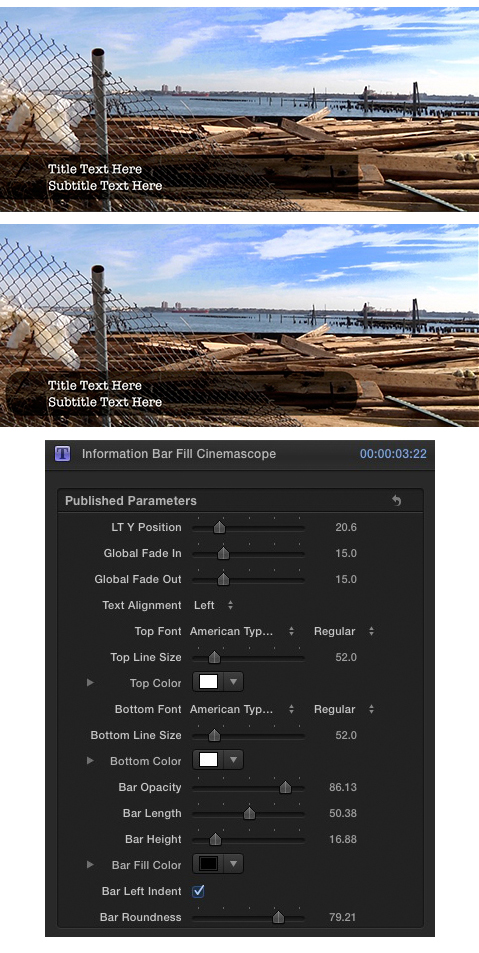
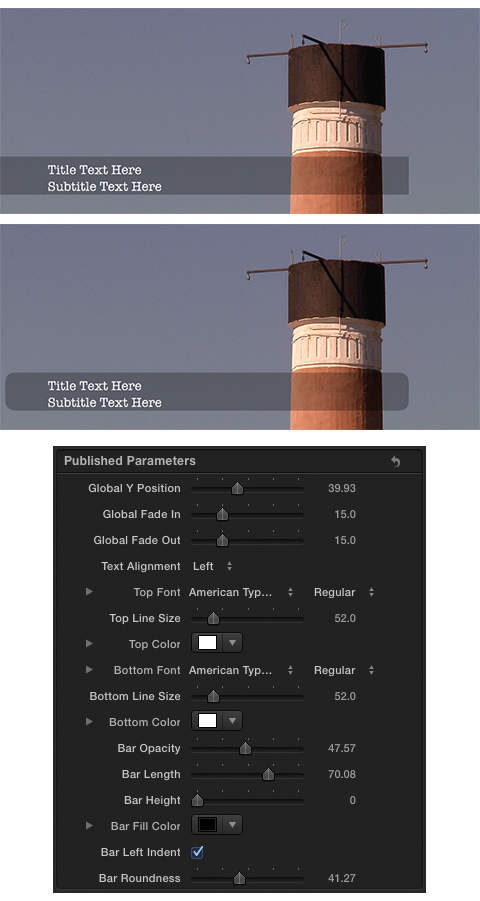
If you review the settings snapshot below you will notice I added additional options that make my version much more useful, at least for me. I added support for Global Y Positioning (more on this below), Fade In/Out Frames, Bar Opacity, Bar Left Indent, and Bar Roundness.

ib-matrix

By default the Title places the text within the 1.78:1 Title Safe Area located at the bottom left of the zone. The Global Y Position setting allows the operator to cumulatively move all Title elements up on the Y axis to 2.35:1 Title Safe positioning.

The Original version of the Title has two check boxes that control whether all elements fade in and/or out. I added Fade in and Fade Out sliders that support frame by frame customization. Setting the sliders to zero results in no fading.

Bar Opacity is now supported. I believe I set this up to default to 50% Opacity. Regardless – it’s now fully customizable.

Bar Left Indent is an interesting setting. Notice there is also a Bar Roundness setting that will change the shape of the bar. Since by default the bar is anchored to the left of the image frame, applying roundness to it results in a partially obstructed left edge. The Bar Left Indent setting moves the bar’s left edge in a few pixels to the right to compensate. In fact It can be used without any roundness applied as well for creative purposes.

There have been some reports of font change instability. In fact this behavior is also present in the original version of the Title. I found this to be not that big of a deal.

The Installer will place the Title in the FCPX Titles Browser under the Custom Lower Thirds Category/Information Bar Theme.

-paul.

Download

spotPoint Lighting – Simultaneously …

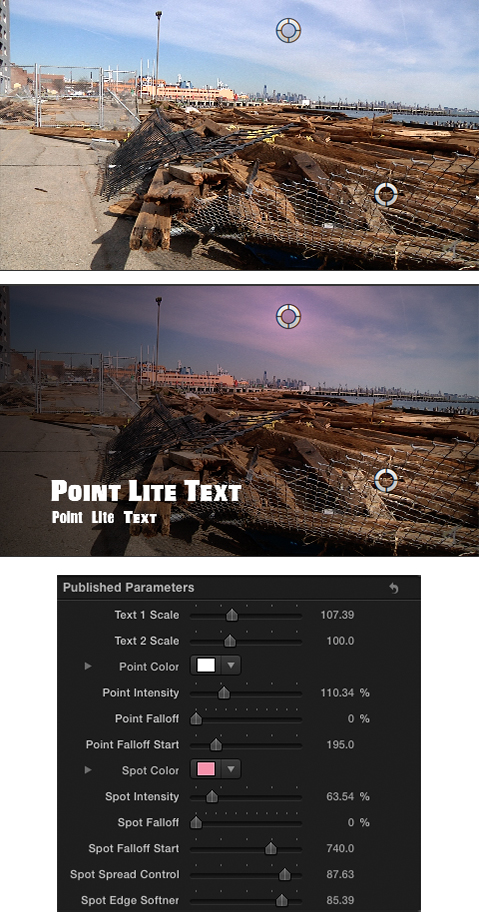
I’m working on the next version of spotPoint Lighting. The next version will include simultaneous use and control of Spot and Point Lights. The example below is actually a Title as opposed to the Effect that was initially released. I’m trying to decide which format would be more useful. Having two independent text layers right within the package is definitely a plus. OTOH Effects are much cleaner implementations, and least for me – all due to their ability to be applied to individual clips. Titles are fine for timeline compositing. They do add a bit of clutter to the mix …

Below I used the Spot Light to warm up the sky independent of the Point Light.

-paul.

spot-matrix

spotPoint Lighting for FCP X …

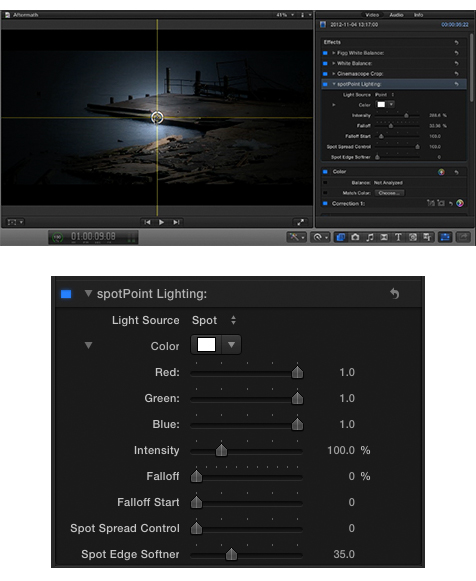
I’m distributing a new effect that offers some interesting control for simulated Spot and Point lighting of your video shots:

spotPoint Lighting

splight

As noted there are two Light Source options:Spot and Point. You can set the color of the light to suit your needs. Global controls include Intensity, Falloff, and Falloff Start. There are two dedicated controls for the Spot source:Spread Control and Edge Softener. The positioning of the light is controlled by a Drag Target. Incidentally both light sources are flat and frontal.

I really like the Point source lighting. You can create some very interesting looks and cinematic mood lighting scenarios., especially when experimenting with different color light sources.

Check out the produceNewMedia Vimeo Page for a demo. There is also a demo for Cinemascope Toolkit on that page as well.

In case you are wondering why I didn’t embed the video – for some reason I’m having problems with the Vimeo player when it is resized to fit into the supported area of my site theme (within a blog post). I am looking into it …

The custom installer will send the effect to a new Lightsource Category located in your FCPX Effects Browser.

-paul.

spotPoint Lighting

Download

Film Zone

Cinemascope Toolkit ver.1.2 has been released. The Crop Guides popup now displays one of three options:Letterbox, Film Zone, Letterbox and Film Zone. The Film Zone is essentially a set of colored cropping guides less the letterbox matte(s). Viewing the underlying clip with the Film Zone displayed on it’s own makes it easy to view what is being cropped. Also, the Film Zone display works well when the underlying clip is very dark at the top and/or bottom of the frame. You can set the Film Zone color to orange (default), black, or white.

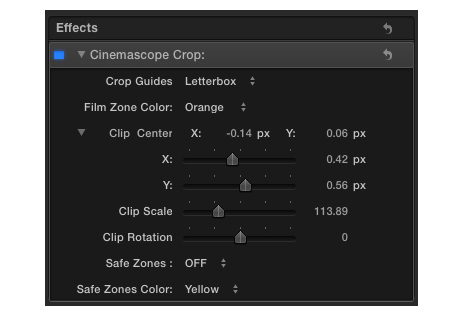
Also new in this release is the capability to reposition the clip manually by clicking and dragging the center point object (Drag Target). When doing so the clip positioning sliders in the EFX UI will update accordingly.

Here is a look at the new controls:

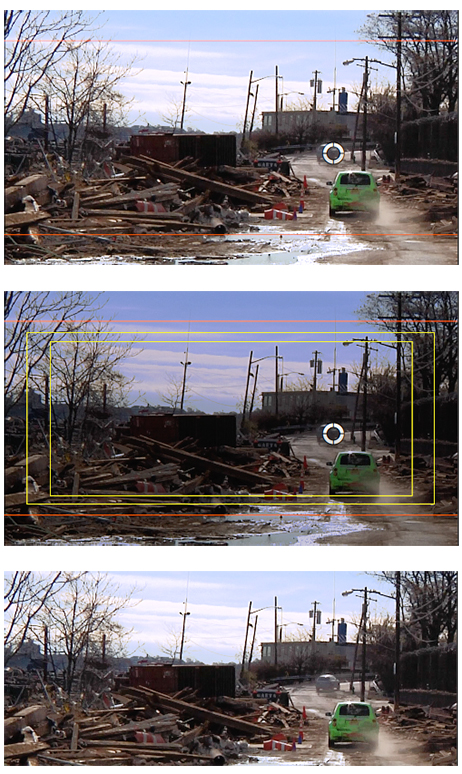
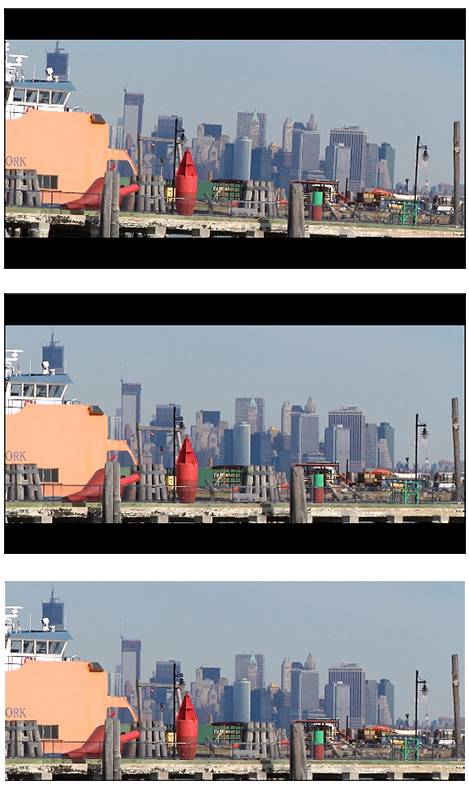
In the image matrix below you can see the top clip was repositioned (and scaled). The visible Film Zone clearly displays the 2.35:1 frame. In the middle image the 2.35:1 Safe Zones are displayed along with the Film Zone. Note the clips reduced opacity. The bottom image is the cropped output.

Please note you must set the FCP X Player Background to Black when using Cinemascope Toolkit. Do this in the application Preferences/Playback. When you switch on the Safe Zones display the clip opacity is reduced. This provides a clear view of the zones. If the player background is set to Checkerboard, there’s nothing behind the clip – it’s transparent. The clip’s opacity reduction will be prevelant and this feature will be useless.

Also – I designed the matting system to be independent of the clip’s image layer. Any agressive grading or exposure adjustments will have no effect on the visual state of the letterbox matte(s).

-paul.

Download Cinemascope Toolkit

Safe Zones

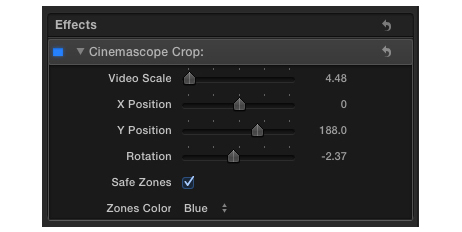
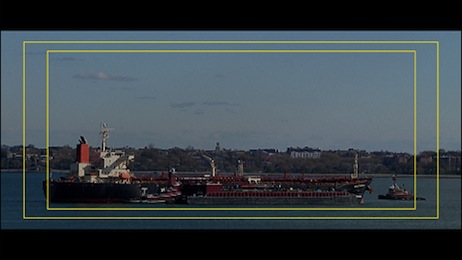
Cinemascope Toolkit ver.1.1 was released yesterday. I added the ability to display 2.35:1 Safe Zones (Yellow or Blue) to clip(s) where the filter is applied. When the Safe Zones option is switched on the underlying clips’ opacity is reduced to about 30%.

Below I use the Yellow Safe Zones for better visibility.

The Rotation parameter is also new. Instead of publishing the default Motion circular knob object to control this effect I used a slider. Moving it in either direction rotates the video image CW/CCW up to +/- 20°. Keep in mind you may need to adjust the scale of the image to compensate for the rotation of the frame. It all depends on how you decide to frame your image within the letterbox matte(s).

I needed to export a still of the shot below @2.35:1. Notice in the top example the image framing is off. Pulling the Rotation slider slightly to the left fixed the problem. The exported (cropped) image looks much better.

One slight issue with this tool is that it is an “Effect.” This means it is applied on a clip by clip basis. Not a problem. However if for example you switch on the Safe Zones and reduce the clip’s Exposure/Highlights – the visibility of the Safe Zones are equally affected. If the toolkit was built as a Title or Generator, this would not be the case. OTOH Titles and Generators add additional clutter in your timeline. Also, any image manipulation to the underlying video (scale, position, etc.) from within the Title or Generator would be applied globally to everything below it. Obviously a problem. The ability to apply this kit as an Effect makes it much more useful …

-paul.

Download Cinemascope Toolkit

Cinemascope Toolkit …

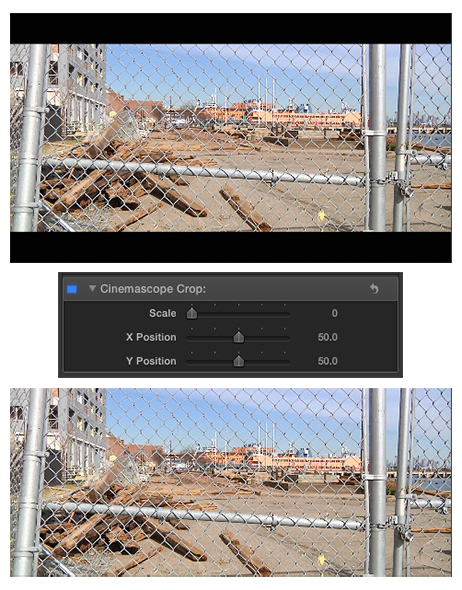
I’ve released my Cinemascope Toolkit. The package includes a basic 2.35:1 matte (“Cinemascope Crop”) created in Motion and wrapped in a FCP X Effect. The Effect supports video Scale control and X/Y positioning. I’ve also included four Compressor Presets that output cropped MPEG-4/H.264 videos. Frame things up in FCP X and output using one of the presets for 2.35:1 aspect ratios.

The Installer is hard coded in Objective-C. All asset routing will be handled automatically when you run the installer. The Effect will be installed in a Matte Category under a Widescreen Theme in the FCP X Effects Browser. The Compressor Presets will be located in the Settings window under the Custom/CinemaScope Presets – Settings Group.

You can edit whatever is defined by the installer. For example I did not edit the naming convention that I use for my Compressor Presets. They all begin with the first four letters of my name. And of course the preset parameters can be edited to suit your needs.

You can customize the FCP Category and Theme as well. After installing the toolkit – pull the Cinemascope Crop folder out of the ~/Movies/Motion Templates/Effects/Mattes folder. Use my toMotion application to customize.

Download Cinemascope Toolkit

-paul.

toMotion

One of the most useful features in the Final Cut Pro X/Motion 5 workflow environment is the ability to create, edit, publish, and share media content created in Motion 5. Creations like Effects, Titles, Generators, etc. can easily make their way into FCPX for widespread use. What is astonishing is these robust media tools can be created without writing a single line of code. Efficient distribution of these tools sparked my interest and lured me back into Xcode.

Before I preview my new application, let me explain the current (and kludgy) method of incorporating distributed Motion content into the necessary location(s) on the user’s system.

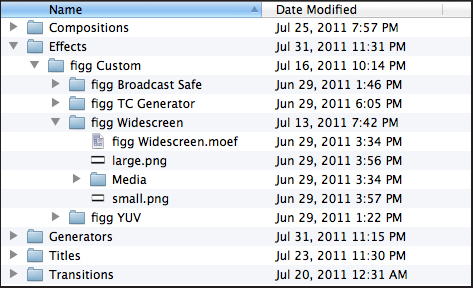
When you install Motion 5 a folder structure is created in the user’s ~/Movies folder. The top level folder (below “Movies”) is called Motion Templates. Below Motion Templates, 5 sub folders are created: Compositions, Effects, Generators, Titles, and Transitions. It’s important to note that each one of these folders pick up a .localized file extension. This was a very important issue that I needed to be aware of when developing the new application. More on this later …

Anyway, if a user is running both Motion 5 and FCPX, it is very easy to move Motion content to and from FCPX. This content is ultimately located and accessible in the FCPX Effects Browser. For example an Effects package can be “Published” from within Motion to FCPX and sent to a user appended “Category” located in the Effects Browser. This creates a very well organized list that makes it very easy to manage and access Motion tools while working on FCPX projects.

Here is where things get a bit confusing: As previously noted, Motion content authors can also share their creations. With this in mind I realized the user on the receiving end was forced to dig into the existing Motion Templates folder structure and manually place their acquired tools in the proper location. The minute I saw content authors including a snapshot similar to what I have inserted below, and using it to display where to place distributed content … I knew there had to be a better way.
Enter toMotion.

I won’t get into too much detail here. In fact I built a webpage, also accessible from within the application that explains the concept in full. It’s available HERE. Basically toMotion is a sophisticated folder routing tool that interacts directly with the Motion Templates sub folders and their underlying contents. You simply drag in acquired Motion content folders, set a destination with or without appending a custom Category, and fire away. The source folder is automatically moved to your targeted location. Keep in mind this is *not* a copy operation. The source input folder is in fact moved to the targeted location.
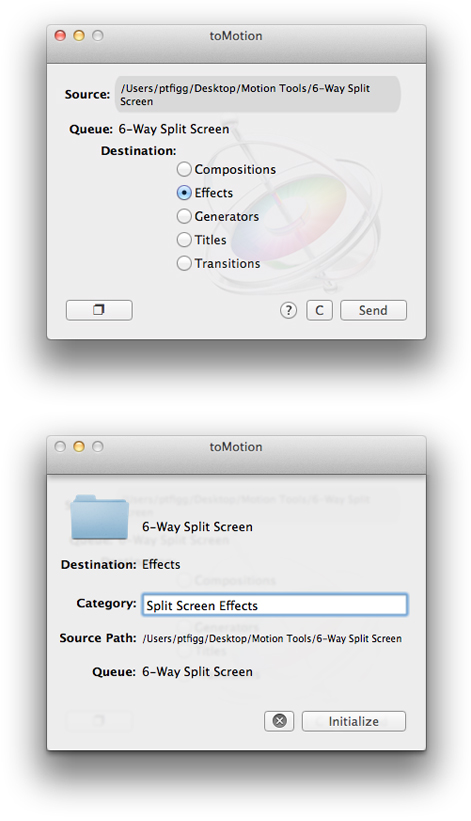
It also came to my attention that user’s who have not yet purchased and/or installed Motion 5 may still utilize distributed Motion content. The caveat here is they will not have the required folder structure in their ~/Movies folder. Without this folder structure it will be impossible for the content to be incorporated into the FCPX Effects Browser. To alleviate this I built in support for the creation of this necessary folder structure. The user can access this option from within the Application Preferences. Upon completion of this action the Motion Templates folder and it’s 5 subfolders will be in place and ready for content.

Finally I decided to add a Backup Solution. The user can select an existing folder located on their system, or create a new folder, and designate it as the backup repository. The backup action copies the the Motion Templates folder and it’s contents, appends a date, and sends it to the designated location.

I think the application turned out pretty well. I learned allot, which of course is my ultimate goal when writing these Cocoa Applications. By the way – I previously mentioned this .localized folder extension issue. I must admit this was an oversight on my part. I knew my code was working regarding folder creation and movement of folders to specific locations. I just could not send folders to the Motion Templates folder or any of it’s subfolders. I finally initiated a Get Info (⌘ + i) action on one of the folders and realized they all shared this .localized extension. I edited my code and I was good to go ..

-paul.