Pro Tools Aux I/O Customization

Avid’s latest Pro Tools update [2022.9] includes Aux I/O support for internal audio connections and assignments using Core Audio devices that are supplemental Extensions to the main Playback Engine. 

Extensions as such may include supported hardware plus preexisting and/or Pro Tools supplied virtual devices. Virtual Devices are referred to as Audio Bridges.

To access the Aux I/O configuration window: [Setup menu] … I/O. Press Aux I/O button under Input or Output tabs.

You will notice Pro Tools supplied Audio Bridges are listed in the Device Name column. Their attributes (e.g. channel configuration) are fixed in this window. In essence you cannot customize the noted attributes. ** See below for a workaround. 

Users can edit associated Display Name references representing the instance of any listed Device. Do this by simply activating an editable text field.

** To customize a Pro Tools Audio Bridge Device Name and channel configuration:

Access and edit the ProToolsAudioBridge.config text file:

Path: Macintosh HD/Library/Audio/Plug-Ins/HAL/ProToolsAudioBridge.driver/Contents/Resources

Example

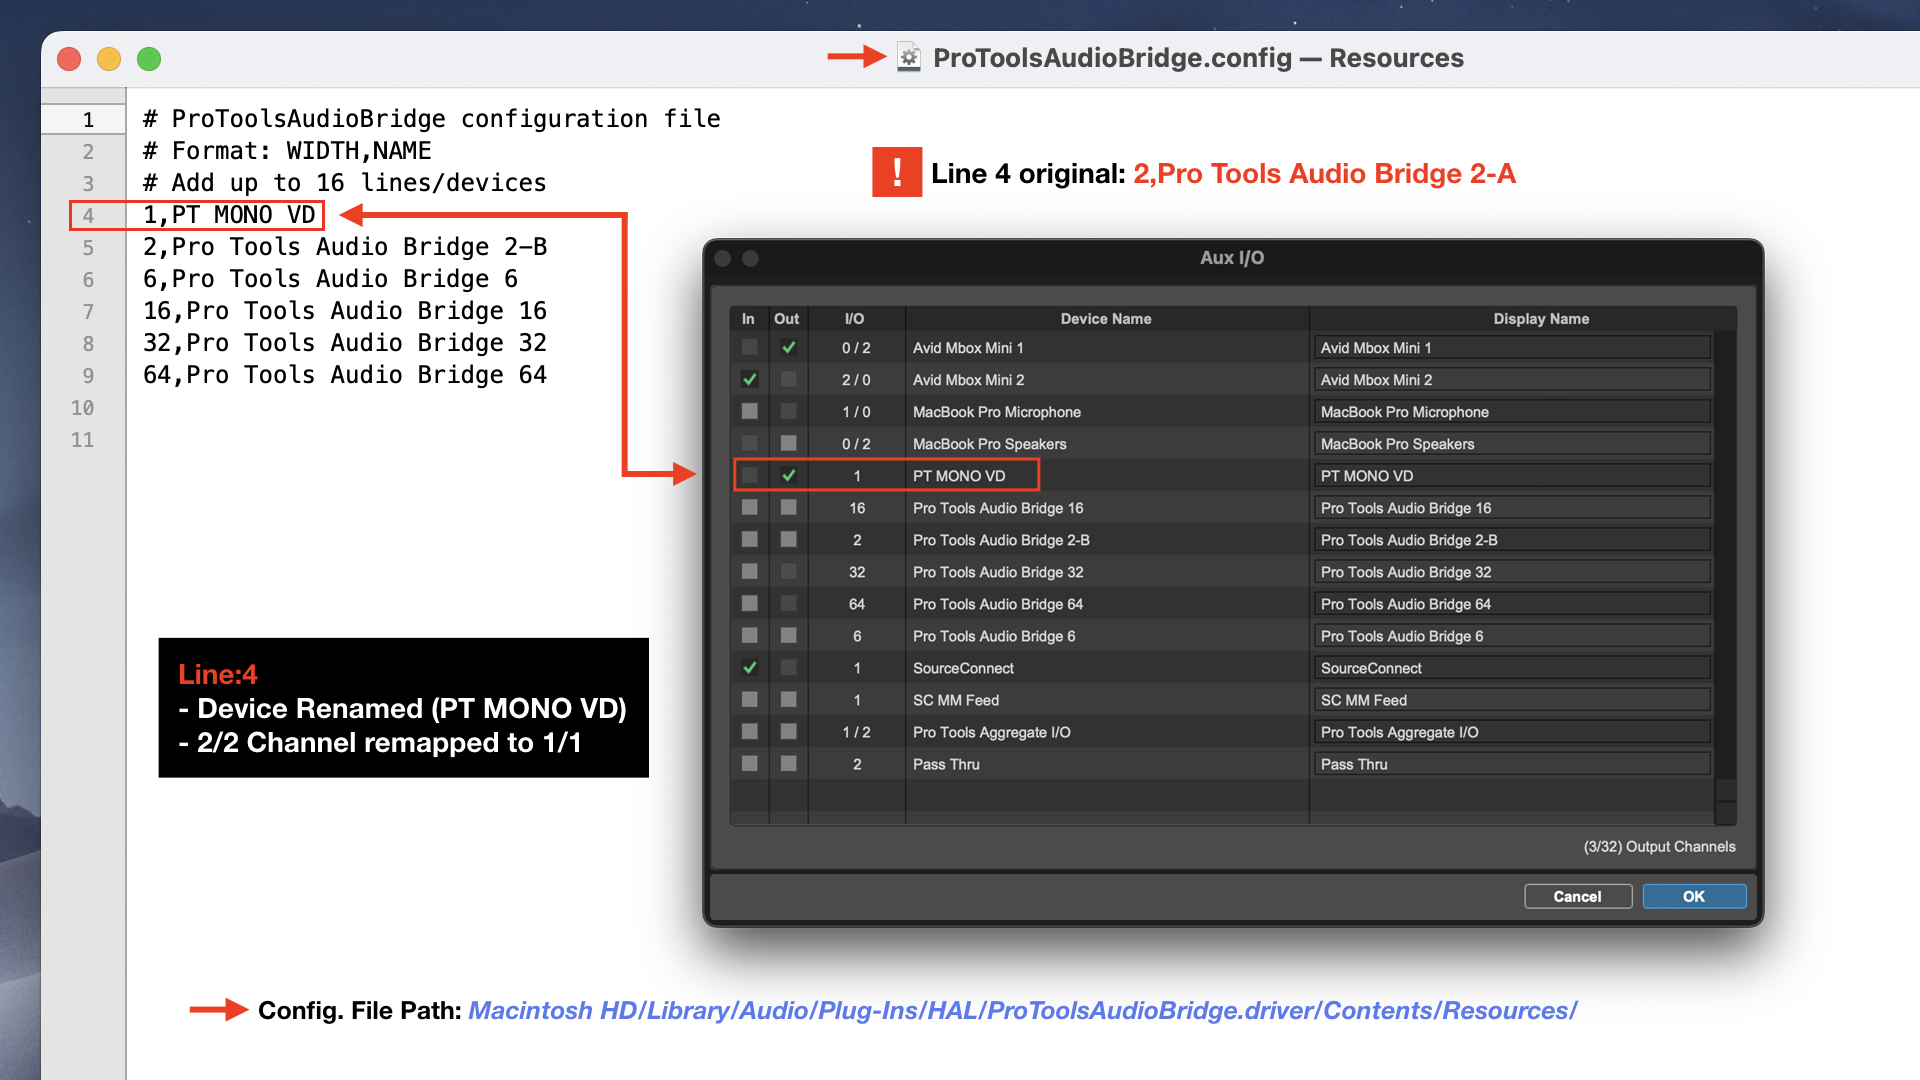
In the displayed image the listed Audio Bridge in line 4 read by default:

2,Pro Tools Audio Bridge 2-A

That’s a 2 channel device (2/2 discrete) followed by the name of the Audio Bridge.

I edited the line 4 reference to read:

1,PT MONO VD

Results: Channel configuration is now 1×1 (discrete MONO) with a customized Device Name: PT MONO VD. It’s reference will be updated in Mac System Preferences/Sound options for possible system wide use as well.

It appears Avid is providing support to add up to 16 lines/devices in the configuration file. I concluded a full system restart is necessary in order to instantiate customized configurations.

Note Aux I/O is not available in “Pro Tools Intro.”

-paul.

Monitoring and Isolation

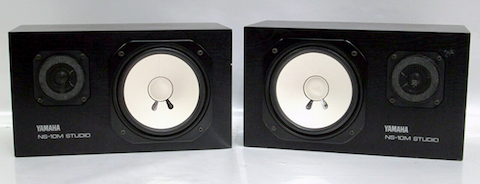
The vast majority of producers, engineers, and/or “editors” working with typical spoken word Podcast audio are not using calibrated reference monitors in quiet work spaces with optimized acoustics.

That said, there’s some chatter out there referring to producing and mixing Podcasts solely through fancy near field monitors.

Consider this: what about efficiently dealing with inherent audio clip attributes that require isolation as well as the subjective processing tasks/optimizations typically applied at the pre-mixing stage?

Without proper isolation – it would be difficult to:

(A) Establish audible awareness of (low-level) noise floor nuances

(B) Accurately capture noise profiles

(C) Evaluate S/N

(D) Execute intricate/seamless dialogue edits

(E) Recognize and eliminate subtle mouth noises

(F) Optimize breaths

(G) Replicate typical consumption methods and environments

In my view the sole use of near field monitors for Podcast post production is not your best option. Closed back headphones OTOH are paramount. They are absolutely vital for this type of audio post throughout various stages of your workflow.

Note it is certainly fine to check and/or monitor a MIX through (various types of) near field monitors *after* all of the above variables have been addressed.

And don’t forget to maintain awareness of typical consumption methods and devices, such as laptop speakers, trendy headphones, smart phones, earbuds, and vehicles.

-paul.

Audio Plugin for Podcast Post and Streaming

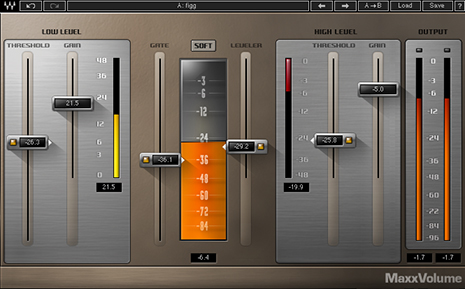
An obscure and rarely mentioned audio plugin by Waves exists that is well suited for Spoken Word processing, Live Streaming, and Podcast Post Production – MaxxVolume.

Back in 2012 I documented my initial interest and subsequent purchase of MaxxVolume. I paid $149 for the plugin, on sale at the time over at DontCrack. I believe the original selling price was $400. It’s currently available for $49.

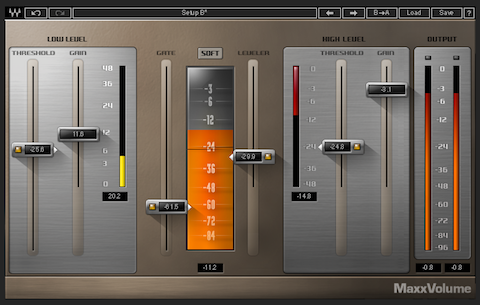
MaxxVolume is a multi-stage dynamics processor. The plugin features High/Low Level Compressor modules, a Downward Expander, a Leveler stage (aka RMS compressor/AGC), a user selectable Loud/Soft ARC flag, and a global Output Gain control.

Let’s explore the attributes of MaxxVolume …

Leveler

The Leveler fader value defines the AGC threshold and target. The inherent processing uses long attack and release times similar in attributes to an RMS compressor to effectively maintain consistent levels over time. Basically, automatic gain-riding initializes when the passing signal level exceeds the threshold and correlated target.

The Energy Meter’s internal chain placement is located after the Leveler processing and before the plugin’s remaining dynamics modules.

Gate

The included Gate is essentially a Downward Expander. When the passing signal level drops below the defined Threshold fader setting – attenuation is initialized. Note the general difference between a Gate and Downward Expander: a Gate applies a sort of hard mute. A Downward Expander applies a much more gradual transition between audibility and attenuation.

High Level Compressor

A traditional compressor applies gain reduction (dynamic range compression) when signal levels exceeds a defined threshold. In general the operator may (1) elect to work with the compressed/attenuated audio, or (2) apply makeup gain to compensate for the resulting attenuation.

The MaxxVolume High Level Compressor is controlled by a single Threshold fader. Gain reduction is indicated on the associated meter when the signal level exceeds the defined threshold. Automatic makeup gain is applied to compensate for active gain attenuation.

The Gain fader located in this module controls the maximum output signal level. This setting is NOT a ceiling based compliance limiter!

Low Level Compressor

This module basically applies upward soft-knee compression. It allows the operator to add a specific amount of gain to the passing audio when it’s level drops below the user defined threshold. The associated Gain Meter indicates the amount of makeup gain.

Note: The High and Low Level Compressor threshold settings are displayed within the previously mentioned Energy Meter.

The Soft/Loud Flag

This flag sets the attributes for the Waves proprietary ARC (Auto Release Control).

ARC, as described by Waves:

“The ARC algorithm is designed to dynamically choose the optimum release value for a wide-ranging input. ARC reacts much like a human ear, and can produce significantly increased RMS (average) levels with excellent audio clarity.”

In essence – the Loud setting uses shorter Release times resulting in elevated loudness. Conversely the Soft setting uses longer Release times resulting in a softer output.

Output Meter

This meter indicates Peak Amplitude and potential inherent clipping.

Setting it Up

(1) Disable the Downward Expander (you will use it eventually). By the way – all Threshold faders support deactivation. Simply click the encapsulated yellow indicator located on each fader.

(2) Set the ARC flag to Soft and define a Leveler threshold.

(3) Adjust the High Level Compressor to (1) compress dynamics, and (2) compensate for the attenuated signal level.

(4) Apply 5 or 6dB of Low Level Compressor module gain. Tweak the module Threshold and readjust gain accordingly. Be cautious when applying excessive gain at levels above the defined threshold. Pay close attention to the noise floor.

(5) Lastly, adjust the High Level Compressor Gain to optimize the output.

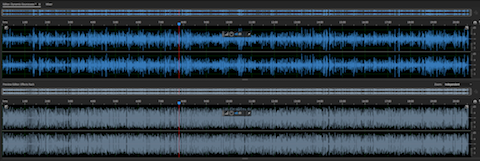
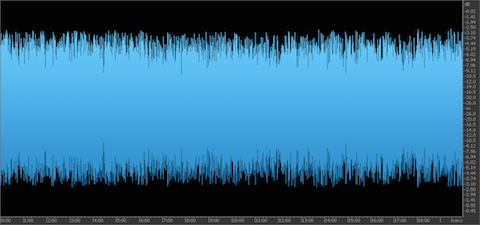
If you are running Adobe Audition – use the Preview Editor to reflect the results of your settings relative to the source. The updated waveform will indicate the results of the applied settings. Observe the processed dynamics and evaluate the audible consistency of the average loudness over time.

Of course visual attributes of any waveform are meaningless if the sound quality is compromised. Use those ears to achieve optimum results.

Notes

It’s important to establish a clear understanding of each processing module and the interactive processing results.

If necessary – apply Broadband Noise Reduction and/or Phase Rotation before MaxxVolume in your signal processing chain.

Remember – the High Level Compressor Gain does not establish a hard limited compliance ceiling! You will need to Insert a post compliance limiter. I recommend the following limiters: ISL by Nugen Audio and Elixir by Flux. TrackLimit by DMG Audio is also a worthy consideration.

Specialized Use Cases for MaxxVolume

• Intelligibility optimization

• Pre-Loudness Normalization dynamics processing

• Live Streaming

• Live Venue processing

Personal Perspective

– -> On multiple occasions I’ve expressed how it can be difficult working with non-scalable audio plugins on high-resolution monitors. I am a proponent of defining specific numerical setting values on supported plugins in order to fine tune parameters. Legacy UI designs offered by various developers generally exhibit fuzzy text and difficult to read values. These difficulties are prevalent when running monitor resolutions higher than 1920×1080 (I run a 4k compatible monitor at 2560×1440). In essence, viewing MaxxVolume’s fader values and additional indicators can be visually challenging.

– -> Be careful when using the Low Level Compressor. Excessive gain will elevate breaths and boost the audible noise floor.

– -> An integrated compliance limiter would be useful. As it stands, the insertion of a down-stream limiter is vital.

-paul.

upTimer 3.0

I think it was in 2005. I was looking around for some sort of hardware component Timer to track Podcast recording session elapsed time. I came across an Ad in Radio Magazine sponsored by ESE. They specialize in manufacturing different types of clocks, timers, and timecode utilities intended for broadcast environments. It was their Up Timer (designed to track live programs and air time) that sparked my interest.

The device originally retailed for (I think?) $300. Functionality is straightforward: LED display – Start, Stop. Reset buttons, and a DB9 interface for remote control operation. Interestingly – it is limited to a 60 min. ceiling. Actually, it’s range was/is 00:00 – 59:59.

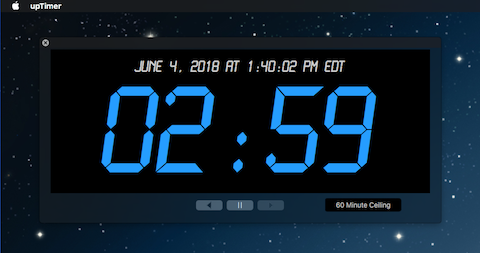
Below is a snapshot of the current (desktop) model. It retails for less than $200.

Anyway, shortly after my initial discovery of the device, I decided to build a software version for the Mac. Version 2 was released in 2011. Seven years later I am releasing Version 3.

Besides the noticeable UI redesign, the application is now 64bit.

* The ceiling is somewhat flexible, thus allowing the user to select either a 60 or 90 min. ceiling.

* The upTimer font color can be set to blue or yellow. The font color shifts to red when the elapsed time reaches the 2 min. mark relative to the defined ceiling.

* The operation keys (Reset, Stop, Start) are mapped to ←, ↓, → keyboard keys respectively.

* The application window checks in at approx. 735 x 340 pixels. I plan to add scalability to the UI sometime in the future.

Note in this version I decided to include and display a running long form Date and Time string above the upTimer. The user can hide it’s visibility, along with the linked ceiling setting indicator.

Update: Version 3.5 includes a new UI size display preference. The Large option resizes the application window by approx. 40%.

Update: Version 3.5.1 includes Application Menu actions with mapped keyboard shortcuts to toggle the display size of the UI.

Update: Version 3.5.2 mainly includes UI tweaks.

Download upTimer 3.5.2
(OSX 10.10.5 or later)

Fee? None. My only request is to please keep me in mind for expert Podcast Audio Post, audio processing, and consulting. I’ve been in the space since 2004.

-paul.

16 bit Audio

The vast majority of Podcast producers are not using multi- thousand dollar Neumann mics and/or highly efficient preamps in acoustically treated environments …

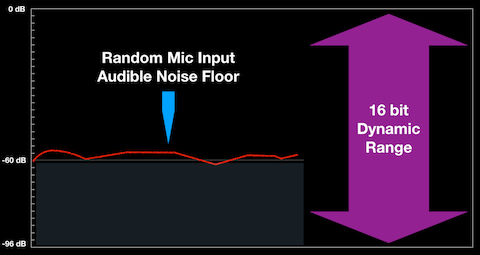
When recording (spoken word) audio via mic input, the noise floor is perceived as the level of ambient noise and residual preamp noise – NOT the system noise. Any such mic input will exhibit a higher perceived noise floor with a reduced SNR compared to a much more efficient DI or electronic instrument.

Consider the quantified theoretical dynamic range of 16 bit audio (96 dB). When recording with a mic in a typical environment – your system is incapable of effectively utilizing the full dynamic range of 16 bit audio due to the noted (elevated) perceived noise.

When producing Podcast audio, wide dynamics capabilities are irrelevant. In fact persistent wide dynamics in spoken word audio intended for Internet/Mobile/Podcast distribution will compromise intelligibility.

With all this in mind, what is the advantage of recording 24 bit (spoken word) Podcast audio with a theoretical dynamic range of 144 dB vs.16 bit audio? In my view there is no advantage, especially when proper down conversion techniques such as Dithering are for the most part ignored. An omission as such will compromise the sonic attributes of down converted audio derived from higher resolution source masters.

Are you striving for an efficient Podcast production workflow with excellent fidelity and adequate frequency response? 44.1 kHz (or 48 kHz) • 16 bit audio will be sufficient. Of course there will be optimization variables and requirements such as quality of gear, optimal recording levels, and ample headroom.

Notes:

– If you are producing highly dynamic episodic dramas, fine arts content, or complex narratives with music and sound effects elements – and you prefer to work with 24 bit media … by all means do so.

– When down converting from 24 bit to 16 bit in preparation for distribution, recognize the significance of Dithering.

– Be aware of MP3 codec filtering attributes, inherent frequency response limitations, artifacts, and the consequences of low bit rate encoding.

– Applying a low-pass filter to lossless audio prior to lossy encoding is recommended. Such a roll-off will effectively supply the lossy encoder with managed high frequency activity that is below the codec’s filtering threshold.

-paul.

Mic Preamp Level and Gain Staging

When configuring voice processors such as the dbx 286A/s (or any other device with a similar configuration) – there is always an optimal preamp level setting or sweet spot for the connected microphone. Basically – your mic needs to be properly driven at the preamp stage in order to pass sufficient gain with low inherent noise and ample headroom throughout the device and thru it’s downstream processing modules.

In general, intra-device Drive based Compressors are designed to elevate the module input gain as the setting is increased. In doing so the dynamic range of the passing signal will be decreased. This often results in an elevation of the noise floor that was nonexistent prior to the compression stage.

Please note: After initial preamp optimization, this setting should remain static. The preamp level control should NOT be used for gain staging or compression noise floor compensation! In essence improper preamp gain will hinder the effectiveness of downstream intra-device processing.

My recommendation for optimal signal to noise: set the preamp gain accordingly. Apply intra-device processing. Lastly, use the OUTPUT gain for any necessary gain staging or compensation. This will have no effect on the initial (and hopefully optimized) mic input setting as well as the subsequent processed signal passing through the device.

-paul.

SSL 4000 Series

Waves has sporadically released the SSL 4000 Series Channel Strip plugins independently and free from previous bundle restrictions. This is great news. What’s even better is their limited time pricing of $29.

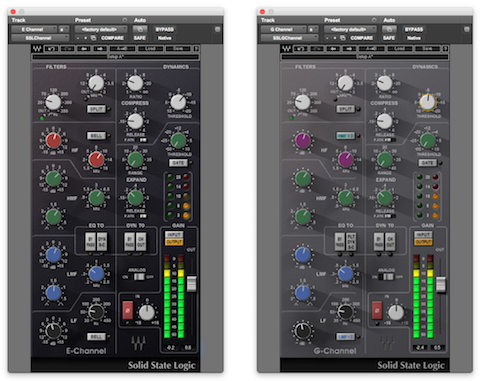
On the surface both channel strips feature various equalization stages and dynamics processing modules. There are a few discernible differences between the E-Channel and G-Channel versions. Also, certain shared and/or unique parameters and features are worth discussing.

Equalization

The main difference between the two versions is how certain gain settings within two specific EQ modules affect bandwidth (aka “Q” values).

For instance, the E-Channel’s HMF and LMF module bandwidth remains constant at all gain levels. Conversely, the G-Channel’s HMF and LMF module bandwidth will vary based on the gain level settings. Specifically, as a filter’s gain level is increased or decreased, the bandwidth narrows and potentially becomes more surgical.

Both versions include a Split option within the High-Pass/Low-Pass filter modules. When activated, the filters are placed before the dynamics modules.

The E-Channel’s HF and LF eq modules are (by default) Shelving Filters. Pressing the BELL selector changes their attributes as described.

The G-Channel’s HF and LF eq modules feature fixed Shelving Filters. As well, the HMFx3 option multiples the HMF frequency by three. The LMF /3 option divides the LMF frequency by 3.

The E-Channel’s Dyn S-C option inserts the filters and EQ into the dynamics sidechain for frequency sensitive processing. The G-Channel’s FLT Dyn S-C option inserts the filters into the dynamics sidechain (Note: “filters” refers to high-pass/low-pass modules).

Dynamics

The Compressor features soft-knee processing with automatic makeup gain. The default attack time is slow and program dependent. Activating F.ATK sets the attack time to 1 ms. The Compressor will function as a limiter when it’s ratio is set to infinity (Note: attack time attributes are the same in the Expander/Gate module).

The following in-depth Compressor and Expander/Gate attributes are listed in the native SSL Duende Plugin documentation:

Both versions of the plugin include two DYN To options:

Bypass: This deactivates all dynamics modules
CH Out: This inserts the dynamics processing at the output (post EQ)

Additional Features

Both versions include a switchable Analog Emulation stage, Phase Reverse, Input Trim, and Output Fader. The Level Meters are switchable for Input and/or Output level monitoring.

The plugins are aligned as follows: -18 dBFS = 0dBu

-paul.

References:
Waves Audio Plugin User Guide
SSL Duende Documentation

Aphex 320D Compellor

What is a Compellor? In short it is a Compressor-Leveler-Limiter. The device is specifically designed for the transparent control of audio levels.

It operates as a stereo processor or as a two-channel (mono) processor supporting independent channel control.

The device includes 3 interactive gain controllers:

– Frequency Discriminate Leveler
– Compressor
– Limiter

Additional features include a Dynamic Release Computer (DRC), Dynamic Verification Gate (DVG), and a Silence Gate.

The original device (model 300 Stereo Compellor) was released in 1984. The product line evolved and culminated in 2003 with the release of the 320D. Through the years the Compellor has been widely used in professional broadcast, post houses, recording studios, and live venues.

In 2004 I purchased a used model 320A from a radio station. The “A” reference indicates it’s analog circuitry. I’ve used the 320A for countless audio file and tape transfers, post production processing, Telephone/Skype recording sessions, and monitoring. The device provides three selectable Operating Levels … +8dBu, +4dBu, and -10dBV.

Recently the complex level and gain reduction metering for the right channel failed. I replaced the faulty 320A with a 320D. This version features digital and analog I/O with common selectable (analog) Operating Levels (+4dBu, and -10dBV).

At some point my faulty 320A will be shipped out to Burbank California for authorized service.

320D – Automatic Processing and Detection

As noted Aphex classifies the Compellor as a Frequency Discriminant Leveler. It responds slower and less aggressively to low frequencies. In essence low frequency energy will not initiate gain reduction.

A Dynamic Release Computer (DRC) instantiates program dependent compression release times.

The Dynamic Verification Gate (DVG) computes the historical average of peak values and verifies whether measured values exceed or are equal to the historical value. When the signal level is below the average, leveling and compression gain reduction is frozen.

Controls

The device Drive control sets the preprocessed VCA gain. Higher settings yield a higher level of gain reduction (VCA refers to Voltage Controlled Amplifier).

The Process Balance control allows the operator to fine tune the Leveling and/or Compression balance and weighting. Leveling is a slow method of gain reduction. It maintains transient retention and wider dynamics. The Compression stage works faster and acts more aggressively on inherent dynamics. The key is by combining both modes, the processed output will be very consistent

A Rate (speed) toggle option is provided: Fast, suitable for speech/voice, or Slow, suitable for program material such as produced TV and/or Radio programs.

The device Output control normalizes the processed audio to 0VU.

Silence Gate: Aphex stresses – this is not an audio gate! It is a user defined threshold parameter. When the signal drops below the threshold for 1 sec. or longer, the Silence Gate freezes the VCA gain. This prevents the buildup of noise during pauses and/or extended passages of silence.

The device Limiter features a very fast attack and high threshold. It is designed to prevent occasional high transient activity and overshoots.

A Stereo Enhance mode is available on the 320A and 320D models. When activated it widens the stereo image. It’s effect is dependent upon the amount of applied compression.

Metering

The 320D Compellor features three, bi-color (red, green) LED metering modes: Input, Output, and Gain Reduction. For Input/Output metering – the red LED’s indicate VU/average. Green LED’s indicate peak level.

When the meter is set to display gain reduction (“GR”), the green LED’s indicate total gain reduction. Depending on the Process Balance control weighting – a floating red LED may appear within green LED instances. The floating red LED indicates Leveling gain reduction. If Leveling gain reduction is in fact occurring, the total gain reduction will be indicated by the subsequent green LED(s).

Below are 4 examples:

Example 1 displays Input or Output metering with an average (red) level of 0VU and a peak (green) level of +6dB. This translates to a +4dBu average level and a +10dB peak level (analog OL set to +4dBu).

Example 2 displays 4dB of Leveling Gain Reduction and 8dB of Total Gain Reduction.

Example 3 displays 12dB of Leveling Gain Reduction.

Example 4 displays 10dB of Compression Gain Reduction.

**Notice the position of the Process Balance control for examples 2, 3, and 4.

320D I/O

The 320D is essentially an analog processor utilizing standard XLR I/O jacks. The device also includes AES/EBU XLR jacks along with an internal DAC for digital I/O. The Input mode and/or Sample Rate is user selectable.

When implementing digital I/O – the Incoming audio is converted to analog as it passes through the device. The audio is then converted back to digital and output accordingly.

The digital input is calibrated internally and matches -20dBFS to 0VU on the Compellor’s meter. The +4dBu/-10dBV Operating Level options only affect the analog I/O.

Notes:

The Aphex Compellor is a long standing, highly regarded, and ubiquitous audio processor. It has been an integral multipurpose tool for me for 12+ years. My newly purchased (used) 320D is in near mint condition. In fact it looks and feels as if it was hardly used by the previous owner.

My system includes additional Aphex audio processors (651 Compressor, 109 EQ, 622 Expander/Gate, and a 720 Dominator II Multiband Peak Limiter). As well, a Mackie Onyx 1220i Mixer, Motu I/O, dbx 160A Compressor, dbx 286A Mic Processor, Marantz CF Recorder, and a Telos One Digital Hybrid. All components, with the exception of the 286A – are interfaced through a balanced Patchbay.

A typical processing/monitoring chain will pass system audio through the Compellor, followed by the 720 Peak Limiter. The processed audio is ultimately routed to the system’s Main Output(s). This chain optimizes playback of poorly produced Podcasts, VO’s, live streams, or videos. The routing is implemented via Patchbay.

A typical audio processing chain will route Pro Tools audio out via hardware insert (or bus, alternative output, etc.) through the Compellor (or a more complex chain) and returned in Pro Tools. In this scenario I use a set of assignable interface line inputs/outputs. The routing is implemented via Patchbay. I document the setup and use of hardware inserts here.

-paul.

Real Time Print To Track

Logic and Audition users will be familiar with the term Bounce to Track. This process allows the user to perform an Off-line Mixdown of a selected group of Session Tracks without physically exporting. In most cases the Mixdown appears on a supplemental target Track.

Bouncing Off-line is a time saver. However it can be precarious. It would be irresponsible to submit a finished piece of audio to a client without 100% conformation the bounced delivery file (most likely slated for distribution) is glitch free. In essence it is imperative to throughly check your piece prior to submission.

Off-line Bounce (aka Bounce to Disk) was once notoriously absent from Pro Tools. Avid finally implemented support a few years ago.

In professional Post Production, engineers may perform a real time (On-line) Bounce of a mix Session. The process is commonly referred to as Printing. It requires the operator to sit through the Session in it’s entirety.

Besides glitch detection capabilities, it is possible to edit clips before the playhead reaches their location. As well, you can edit clips and/or sub-segments within a previously completed Print and only re-Print the manipulated segment.

So how is this done? Simple – if the DAW or Interface supports it.

For instance in Pro Tools the user can assign Bus outputs to the input of a standard Audio Track. The key is you can ARM a standard Audio Track to record any signal that is passing through it. This would be the Print Track.

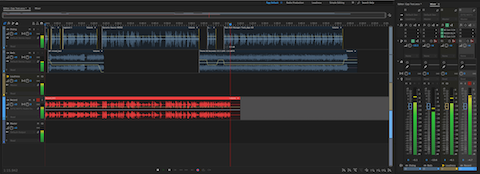
Adobe Audition CC does not support direct Bus Output —>> Audio Track assignments. However, it is still possible to implement a Print workflow (see attached image). You will need a supported Audio Interface with a Mix Return. Simply assign all Session Tracks and Buses to the Main Output. Then add a supplemental Audio Track. Set it’s input to Mix Return. ARM the Track to record and fire away.

-paul.

Adobe Audition CC Productivity

Below I’ve listed a few Adobe Audition CC (ver.2015.2.1) features/options that may be obscure and perhaps underutilized.

aud_small

Usability

1- Maximize Active Frame (⌘↓). This command toggles full screen display accessibility of the active (blue outlined) UI Panel.

2- Lock In Time (Multitrack). When activated, selected clips are pinned to their current location. I mapped ⌥⌘L for this function.

3- Group (⌘G) (Multitrack). Multiple clips will be congregated and may be repositioned cumulatively.

4- Suspend Groups (⏎⌘G) (Multitrack). This function temporarily deactivates the Group. Actually, this command toggles the behavior between deactivate and activate. There are also options to Remove Focus Clip from Group and Ungroup Selected Clips. They both support custom shortcut mapping,

5- Right + Click on any Clip’s Fade Handle (Multitrack) to display the following customization menu:

– No Fade
– Fade In/Out
– Crossfade
– Symmetrical
– Asymmetrical
– Linear
– Cosine
– Automatic Crossfade Enabled

6- Bounce to New Track (Multitrack). This feature will process and combine multiple clips located on a single track or multiple tracks. This will free up system resources. The following options support custom shortcut mapping:

– Selected Track
– Time Selection
– Selected Clips In Time Selection
– Selected Clips Only

7- Convert To Unique Copy (Multitrack). This function creates a sub clip derived from the original trimmed source clip. Media Handles are no longer accessible in the converted copy (Multitrack and/or Waveform Editor environments). I mapped ⌥⌘C for this function.

Editing

1- Time Selection in all Tracks (Multitrack). This is a Ripple Delete variation (⏎⌘⌦) that will retain clip relevant Marker position(s).

2- Split All Clips Under Playhead (Multitrack). I mapped ⌥⌘R for this function.

3- Merge Clips (remove thru edits) (Multitrack). I mapped ⌥⌘J for this function.

Mixer/Track Inserts and Sends

1- Individual Track supplied buttons will designate Sends and Inserts as Pre or Post Fader.

Markers

1- Markers implemented in the Waveform Editor may be Merged thus allowing easy selection of encapsulated audio.

2- Selected Range Markers present in the Waveform Editor may be exported as individual clips.

3- Selected Range Markers present in the Waveform Editor may be added to a Playlist where they may be reordered for auditioning.

Exporting

1- The (Multitrack) Session Export Dialog includes user defined Mixdown options:

– Master: Stereo, Mono, or 5.1
– Signal present on individual Tracks
– Signal present on individual Busses

2- Export with Adobe Media Encoder (Multitrack). This Export option runs Media Encoder and requires the user to select a predefined Media Encoder preset. Routing options are available as well.

-paul.

Loudness Measurement and Silence

Consider this: Two extended segments of audio, Loudness Normalized (or mixed in real time) to the same Integrated Loudness Target.

Segment (A) is fairly consistent, with a very limited amount of intermittent silence gaps.

Segment (B) is far less consistent, due to a multitude of intermittent silence gaps.

When passing both segments through a Loudness Meter (or measuring the segments offline), and recognizing Integrated Loudness is a reflection of the average perceptual Loudness of an entire segment – how will inherent silence affect the accuracy of the cumulative measurements?

In theory the silence gaps in Segment (B) should affect the overall measurement by returning a lower representation of average Integrated Loudness. If additional gain is added to compensate, Segment (B) would be perceptually louder than Segment (A).

Basically without some sort of active measurement threshold, the algorithms would factor in silence gaps and return an inaccurate representation of Integrated Loudness.

The Fix

In order to establish perceptual accuracy, silence gaps must be removed from active measurements. Loudness Meters and their algorithms are designed to ignore silence gaps. The omission of silence is based on the relationship between the average signal level and a predefined threshold.

Loudness Meter (G10) Gate

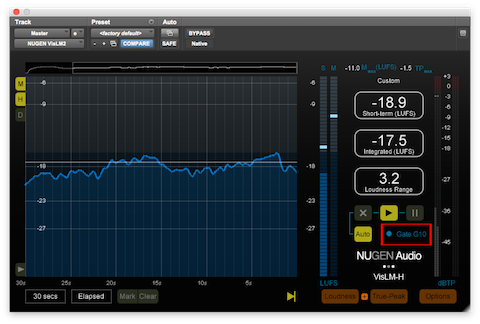
The specification Gate (G10) is an aspect of the ITU Loudness Measurement algorithms included in compliant Loudness Meters. It’s function is to temporarily pause Loudness measurements when the signal drops below a relative threshold, thus allowing only prominent foreground sound to be measured.

The relative threshold is -10 LU below ungated LUFS. Momentary and Short Term measurements are not gated. There is also a -70 LUFS Absolute Gate that will force metering to ignore extreme low level noise.

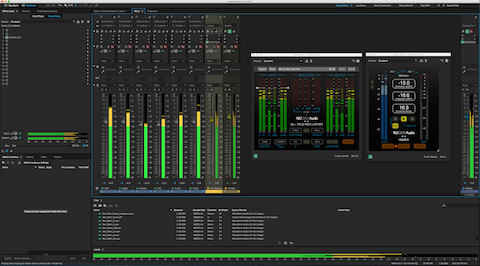
Most Loudness Meters reveal a visual indication of active gating (see attached image) and confirm the accuracy of displayed measurements.

Gate-(480)

Additional “Gate” Generalizations and Nomenclature

A Downward Expander and it’s applied attenuation is dependent on signal level when the signal drops below a user defined threshold. The Ratio dictates the amount of attenuation. Alternatively a Noise Gate functions independent of signal level. When the level drops below the defined threshold, hard muting is applied.

Silence Gate

This is a somewhat proprietary term. It is a parameter setting available on the Aphex 320A and 320D Compellor hardware Leveler/Compressor.

Compellor

When a passing signal level drops below the user defined Silence Gate threshold for 1 second or longer, the device’s VCA (Voltage Controlled Amplifier) gain is frozen. The Silence Gate will prevent the Leveling and Compression processing from releasing and inadvertently increasing the audibility of background noise.

-paul.

Hardware Inserts In Your DAW

It is possible to implement support for use of external hardware processing components within your software DAW. This support is common in music recording and audio post production environments.

When properly implemented, operators have the capability to insert an instance of an external component (or chain) on a DAW audio track just like any other installed third party software plugin.

Besides potential tonal advantages, routing through a specialized external component can be less taxing on the host system’s resources.

Requirements

1 – Your Interface must have an available output (mono or stereo) for routing audio to an external component. You will also need an available input (again, mono or stereo) to accept the processed audio.

2 – Your DAW must support the routing.

Pro Tools and Logic Pro X

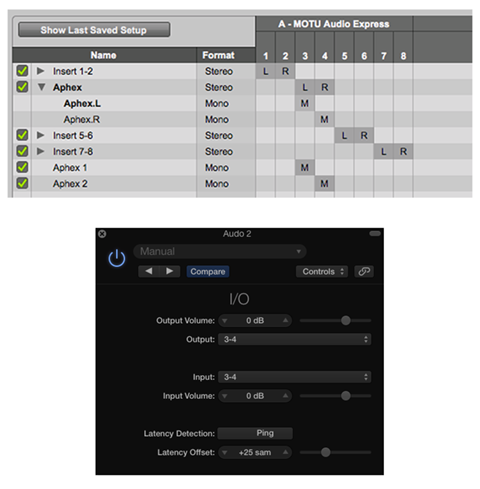
In the Pro Tools I/O settings you must define a set of available (and matching) Interface inputs and outputs for signal routing. In Logic Pro X, there is an I/O routing option plugin included in the Utility plugins group.

Have a look at the routing configuration options for both DAWS:

Inserts_small

The upper image displays a Pro Tools Insert Routing matrix. The default audio interface has a total of 8 inputs and outputs available as discrete I/O mono channels. They can remain as such. Alternatively, they can be paired to create four stereo signal paths.

I’ve defined three instances or parent paths of “Aphex” inserts using interface inputs and outputs 3 + 4. My processing chain supports a stereo signal flow or discrete dual mono.

The first Aphex instance is a stereo insert. Clicking the disclosure triangle reveals two associated mono channels that make up the stereo pair. This configuration translates in Pro Tools as a stereo hardware insert or as two discrete mono inserts.

At the bottom of the list I’ve also created two custom mono paths the will pass audio to discrete mono component channels. This alternative solution is unnecessary in this particular configuration. The stereo instance above provides the same level of flexibility with support for mono accessibility. Just be aware of the configuration flexibility.

The lower image displays a Logic Pro X stereo I/O instance as it would appear when inserted on any track. Notice how I am using the same combination of interface channels (3 + 4) to output the signal to external components, and to route the processed audio back into the DAW.

Use Case

Let’s say you are the proud owner of the very affordable and recommended dbx 266xs Dynamics Processor. You would like to use it to pre-process a discrete channel Skype session in realtime. This dbx Compressor, Limiter, and Gate can function as a dual mono processor. With routing properly configured, you can insert mono instances of the hardware processor on discrete tracks in your DAW session. Simply customize settings for each dbx channel and fire away.

266xs_small

My Chain

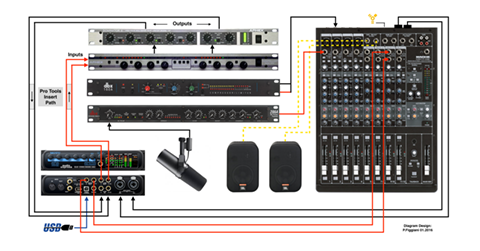
Over the years I’ve accumulated various analog audio processors by Telos, dbx, and Aphex. In the displayed diagram I disclose part of my current configuration with a few active components.

hardware_inserts-small

Before I get into the Pro Tools insert path configuration, let me explain the basic signal routing:

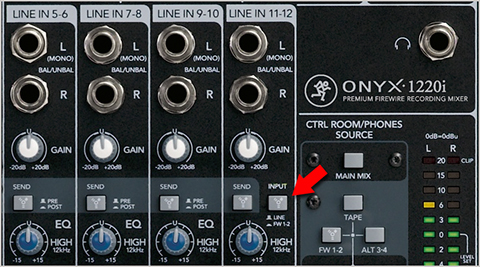
• I use a Mackie Onyx 1220i FW Mixer in combination with a Motu Audio Express USB/FW Interface. The Mackie controls a POTS line mix-minus using a Telos Digital Hybrid. The mixer also controls signal routing scenarios and recording on a Marantz CF Recorder. I use the mixer’s Control Room outputs to feed the inputs of a power amplifier to drive my JBL near-field monitors.

• The Motu’s Main Outputs are patched to the mixer. This audio is available on the Control Room outputs. I can easily switch back and forth between the mixer and the interface, designating one or the other as the default I/O.

• The mixer also functions as a secondary gain stage for the mic signal path. Notice how the mic is directly connected to the dbx 286A Voice Processor. It’s balanced line output feeds the channel 1 line input on the Mackie. The balanced Mackie Main Outputs are set to deliver a Mic Level signal. They feed the Mic Level inputs on the Motu interface. These inputs can be linked and routed to a single stereo DAW track. Alternatively I can designate the inputs to deliver discrete mono. This is handy when a second mic is integrated

• The dbx160a is a single channel (mono) compressor. It is connected to the Mackie’s channel 2 insert. I can use this device as a serial processor on mixer channel 2. I can also insert it on the channel that returns a telco caller’s POTS audio back to the mixer. In this scenario I can easily bypass it’s use on an insert and instead connect it in-line.

• All system connections are made with balanced XLR and TRS cables.

Not pictured: Aphex Expressor (mono) Compressor, Aphex 622 Expander/Gate, and Aphex two channel Parametric EQ.

Hardware Chain Insert

Let’s focus on the Pro Tools Insert path, instantiated on a stereo audio track:

The two (pictured) devices that I am currently using for external audio processing are by Aphex: 320a Compellor, and the 720 Dominator II. The 320a Compellor is widely used in radio broadcast facilities. This device can be configured to function as a Leveler, Compressor, or a mixture of both. A Process Balance setting controls the Leveling and Compression weighting. It supports stereo and dual mono processing. The current “D” version supports AES/EBU Digital I/O.

The Dominator II is a 3-band Peak Limiter with adjustable crossovers and zero overshoot. This device is also widely used in broadcast facilities and for live performances. The current 722 version features enhanced broadcast processing support, including Pre-Emphasis and De-Emphasis options.

With the Motu interface designated as the default I/0, it’s 3+4 Line Outputs route audio via insert from a Pro Tools audio track to the Compellor’s inputs. The Compellor’s outputs feed the Dominator II’s inputs. It’s outputs feed the Motu’s Line Inputs, routing the processed audio back to the DAW track where the hardware insert was originally instantiated.

A Skype session would be an obvious use option. In this case I would implement discrete mono hardware processing using two separate insert instances. In fact I can use this configuration when recording any audio source, or as a realtime processing option for output, playback, and streaming.

As far as playback, the Motu interface supports a Mix 1 Return option. In essence I can assign my system’s output into Pro Tools. With Input Monitoring activated, I can route the signal through the external processors and monitor the wet audio. This is a handy feature during playback of poorly produced programs.

Audition

Unfortunately Adobe Audition does not support hardware inserts. However there are various ways to integrate your external components in a multitrack session. For example you can assign a track’s output (or outputs) to an available interface output that feeds an external component’s input (or inputs). The processed audio is then routed to available interface inputs. By defining this active interface input as a track input, you essentially route processed audio back into the session.

This signal routing option will work in any DAW. Be aware you run the risk of initiating feedback loops!. To avoid this please make sure the software routing utility for the particular interface is properly configured.

In Conclusion

It is easy to integrate your analog gear in your software DAW. Use case scenarios are endless. Of course support and effectiveness will vary across all components and applications. I will say it’s a pretty cool feature, especially when software versions of coveted analog devices simply do not exist.

-paul.

Understanding Pan Mode Options

Adobe Audition and Logic Pro X include Pan Mode preference options that determine track output gain for center panned mono clips included in stereo sessions. These options are often the source of confusion when working with a combination of mono and stereo clips, especially when clips are pre-Loudness Normalized prior to importing.

In Audition, the Left/Right Cut (Logarithmic) option retains center panned mono clip gain. The -3.0 dB Center option, which by the way is customizable – will attenuate center panned mono clip gain by the specified dB value.

For example if you were targeting -16.0 LUFS in a stereo session using a combination of pre-Loudness Normalized clips, and all channel faders were set to unity – the imported mono clips need to be -19.0 LUFS (Integrated). The stereo clips need to be -16.0 LUFS (Integrated). The Left/Right Cut Pan Mode option will not alter the gain of the center panned mono clips. This would result in a -16.0 LUFS stereo mixdown.

Conversely the -3.0 dB Center Pan Mode option will apply a -3 dB gain offset (it will subtract 3 dB of gain) to center panned mono clips resulting in a -19.0 LUFS stereo mixdown. In most cases this -3 LU discrepancy is not the desired target for a stereo mixdown. Note 1 LU == 1 dB.

As stated Logic Pro X provides a similar level of Pan Mode flexibility. I’ve also tested Reaper, and it’s options are equally flexible.

Pro Tools

Pro Tools Pan Mode support (they call it Pan Depth) is somewhat restricted. The preference is limited to Center Pan Mode, with selectable dB compensation options (-2.5 dB, -3.0 dB, -4.5 dB, and -6.0 dB).

There are several ways to reconstitute the loss of gain that occurs in Pro Tools when working with center panned mono clips in stereo sessions. One option would be to duplicate a mono clip and place each instance of it on hard-panned discrete mono tracks (L+R respectively). Routing the mono tracks to a stereo output will reconstitute the loss of gain.

A second and much more efficient method is to route all individual instances of mono session clips to a stereo Auxiliary Input, and use it to apply the necessary compensating gain offset before the signal reaches the stereo Master Output. The gain offset can be applied using the Aux Input channel fader or by using an inserted gain trim plugin. Stereo clips included in the session can bypass this Aux and should be directly routed to the stereo Master Output. In essence stereo clips do not require compensation.

Example Session

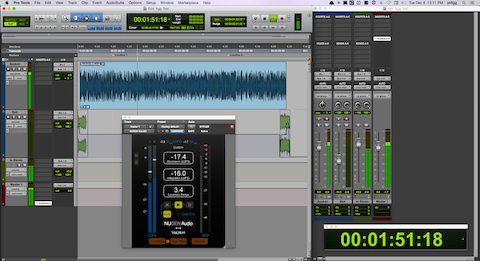
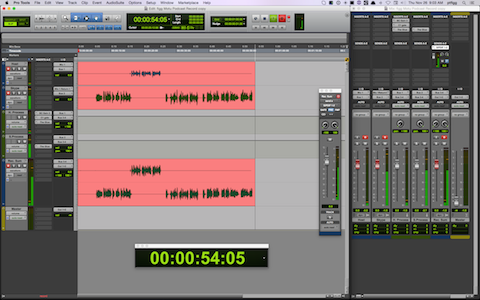
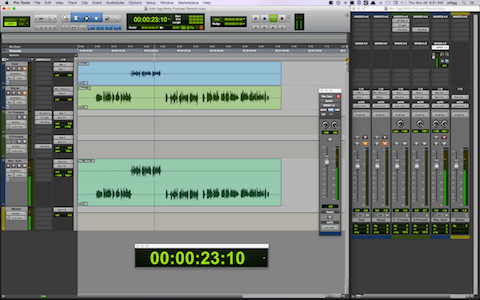
Have a look at the attached Pro Tools session snapshot. In order to clearly display the signal path relative to it’s gain, I purposely implemented Pre-Fader Metering.

pt-pan_small

Notice how the mono spoken word clip included on track 1 is routed (by way of stereo Bus 1-2) to a stereo Auxiliary Input track (named to Stereo). Also notice how the stereo signal level displayed by the meters on the Stereo Auxiliary Input track is lower than the mono source that is feeding it. The level variation is clear due to Pre-Fader Metering. It is the direct result of the session’s Pan Depth setting that is subtracting -3dB of gain on this center panned mono track.

Next, notice how the signal level on the Master Output has been reconstituted and is in fact equal to the original mono source. We’ve effectively added +3dB of gain to compensate for the attenuation of the original center panned mono clip. The +3dB gain compensation was applied to the signal on the Auxiliary Input track (via fader) before routing it’s output to the stereo Master Output.

So it’s: Center Panned mono resulting in a -3dB gain attenuation —>> to a stereo Aux Input with +3dB of gain compensation —>> to stereo Master Output at unity.

In case you are wondering – why not add +3dB of gain to the mono clip and bypass all the fluff? By doing so you would be altering the native inherent gain structure of the mono source clip, possibly resulting in clipping. My described workflow simply reconstitutes the attenuated gain after it occurs on center panned mono clips. It is all necessary due to Pro Tool’s Pan Depth methods and implementation.

-paul.

Utilizing Multiple Outputs for Recording

The vast majority of audio industry professionals use DAWS running on proficient computer systems to record audio directly to secondary hard disks. For some reason direct to disk recording is not widely endorsed in the Podcasting space. Many consultants (for various reasons) advise against this recording method. Instead, they recommend the use of inexpensive hand-held solid state Recorders.

For instance I’ve heard a few people state “computers cause ground loops”, hence the widespread Portable Recorder recommendation. In my opinion that is a half-baked assertion. In fact, ANY electronic component in a signal chain (including your electrical system) is capable of producing inherent noise. Often the replacement of cheaply manufactured components (interfaces, mixers, processors, cables, etc.) will solve audible noise problems. The key is to isolate the source and correct or replace it.

Portable Recorders are well suited for location interviews and video shoots. For in-studio sessions I feel direct to disk recording on a proficient system is much more flexible compared to the use of an external device. More so, the sole use of a Portable Recorder without a proper backup strategy is flat out risky.

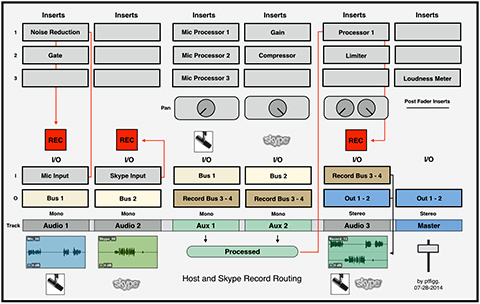
That being said I thought I would document a basic Skype Recording session that I implemented in Pro Tools using a multi-output Motu Audio Interface. The incoming audio will be recorded on a secondary hard disk installed (or interfaced) on the host system. The real time session audio will also be routed to an alternate Interface Output, feeding an external Recorder for backup purposes.

Recording_Session_small

Note a multi-output Mixer can be used in place of an Audio Interface. As far as software you can use any modern DAW to replicate the described session. If you are using a Mac, Rogue Amoeba’s distinctive Audio Hijack application is also highly capable.

Objectives:

1-Record Studio Host and Skype Participant on discrete mono tracks in real time.

2-Combine the discrete recordings and create a split-stereo clip with independent dynamics processing applied to each channel, all in real time.

3-Use a Pre-Fader Send to independently control the level of the split-stereo discrete recording, and patch the real time signal to the Interface S/PDIF Output. This will feed the external Recorder’s S/PDIF Input.

4-Monitor the session through Headphones and play out through Desktop near-field Monitors.

Please review the displayed Pro Tools session snapshot.

• The Input for the mono Host track is the Interface connected mic. The Input for the mono Skype track is “Mix 1 Return.” This is an Interface supported feature, allowing the operator to route the computer’s Output (in this case Skype) to an available DAW Input. This configuration effectively creates a mix-minus with discrete, unprocessed recordings on individual mono tracks.

• The mono recording tracks are routed to individual mono Aux Input tracks using Buses. The Aux Input tracks are hard-panned L+R and contain various inserted processing options, including a Gain Trim, Expander, and Compressor.

The processing applied in this session is not intended to replace what would normally occur in post. The Compressors are there just to tame dynamics in the event either participant exceeds nominal input levels. The Expander is set up to apply mild attenuation when the host is not speaking.

• The Aux Input tracks have their Outputs set to a common stereo Bus.

• Finally a third standard stereo audio track (Rec-Sum) uses the stereo Bus Output(s) as it’s Inputs. By hard panning the channels L+R we are able to maintain discrete channel separation within any printed stereo clip.

To record the discrete raw audio and the processed split-stereo audio in real time, we simply arm all session Audio tracks to record and fire away. The session can be monitored through Headphones and played out through near fields via the Main Output.

Secondary Output

The Motu Interface used for this session has a total of 8 Outputs, including a stereo S/PDIF option. I implemented Pre-Fader Send on the session’s Rec-Sum channel with it’s Output set to S/PDIF. This will route the track’s split-stereo audio to the S/PDIF stereo Input of an external Marantz CF Recorder. With the Send designated as Pre-Fader, it’s level control will be independent of the parent (Rec-Sum) channel fader, thus allowing discrete control of the real time signal being fed to the Recorder.

Note in the displayed Pro Tools session snapshot – the floating fader positioned to the left of the mixer is a user friendly and easily accessible copy of the much smaller Send fader displayed in the parent (Rec-Sum) track.

In summary, we can successfully initialize and capture 4 recordings in a single pass: the raw Host audio, the raw Skype participant audio, a split-stereo processed version of the Skype session, and a split-stereo copy of the processed Skype session stored on the Recorder.

The image below displays the completed session with the split-stereo clip playing through the Main Outputs.

Mix_small

My general recommendation:when it is feasible, use direct to disk and Portable recording options in unison on a proficient system to capture in-studio multitrack and single participant Podcast sessions.

-paul.

Bit Depth and Dither

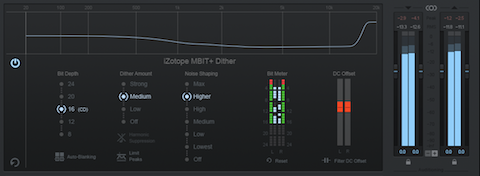
In a professional workflow Dither will be applied to audio clips (or mixes) when reducing word length. This process will mitigate errors that occur due to the subtraction of digital audio bits. I thought I’d cover the basics.

Dither_small

Digital Audio

Digital Audio incorporates individual samples consisting of bits created by the process of Quantization. This is essentially the conversion of a continuous, linear range of values present in analog audio into a fixed range of discrete values. Bit Depth (a.k.a. Word Length or Resolution) represents the number of bits stored in a sample’s measure of amplitude. It indicates the extent of inherent vertical precision. Higher bit depths (or bits per sample) encompass improved vertical dynamic resolution resulting in an extended Dynamic Range.

1 bit = 6dB of Dynamic Range. Theoretically 16bit audio has a quantified Dynamic Range of 96 dB. 24 bit audio has a quantified Dynamic Range of 144 dB. However, in order to accurately assess Dynamic Range we must also recognize the amplitude of the highest spectral component of the inherent noise floor. Specifically, where it resides relative to the maximum Peak value that a system is capable of reproducing. Dynamic Range is the measurement of this ratio or range.

Signal to Noise Ratio (SNR) is the quantified range between the nominal average signal level and the average level of the noise floor. Audio with an extended Dynamic Range will exhibit a higher SNR compared to audio with a reduced Dynamic Range. In essence 24 bit audio will allow you to work with additional headroom without any increase in noise compared to 16 bit audio.

Word Length Reduction

Truncation is the removal of bits with no compensating replacement. The repositioning of samples after converting to a lower resolution creates Quantization Errors resulting in audible artifacts and distortion. Dither is technology that adds minimal perceived noise to audio before word length reduction. This noise will mitigate (mask/remove) the audibility of distortion caused by Quantization Errors. The process preserves fidelity and Dynamic Range of audio throughout bit-depth conversion and/or bit-depth reduction exporting.

There is a trade off: you are replacing bad noise with alternative “good” noise that is smoother, less audible, and much more consistent.

Noise Shaping is a supplemental option that pushes noise into frequency ranges that are less audible to humans, thus allowing greater Dither with reduced perceptual noise.

(Take a look at the Noise Shaped frequency response curve in the attached image. There is a clear visual indication of increased gain at higher frequencies).

Podcasting

So what does this all mean for the typical Podcast Producer? Is Dither just another obscure aspect of professional Audio Mastering and/or Post Production that can be safely ignored?

Consider the following variables:

If you are recording spoken word using properly configured gear in a reasonably quiet and optimized environment – there is no discernible advantage recording 24-bit audio in preparation for 16-bit encoding and delivery. In my opinion 16-bit audio from acquisition to distribution will be more than adequate.

If you elect to record 24 bit audio, and you are not properly implementing word length reduction to 16 bit, you are essentially nulling the advantages of the original higher resolution audio. In essence fidelity degradation (artifacts/distortion) will occur due to the absence of efficient error masking. This is not my opinion – it is a fact.

Remember, I’m specifically referring to spoken word audio slated for Podcast distribution. If you are tracking music, well then by all means make full use of the advantages of higher resolution audio recording.

Consider this: The stand-alone version of iZotope’s Ozone 8 Mastering Suite processes all imported audio to 32 bit word length. The manual specifically states:

“Ozone processes files at 32-bit so Dither is desirable for files being exported to values lower than 32-bit …

… When exporting to a bit depth lower than 32-bit, checking this (Dither option) box will apply high-quality dithering to the exported file. This allows you to preserve the sound quality and dynamic range of a higher bit depth, when exporting the audio file to a lower bit depth.”

Most DAWS include Dither options. In some cases it’s by way of a plugin. You may also notice Dither options included in application Preferences or Export dialogs.

Hopefully after reading this article you will understand what Dither is, it’s purpose, and whether you should consider implementing it. Please note: Dither must be applied at the very last stage of any processing chain.

-paul.

dbx 286s: Beyond The Basics …

The dbx brand has been a favorite of mine since the late 1970’s. My first piece of dbx kit was a stand-alone noise reduction unit that I coupled with an old Teac Reel to Reel Tape Deck. Through the years I’ve owned various EQ’s and Dynamics processors, including the highly regarded 160A Compressor. I purchased mine in 2006.

160a-small

In January 2011 I was skimming through eBay listings looking for a dbx 286A Microphone Preamp Processor. At the time I had heard the original 286 model was co-designed by Bob Orban, and both models were widely used in Radio Broadcast facilities. I found it interesting that Radio Engineers would use a piece of gear that was not only cheap in terms of cost – but unconventional in terms of controls.

286A-small

One piece was available on eBay, supposedly used for 4 hours at a party in Hollywood Hills California, and then boxed for resale. The seller had a positive reputation, so I grabbed it for $115. Upon arrival it’s condition was as described, and it’s been in my rack ever since.

The 286/286A has evolved into the 286s, quite frankly an outright steal priced at $199. Due to it’s straight forward approach and affordable price, the Podcasting community has embraced it and often classifies it as “drool-worthy.” Pretty amusing.

286-small

In this article I am going to focus on the attributes of the Compressor stage and the De-Esser. I will demystify the DeEsser and discuss the importance of the Output (Gain) Compensation setting.

Unconventional

I mentioned the processor is unconventional. For example the Compressor’s Drive and Density settings essentially replace the Threshold, Ratio, Attack, and Release controls present on most Compressors.

The De-Esser requires a user defined High-Pass Frequency designation and Threshold setting to reduce excessive sibilance. Setup can be time consuming due to the lack of any visual representation of problematic energy in need of attenuation.

Compressor:Drive

Compression results depend on the level (and dynamics) of the incoming signal and corresponding settings. On a conventional compressor the Threshold monitors the incoming signal. When the signal surpasses the Threshold, processing engages and gain reduction is activated. The Ratio determines the amount of gain reduction. The Attack will affect how aggressively (or the speed at which) gain reduction initializes and ultimatly reaches maximum attenuation. The Release will control the speed of the transition from full attenuation – back to the original level

The Drive control on the 286s determines the amount of gain reduction (compression) applied to the incoming signal. Higher settings will increase the input signal level resulting in more aggressive compression (and noise).

How much gain reduction should you shoot for? Well that’s subjective. I would recommend experimenting with 6-12dB of gain reduction. Of course results will vary due to obvious variables (mic selection, preamp level, etc.)

Compressor:Density

When using a compressor to process spoken word, improper Release settings can result in choppiness, often referred to as pumping. The key is to have the gain reduction occurrences smoothly transition between instances of audible sound and natural pauses (silence).

The 286s uses a variable program dependent Release. In the event you feel (and hear) the necessity to speed up or slow down the program dependent Release – the Density control will come in handy.

Note the Density scale on the 286s is again somewhat unconventional. On a typical dynamics processor – setting the Release full counter-clockwise would result in a very fast Release. As the setting is adjusted clockwise, the Release duration is extended. The scale usually transitions from milliseconds to full seconds.

On the 286s, think of Density as a linear speed controller, where “1” (counter-clockwise) is slow and “10” (full clockwise) is fast.

For normal speech I recommend experimenting with the Density set between 3 and 5.

The De-Esser

If you check around you will notice a wide range of references regarding the frequency range where sibilance generally occurs. In reality there are many variables. Each instance of sibilance will need to be accurately identified and addressed accordingly.

The 286s De-Esser uses a variable high-pass filter. This instructs the processor where to initiate the attenuation of problematic energy. This Frequency control has a range of 800Hz-10kHz. The user manual states ” … settings between 4-8kHz will yield the best results for vocal processing.” This is good starting point. However proper setup requires time consuming arbitrary tweaking that may result in a low level of accuracy. A visual representation of the frequency range of the excessive sibilant energy will solve this problem. Once you identify the frequencies and/or range where most of the energy is present, setting the Frequency on the 286s will be demystified.

The De-Esser’s Threshold setting controls the amount of attenuation (sensitivity) and will remain constant as the input level changes.

Have a look at the spectral analysis below:

sibilance-small

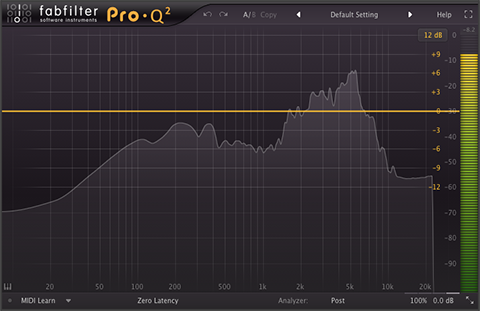
Notice the excessive energy in the 2-6kHz range (Frequency Range is represented on the X axis). For this particular segment of audio I would initially set the Frequency control on the 286s to 5kHz. Next I would adjust the Threshold until the sibilant energy is attenuated. I would then sweep the Frequency setting within the visual range of the sibilant energy and fine tune both settings until I achieve the most pleasing results. The key is not to over do it. Heavy attenuation will suppress vital energy and remove any hint of natural presence and sparkle.

To perform this analysis excersize – set the Threshold setting on the 286s to OFF. Pass the output of the processor to your DAW of choice and perform a real time spectral analysis of your voice using a software plugin the includes a Spectrum Analyzer. You can use any supported EQ plugin with it’s controls bypassed. You can also use something like the free (AU/VST) Span plugin by Voxengo (note that Span is CPU intensive).

Output Gain Compensation

Gain Compensation is an integral element of Audio Compression. It’s intent is to offset the gain reduction that occurs when audio is compressed. It is often referred to as Make-up Gain. When this gain offset is applied to compressed audio, the perceived, average level of the audio is increased. Excessive Make-up Gain can sometimes elevate noise that may have been previously inaudible at lower average levels.

Earlier I discussed how an elevated Drive control setting on the 286s will increase the input signal of low level source audio. In doing so you may initiate a suitable amount of compression. However you also run the risk of a noticeable increase in noise. In this particular scenario, try setting the Output Gain on the 286s to a negative value to offset the gain (and noise) that may have been introduced by the Drive setting.

Conclusion

I think it’s important to first learn the basics of Audio Compression from a conventional perspective. In doing so you will find it easier to get the most out of the unconventional controls on the dbx 286s, especially Drive and Density.

And let’s not forget that De-Essing is really nothing more than frequency band compression that will attenuate problematic energy. Establishing a visual reference to the energy will simplify the process of accurate correction.

-paul.

Skype, Logic Pro X, and Aggregate Devices …

Scenario:

Studio Host and Skype participant to be recorded inside Logic Pro X on a single machine (single pass) with no additional hardware other than a Mic Input Device.

Objectives:

[– Two independent mono Host/Participant stems with no processing.

[– One processed split-stereo mixdown of the session with the Host and Guest residing on discrete (L+R) channels.

[– Real time Processing and Recording of all instances.

skype-waves-small

Of course the objectives noted above are easily attainable using two independent machines, with the recording box running Logic Pro X and the Skype machine handling the connection. In this case you would also need to use a mixer to set up a proper mix-minus.

You can also implement similar workflows by using two inexpensive USB audio interfaces connected to a single machine.

Considering the resourcefulness of today’s modern day Macs, I’m confident the following workflow will be successful freeing the user from complexities and added costs.

OSX Aggregate Devices

The foundation of this setup is based on a user created Aggregate Audio Device. Aggregate devices appear in the OSX System Preferences/Sound I/O options for system wide use. By wrapping supported “Subdevices” into a single Aggregate, you effectivly create a sort of cumulative Input Device that can be designated in Logic as the default. We also need a software utility that supports routing of the Skype Output to an Input in Logic.

I originally created this workflow using SoundFlower that was installed on my secondary iMac and carried over form previous versions of OSX. SoundFlower, along with the iMac’s Line Input were wrapped into a single Aggregate Device, and then designated in Logic as the default Input.

This worked well. However, I had no plans to install the now unsupported SoundFlower on my production MacPro for further testing. And so I looked around for a suitable up to date (and actively developed) replacement for SoundFlower.

Sound Siphon

Sound Siphon by Static Z Software “… makes your Mac’s Audio Output available as an Audio Input Device. It enables you to send audio from one application to another where it can be processed, streamed, or recorded.

Exactly what I needed.

Note that Sound Siphon is very diverse in terms of features. And the developer states that many useful enhancements are in the works. You can download a restricted demo. My hope is that you consider purchasing a $29.99 license. This will ensure the longevity of the application and continued development. Note that I have no affilation and I gladly purchased a license.

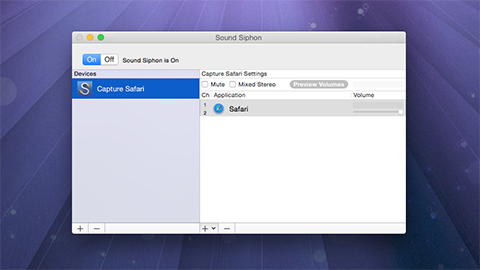
This is a snapshot of Sound Siphon:
ss-small

In the example above I display a user defined Device (“Capture Safari”) that is essentially a Custom Audio Input. I then associated the Safari Application with this device. This becomes a system wide option to capture Safari audio. For example QuickTime X will now display “Capture Safari” as an Input option for audio recording.

It’s important to note that this particular Sound Siphon feature is supplemental to the Skype recording implementation. In other words – it’s an entrley different use case scenario. My goal here is to disclose the flexibility of the application.

Creating the Aggregate Device

Input 1 on my Mackie Onyx 1220i Mixer receives the output from a dbx 286A Voice Processor. The studio Mic is connected to the processor for proper gain staging. I needed to wrap the Mic signal along with the Skype audio into a single Input Device and designate it in Logic’s Preferences for proper routing.

To create an Aggregate Device, open Audio MIDI Setup, located in ~/Applications/Utilities. When creating a new Aggregate, supported Subdevices appear in the right side setup table.
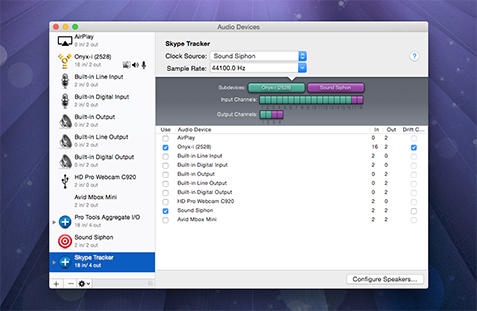
midi-small-44

Notice that Sound Siphon is listed as a 2 in/2 out device in the left source view. This is created when you install the application. Once installed, it will be available to be wrapped into an Aggregate Device along with pre-existing devices.

For my implementation I created “Skype Tracker” as a new Aggregate and selected my mixer (Onyx-(2528)) and Sound Siphon as Subdevices. Up top you set your Sample Rate and the Clock Source. My system seems to perform better with Sound Siphon set as the Clock Source.

It’s important to review the Input Channel matrix of the new Aggregate Device. Notice that Sound Siphon will only support Input channels (17+18). When routing Inputs in Logic, I will use Input 1 for the studio Mic and Input 17 for Skype.

Skype

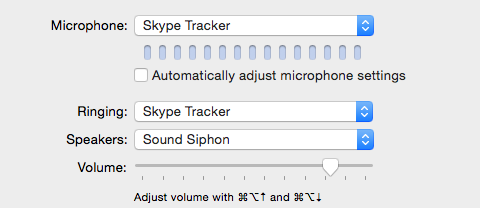
Here are the Skype settings that I am using:
skype-44

The Microphone is set to the Aggregate Device. The Speakers option is set to Sound Siphon. This setting is imperative and from what I can tell non-flexiable.

Logic Pro X

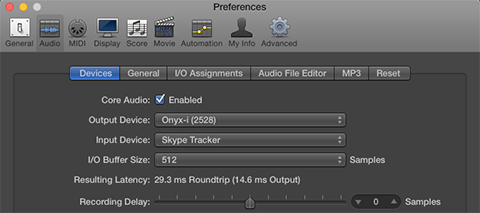
The first thing we need to do is define the Input Device in Global Preferences/Audio/Devices. I set mine to the Aggregate Device:
prefs-sm-44

Next we will address setup and routing. What’s important here is that I use an Object in Logic that may not be immediately obvious in your particular installation.

Specifically, I often use Input Channel Strip Objects in my projects. They are implemented in the Environemnt (aka “MIDI Environment”). It is accessible form the Logic Window Menu.

From the Logic Docs regarding Input Channel Strips:

“The Input Channel Strip allows you to directly route and control signals from your audio hardware’s Inputs. Once an Input Channel Strip is assigned to an Audio Channel Strip, it can be monitored and recorded directly into Logic Pro, along with its effect plug-ins.

The signal is processed, inclusive of plug-ins even while Logic Pro is not playing. In other words, Input Channel Strips can behave just like external hardware processors. Aux sends can be used pre- or post-fader.

Input Channel Strips can be used as live Inputs that can stream audio signals from external sources (such as MIDI synthesizers and sound modules) into a stereo mix (by bouncing an Output Channel Strip).”

You can also create Bus Channel Strip Objects in the Environment. They are not the same as Auxiliary Channel Strips and can be quite useful in certain instances. For more information about Bus Channel Strips please refer to this article.

The Environment

To expose the accessibility of the Logic Environment, open global Preferences and access the Advanced options. The MIDI option needs to be selected as part of the Advanced Tools:
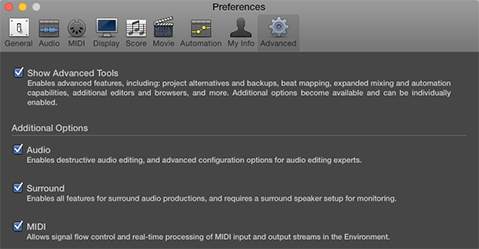
prefs-small

Once that setting is ticked, “Open Midi Environment” will appear as an option in the Logic Window Menu.

Channel Strip Objects are added to the Environment from the New Menu/Channel Strip. Notice how the Environment emulates the Project Mixer:
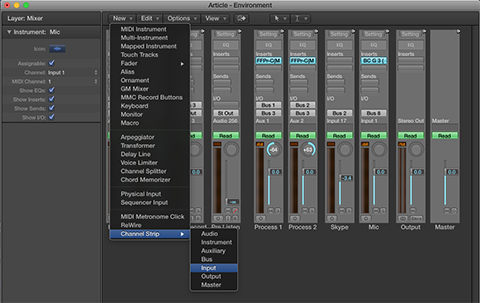
add-env-sm-55

Note that when adding Input Channel Strips in the Environment, you must define the corresponding (Aggregate) Device Inputs using the Channel Strip editor:
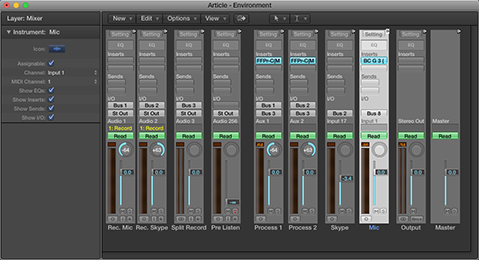
env-sm-77

For this particular project I created two Input Channel Strips in the Environment using Inputs 1 and 17 respectively, based on Aggregate Subdevice availability (Input 1 = Mic, Input 17 = Skype).

You will also need 4 Audio Tracks (2 Mono, 1 Stereo, 1 PreListen), and 2 (Mono) Auxiliary Channel Strips. Create Audio Tracks using the Track/New Tracks option – located in the Logic Application Menu. Add Auxiliary Channel Strips using the Mixer’s Options Menu/Create New … || Note that the Input Channel Strips created in the Environment should be designated Mono.

Here is my Project Mixer with all necessary Objects and Routing:
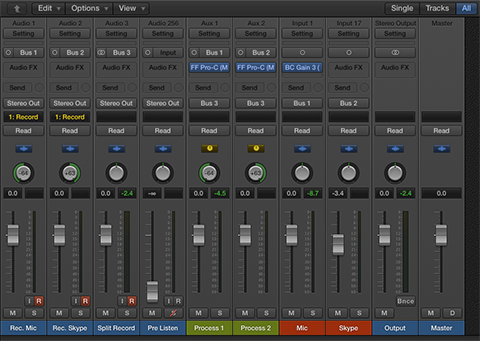
mixer-new-sm-44

Routing

The reddish labeled channels are the two Input Channel Strips that I created in the Environment. If you look at the text at the very top of these Channel Strips, you will see their Input designations.

The signals coming in through the Inputs are routed to their own independent Aux Channels for processing. Notice I inserted a Gain Trim on the Mic Input Channel. All processing options are of course subjective. One example would be to insert two instances of a Compressor on each Aux Channel. You would set these up to apply real time, non-aggresive dynamic range compression as you record.

Moving forward – notice the Aux Channels are Mono and hard panned L+R respectivly. This will maintain channel separation when recording the split-stereo version of the session. In this example each Aux Channel Output is routed to Audio Channel 3 (“Split Record”). This Stereo Audio Track is panned center. When armed it will record the Aux Channel Outputs to a split-stereo file.

Also study how I set up the remaining Audio Tracks – Audio Track 1 (“Rec. Mic”) and Audio Track 2 (“Rec. Skype”). Their Inputs are set to Bus 1 and 2 respectively, allowing these tracks to receive the unprocessed Outputs (“dry” audio) from the Input Channel Strips.

Keep in mind that if Effects are inserted on the Input Channel Strips, the audio routed to Audio Tracks 1+2 will be processed. In most cases I would not insert any Effects on the Input Channel Strips other than Gain. My intension here is to record dry stems.

I Grouped various aspects of these two channels, mainly Volume, Mute, Solo, and Record. This will link the faders and make it easy to control audibility of the mono stems cumulatively.

Wrap Up

That’s basicilly it. You can record/monitor all tracks in real time. And when you are done, there is no need to bounce, although you still can. You simply “Export” or “Export Region” as an individual file(s).
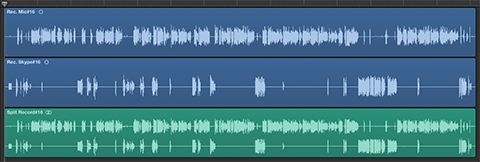
waves-22-small

Notes

You may have noticed the Outputs for the Auxiliary Channel Strips (1+2) and the Input for Audio Track 3 (“Split Record”) is Bus 3. This is in fact a virtual (permanent) Bus used to route the processed audio to Track 3 for recording.

When you select a permanent virtual Bus in Logic for routing, an Auxiliary Channel Strip is auto-created and will appear in the Mixer. For this particular workflow – we use two Auxiliary Channel Strips, one for Mic processing and a second for Skype processing.

Throughout this entire workflow no changes were made to my default OSX Audio I/O Settings located in System Preferences/Sound.

As I always say – Audio Tracking and Post are highly subjective arts. In fact many Logic “experts” have never heard of or utilized the options in the Environment. And your processing options are also subjective. My hope is this documentation will at the very least introduce you the creation and usage of Aggregate Devices.

If by chance you develop a successful alternative solution, all well and good. In my tests I’ve found the documented implementation to work quite well.

Let me know if you have any questions.

I’d like to thank my friend Victor Cajiao for his help while testing this workflow.

-paul.
Asymmetric Waveforms: Should You Be Concerned?

In order to understand the attributes of asymmetric waveforms, it’s important to clarify the differences between DC Offset and Asymmetry …

Waveform Basics

A waveform consists of both a Positive and Negative side, separated by a center (X) axis or “Baseline.” This Baseline represents Zero (∞) amplitude as displayed on the (Y) axis. The center portion of the waveform that is anchored to the Baseline may be referred to as the mean amplitude.

wf-480

DC Offset

DC Offset occurs when the mean amplitude of a waveform is off the center axis due to differing amounts of the signal shifting to the positive or negative side of the waveform.

One common cause of this shift is when faulty electronics insert a DC current into the signal. This abnormality can be corrected in most file based editing applications and DAW’s. Left uncorrected, audio with DC Offset will exhibit compromised dynamic range and a loss of headroom.

Notice the displacement of the mean amplitude:

dc-offset-ex-480-png

The same clip after applying DC Offset correction. Also, notice the preexisting placement of (+/-) energy:

dc-offset-removed-480

Asymmetry

Unlike waveforms that indicate DC Offset, Asymmetric waveform’s mean amplitude will reside on the center axis. However the representations of positive and negative amplitude (energy) will be disproportionate. This can inhibit the amount of gain that can be safely applied to the audio.

In fact, the elevated side of a waveform will tap the target ceiling before it’s counterpart resulting in possible distortion and the loss of headroom.

High-pass filters, and aggressive low-end processing are common causes of asymmetric waveforms. Adding gain to asymmetric waveforms will further intensify the disproportionate placement of energy.

In this example I applied a high-pass filter resulting in asymmetry:

asymm-matural-480

Broadcast Chains

Broadcast engineers closely monitor positive to negative energy distribution as their audio passes through various stages of processing and transmission. Proper symmetry aides in the ability to process a signal more effectively downstream. In essence uniform gain improves clarity and maximizes loudness.

Podcasts

In spoken word – symmetry allows the voice to ride higher in the mix with a lower risk of distortion. Since many Podcast Producers will be adding gain to their mastered audio when loudness normalizing to targets, the benefits of symmetric waveforms are obvious.

If an audio clip’s waveform(s) are asymmetric and the audio exhibits audible distortion and/or a loss of headroom, a Phase Rotator can be used to reestablish proper symmetry.

Below is a segment lifted from a distributed Podcast (full zoom out). Notice the lack of symmetry, with the positive side of the waveform limited much more aggressively than the negative:

podcast-asymm-480

The same clip after Phase Rotation:

asymm-podcas-fixed-480

(I processed the clip above using the Adaptive Phase Rotation option located in iZotope’s RX 4 Advanced Channel Ops module.)

In Conclusion

Please note that asymmetric waveforms are not necessarily bad. In fact the human voice (most notably male) is often asymmetric by nature. If your audio is well recorded, properly processed, and pleasing to the ear … there’s really no need to attempt to correct any indication of asymmetry.

However if you are noticing abnormal displacement of energy, it may be worth looking into. My suggestion would be to evaluate your workflow and determine possible causes. Listen carefully for any indication of distortion. Often a slight EQ tweak or a console setting modification is all that may be necessary to make noticeable (audible) improvements to your audio.

-paul.

Intermediate File Format for New Media Producers: MP2

mp2-file If you are in the audio production business or involved in some sort of collaborative Podcast effort, moving large lossless audio files to and from various locations can be challenging.

Slow internet speeds, Hotel WiFi, and server bottlenecks have the potential to cripple efficient file management and ultimately impede timely delivery. And let’s not forget how quickly drive space can diminish when storing WAV and/or AIFF files for archival purposes.

The Requirements for a Suitable Intermediate

From the perspective of a Spoken Word New Media Producer, there are two requirements for Intermediate files: Size Reduction and Retention of Fidelity. The benefits of file size reduction are obvious. File transfers originating from locations with less than ideal connectivity would be much more efficient, and the consumption of local or remote disk/server space would be minimized. The key here is to use a flexible lossy codec that will reduce file sizes AND hold up well throughout various stages of encoding and decoding.

Consider the possible benefits of the following client/producer relationship: A client converts (encodes) lossless files to lossy and delivers the files to the producer via FTP, DropBox, etc. The Producer would then decode the files back to their original format in preparation for post production.

When the work is completed, the distribution file is created and delivered (in most cases) as an MP3. Finally with a bit of ingenuity, the producer can determine what needs to be retained for archival purposes, and convert these files back to the intermediate format for long term storage.

How about this scenario: Podcast Producer A is located in L.A.. Producer B is located in NYC. Producer B handles the audio post for a double-ender that will consist of 2 individual WAV files recorded locally at each location.

DA

Upon completion of a session, the person in L.A must send the NY based audio producer a copy of the recorded lossless audio. The weekly published program typically runs upwards of 60 minutes. Needless to say the lossless files will be huge. Let’s hope the sender is not in a Hotel room or at Starbucks.

The good news is such a codec exists …

MPEG 1 Layer II (commonly referred to as MP2 with an .mp2 file extension) is in fact a lossy “perceptual” codec. What makes it so unique (by design) is the format’s ability to limit the introduction of artifacts throughout various stages of encoding and decoding. And get this – MP2’s check in at about 1/5th the size of a lossless source. For example a 30 minute (16 bit/44.1kHz) Stereo WAV file currently residing on my desktop is 323.5 megabytes. It’s MP2 counterpart is 58.7 megabytes.

Public Radio

If you look into the file submission requirements over at PRX (The Public Radio Exchange) and NPR (see requirements), you will notice MP2 audio files are what they ask for.

In fact during the early days of IT Conversations, founder and Executive Director Doug Kaye implemented the use of MP2 audio files as intermediates throughout the entire network based on recommendations by some of the most prominent engineers in the Public Radio space. We expected our show producers and content providers to convert their audio files to MP2 prior to submission to our servers using third party software applications.

Eventually a proprietary piece of software (encoder/uploader) was developed and distributed to our affilates. The server side MP2’s were downloaded by our audio engineers, decoded to lossless, produced, and then sent back up to the network as MP2 in preparation for server side distribution encoding (MP3).

From a personal perspective I was so impressed with the codec’s performance, I immediatly began to ask my clients to submit MP2 audio files to me, and I’ve never looked back. I have never experienced a noticeable degradation of audio quality when converting a client’s MP2 back to WAV in preparation for post.

Storage

In my view it’s always a good idea to have unfettered access to all previously produced project files. Besides produced masters, let’s not forget the accumulation of individual project assets that were edited, saved, and mixed in post.

On average my project folders that include audio assets for a 30 minute program may consume upwards of 3 Gigabytes of storage space. Needless to say an efficient method of storage is imperative.

Fidelity Retention

If you are concerned about the possibility of audio quality degradation due to compression artifacts, well that’s understandable. In certain instances accessability to raw, uncompressed audio will be more suitable. However I am convinced that you will be impressed with how well MP2 audio files hold up throughout various workflows.

In fact try this: (Suggested encoders listed below)

Convert a stereo WAV file to stereo MP2 (256 kbps). Compare the file sizes. Listen to the MP2 and assess fidelity retention. Then convert the stereo MP2 directly to stereo MP3 (128 kbps). Listen for any indication of noticeable artifacts.

Let me know what you think …

My recommendation would be to first experiment with converting a few of your completed project assets to MP2 in preparation for storage. I’ve found that I rarely need to dig back into old work. I have on a few occasions, and the decoded MP2’s were perfectly fine. Note that I always save a copy of the produced lossless master.

Specifications and Software

The requirements for mono and stereo MP2 files:

Stereo: 256 kbps, 16 bit, 44.1kHz
Mono: 128 kbps, 16 bit, 44.1kHz

There are many audio applications that support MP2 encoding. Since I have limited exposure to Windows based software, the scope of my awareness is narrow. I do know that Adobe Audition supports the format. In the past I’ve heard that dBPowerAmp is a suitable option.

On the Mac side, besides the cross platform Audition – there is a handy utility on the Mac App Store called Audio-Converter. It’s practically free, priced at $0.99. File encoding is also supported in FFmpeg either from the Command Line or through various third party front ends.

Here is the syntax (stereo, then mono) for Command Line use on a Mac. The converted file will land on your Desktop, named Output.mp2:

ffmpeg -i yourInputFile.wav -acodec mp2 -ab 256k ~/Desktop/Output.mp2

ffmpeg -i yourInputFile.wav -acodec mp2 -ab 128k ~/Desktop/Output.mp2

Here’s a good place to download pre-compiled FFmpeg binaries.

Many modern media applications support native playback of MP2 audio files, including iTunes and Quicktime.

In Conclusion

If you are in the business of moving around large Spoken Word audio files, or if you are struggling with disk space consumption issues, the use of MP2 audio files as intermediates is a worthy solution.

-paul.

iZotope Ozone 6

iZotope has released a newly designed version of Ozone, their flagship Mastering processor. Notice I didn’t refer to Ozone [6] as a plugin? Well I’m happy to report that Ozone [6] is now capable to run independent of a DAW as a stand-alone desktop processor.

oz6-480

Besides the stand-alone option and striking UI overhaul, Ozone’s flexibility has been greatly enhanced with the addition of support to host third party Audio Units and VST plugins. Preliminary tests here indicate that it functions very well in the stand-alone mode. More on this in moment …

I’ve been a customer and supporter of iZotope since early 2005. If I remember correctly Ozone 3 was the first version that I had access to. In fact back in the early days of Podcasting, many producers purchased an Ozone license based on my endorsement. This was an interesting scenario all due to the fact that most of the people in the community who bought it – had no idea how to use it! And so a steady flow of user support inquiries began to trickle in.

I decided the best way to bring users up to speed was to design Presets. I would distribute the underlying XML file and have the users move it to the proper location on their system’s. After doing so, the Preset would be accessible within Ozone’s Preset Manager.

The complexity of the Presets varied. Some people wanted basic Band-Pass filters. Others requested the simulation of a broadcast chain that would result in a signature sound for their recorded voice. In fact I remember one particular instance where the user requested a Preset that would make him sound like an “AM Radio DJ”. So I went to work and I think I made him happy.

As Ozone matured, it’s level of complexity increased resulting in somewhat sluggish performance (at least for me). When iZotope released Alloy 2, I bought it – and found it to be much more responsive. And so I sort of moved away from Ozone, especially Ozone 5. My guess is if my system’s were a bit more robust, poor performance would be less of an issue. Note that my personal experience with Ozone was not necessarily the general concensus. Up to this latest release, the plugin was highly regarded with widespread use in the Mastering community.

Over the past 24 hours I’ve been paying close attention to how Ozone users are reacting to this new version. Note that a few key features have been removed. The Reverb module is totally gone. Gating/Expansion has been removed from the Dynamics Module, and the Dithering options have been minimized. The good news is these particular features are not game changers for me based on how I use this tool. I will say the community reaction has been tepid. Some users are passing on the release due to the omissions that I’ve mentioned and others that I’m sure I’ve overlooked.

For me personally – the $99 upgrade was a no-brainer. In my view the stand-alone functionality and the support for third party plugins makes up for what has been removed. In stand-alone mode you can import multiple files, save your work as projects, implement processing chains in a specific order, apply head/tail cuts/fades, and export your work.

Ozone [6] will accept WAV, AIFF, or MP3 files. If you are exporting to lossless, you can convert Sample Rates and apply Dither. This all worked quite well on my 2010 MacPro. In fact the performance was quite good, with no signs of sluggish performance. I did notice some problematic issues with plugin wrappers not scaling properly. Also the Plugin Manager displayed duplicates of a few plugins. This did not hinder performance in any way. In fact all of my plugins functioned well.

And so that’s my preliminary take. My guess is this new version of Ozone is well suited for advanced New Media Producers who have a basic understanding of how to process audio dynamics and apply EQ. Of course there’s much more to it, and I’m around to answer any questions that you might have.

Look for more information in future posts …

-paul.

Skype in the Box …

Scenario:

Studio Host and Skype participant to be recorded inside your DAW utilizing a slightly advanced configuration.

The session will require a proper mix-minus using your mixer’s Aux Send to feed the Skype Input – minus the Skype participant.

Objectives:

[– Two discrete mono Host/participant recordings with minimal or no processing.

[– Host Mic routed through a voice processing chain using plugins.

[– Incoming Skype routed through a compressor to tame levels, if necessary.

[– One fully processed stereo mix of the session with the Host audio on the left channel and the Skype participant on the right channel.

[– Real time recording and output.

There are certainly various ways to accomplish these objectives utilizing a Bounce to Track concept. The optional inserted plugins and even the routing decisions noted below are entirely subjective. And success with this implementation will depend on how resourceful your system is. I would recommend that you send the session audio out in real time to an external recorder for backup.

Configuration:

This particular example works well for me in Pro Tools. I tried to make this design as generic as possible. My guess is you will have no trouble applying these concepts in any professional DAW. (Click to enlarge)

Skype-NEW-480

Setup:

First I’ll mention that I’m using a Mackie Onyx 1220i Firewire Mixer. This device is defined as my default system I/O. The mixer has a sort nifty feature that allows the creation of a mix-minus just by the press of a button.

onyx-480

Pressing the Input button located on the mixer’s Line In 11-12 channel(s) sets the computer’s audio output as the channel’s input, passing the signal through Firewire 1-2. Disengaging this button will set the Input(s) to Line and the channels’s 1/4″ Input jacks would become active.

Skype recognizes the mixer as the default I/O. So I plug my mic into the mixer’s Channel 1 Input and hard-pan left. I then hard-pan Channel(s) 11-12 right. With the Input button pressed – I can hear Skype. In order to create a successful mix-minus you need to tell the mixer to prevent the Skype input from being inserted back into the Main Mix. These options are located in the mixer’s Source Matrix Control area.

This configuration translates into a Pro Tools session by setting the Track 1 Input (mono) to Onyx Channel 1 and the Track 2 Input (mono) to Onyx Channel 12. I now have discrete channels of audio coming into Pro Tools on independent tracks.

Typically I insert noise reduction plugins on the Mic Input Channel. A Gate basically mutes the channel when there is no signal, and iZotope’s Dialog DeNoiser handles problematic broadband noise in real time. At this stage the Skype Input is recorded with no processing.

Next, both Input Channels are bused out to independent mono Auxiliary Inputs that are hard-panned left + right respectively in preparation to route the passing audio to a Stereo Record bus. To process the mic signal passing through Aux 1 I usually insert something like Waves MaxxVolume, FabFilter’s Pro-DS, and Avid’s Impact Compressor.

For the Skype audio passing through Aux 2, I might insert a gain stage plugin and another instance of Avid’s Impact Compressor. This would keep the Skype audio in check in the event the guest’s delivery is problematic.

The last step is to bus out the processed audio to a Stereo Audio Track with it’s channels hard-panned left + right. This will maintain the channel separation that we established by hard-panning the Aux Inputs. On this track I may insert a Loudness Maximizer and a Peak Limiter. The processed and recorded stereo file will contain the Mic audio on the Left Channel and the Skype audio on the Right Channel.

Finally you’ll notice I have a Loudness Meter inserted on the Master in one of the Pro Tools Post Fader inserts. Once a session is completed I can disarm the “Record” track and monitor the stereo mixdown. Since the Loudness Meter will be operating Post Fader, I can apply a global gain offset using the Master Fader. Output measurements will be accurate. Of course at this point the channels that contain the original discrete mono recordings would need to be muted.

Notes

All the recording and processing steps in this session can be executed in real time. You simply define your Inputs, add Inserts, set up panning/routing, and finally arm your tracks to record. You will be able to converse with the Skype guest as you monitor the session through the mixer’s headphone output with no latency issues. When the session ends you will have access to independent mono recordings for both participants and a processed stereo mix with discrete channels.

Note that you can also implement this workflow as a two step process by first recording the Host/Skype session as discrete mono files. Then Bounce to Track (or Disk) to create the stereo mixdown.

Again the efficiency of this workflow will depend on how resourceful your system is. You might consider running Skype on a separate computer. And I reiterate: as you record in the box, consider sending the session audio out to an external recorder for backup.

-paul.
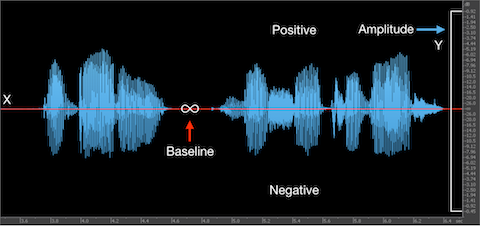
Avid Impact …

Since upgrading to Pro Tools 11 – I lost access to one of my favorite plugins – The Glue by Cytomic. The Glue is an analog modeled console-style Mix Bus Compressor that supports Side-Chaining and features a classic needle type gain reduction meter. This plugin gets high marks in the music production community. In my work I find it very useful on mix buses and to tame dynamics in individual clips. At this time there is no AAX Native version available, although I’ve read a release may be imminent.

After using The Glue for about a year – I grew very fond of the form factor and ease of use. And, the analog gain reduction meter is just too cool. Here’s a video that demonstrates how The Glue can be used as a Limiter to tame transients.

I have a bunch of Compressors that I use in Pro Tools including C1 by Waves and Pro-C by FabFilter. I also use the Compressors included in the Dynamics modules in iZotope’s Ozone and Alloy plugins.

I decided to look around for a suitable replacement for The Glue that would work well in my Pro Tools environment. I was surprised when I stumbled upon something offered by Avid … Impact Mix Bus Compressor.

impact_blog

Before shelling out $300 for this plugin, I decided to check eBay. Sure enough I found a reliable reseller who was accepting offers for this previously registered plugin by way of an iLok license transfer. I secured the license for $80. I’m hoping this is legit

Regardless, I’m looking forward to adding this new tool to my Pro Tools rig. We’ll see how well it stacks up against The Glue.

-paul.
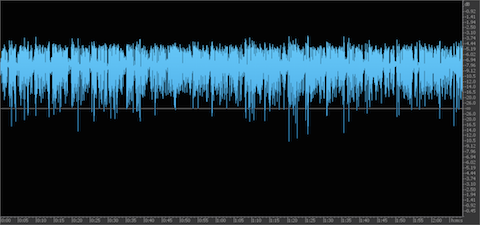
Update:The license transfer worked out fine and from what I’ve heard the process is totally legit …

Waves WLM Plus Loudness Meter …

Waves has just released a stellar update to their critically acclaimed WLM Loudness Meter. The new WLM Plus version, available for free to those who are eligible – includes a few new and very useful features.

The plugin now acts as both a Loudness Meter and a Loudness Processor. New controls (Gain/Trim) are located in the Processing Panel and are designed to apply loudness normalization and correction. There is also a new switchable True Peak Limiter that adheres to the True Peak parameter defined in the selected running preset.

Here’s how it works:

Notice below I am running WLM Plus using my own custom preset (figg -16 LUFS). Besides the obvious Integrated Loudness target (-16 LUFS), I’ve defined -1.0 dBTP as my True Peak ceiling.

wlm-blog

What you need to do is insert the plugin at the end of your chain. Turn on the True Peak Limiter. Now play through the entire segment that you wish to measure and correct. During playback the textField value located on the WLM Plus Trim button will update in realtime, displaying the proper amount of gain compensation that is necessary to meet the Integrated Loudness target (it’s +2.1 dB in this example).

When measurement is complete, simply press the Trim button. This will set the Gain slider to the proper value for accurate compensation. Finish up by bouncing the segment through WLM Plus, much the same as any processing plugin. The processed audio will now match the Integrated Loudness Preset target and True Peaks will be limited accordingly.

I haven’t tested this in Pro Tools but my guess is this also works when using WLM Plus as an Audio Suite process on individual clips.

Of course you can make a manual adjustment to the Gain slider as well. In this case you would use the displayed Trim Value to properly set the necessary amount of gain compensation.

Great update to this well designed Loudness Meter.

-paul.
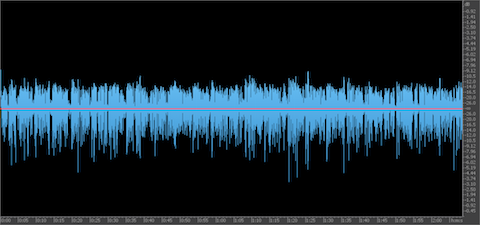
Adobe Loudness Radar Up and Running …

With the release of the Adobe “CC” versions of Audition and Premiere Pro, users now have access to a customized version of the tc electronic Loudness Radar Meter.

LR-Banner

In this video from NAB 2013, an attendee asks an Adobe Rep: “So I’ve heard about Loudness Radar … but I don’t really understand how it works.”

I thought it would be a good idea to discuss the basics of Loudness Radar, targeting those who may not be too familiar with it’s design and function. Before doing so, there are a few key elements of loudness meters and measurement that must be understood before using Loudness Radar proficiently.

Loudness Measurement Specifications:

Program “Integrated” Loudness (I): The measured average loudness of an entire segment of audio.

Loudness Range (LRA): The difference between average soft and average loud parts of a segment.

True Peak (dBTP): The maximum electrical amplitude with focus on intersample peaks.

Meter Time Scales:

• Momentary (M) – time window:400ms
• Short Term (S) – time window:3sec.
• Integrated (I) – start to stop

Program Loudness Scales

Program Loudness is displayed in LUFS (Loudness Units Relative to Full Scale), or LKFS (Loudness K-Weighted Relative To Full Scale). Both are exactly the same and reference an Absolute Scale. The corresponding Relative Scale is displayed in LU’s (Loudness Units). 0 LU will equal the LUFS/LKFS Loudness Target. For more information please refer to this post.

LU’s can also be used to describe the difference in Program Loudness between two segments. For example: “My program is +3 LU louder than yours.” Note that 1 LU = 1 dB.

Meter Ranges (Mode/Scale)

Two examples of this would be EBU +9 and EBU +18. They refer to EBU R128 Meter Specifications. The stated number for each scale can be viewed as the amount of displayed loudness units that exceed the meter’s Loudness Target.

From the EBU R128 Doc:

1. (Range) -18.0 LU to +9.0 LU (-41.0 LUFS to -14.0 LUFS), named “EBU +9 scale”

2. (Range) -36.0 LU to +18.0 LU (-59.0 LUFS to -5.0 LUFS), named “EBU +18 scale”

The EBU +9 Range is well suited for broadcast and spoken word. EBU +18 works well for music, film, and cinema.

Loudness Compliance: Standardized vs. Custom

As you probably know two ubiquitous Loudness Compliance Standards are EBU R128 and ATSC A/85. In short, the Target Loudness for R128 is -23.0 LUFS with peaks not exceeding -1.0 dBTP. For ATSC A/85 it’s -24.0 LKFS, -2.0 dBTP. Compliant loudness meters include presets for these standards.

Setting up a loudness meter with a custom Loudness Target and True Peak is often supported. For example I advocate -16.0 LUFS, -1.5 dBTP for audio distributed on the internet. This is +7 or 8 LU hotter than the R128 and/or ATSC A/85 guidelines (refer to this document). Loudness Radar supports full customization options to suit your needs.

Pause/Reset

Loudness meters have “On and Off” switches, as well as a Reset function. For Loudness Radar – the Pause button temporarily halts metering and measurement. Reset clears all measurements and sets the radar needle back to the 12 o’clock position. Adobe Loudness Radar is mapped to the play/pause transport control of the host application.

Gating

The Loudness Standard options available in the Loudness Radar Settings designate Measurement Gating. In general, the Gate pauses the loudness measurement when a signal drops below a predefined threshold, thus allowing only prominent foreground sounds to be measured. This results in an accurate representation of Program Loudness. For EBU R128 the relative threshold is -10 LU below ungated LUFS. Momentary and Short Term measurements are not gated.

• ITU BS.1770-2 (G10) implements a Relative Gate at -10 LU and a low level Gate at -70 LU.

• Leq(K) implements a -70 LU low level Gate to avoid metering bias during 100% silent passages. This setting is part of the ATSC A/85 Specification.

Loudness Radar In Use

In Audition CC you will find Loudness Radar located in Effects/Special/Loudness Radar Meter. It is also available in the Effects Rack and in the Audio Mixer as an Insert. Likewise it is available in Premiere Pro CC as an Insert in the Audio Track Mixer and in the Audio Effects Panel. In both host applications Loudness Radar can be used to measure individual clips or an entire mix/submix. Please note when measuring an audio mix – Loudness Radar must be placed at the very end of the processing chain. This includes routing your mix to a Bus in a multitrack project.
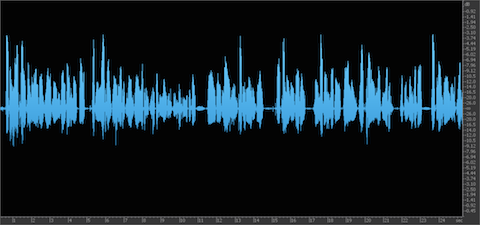
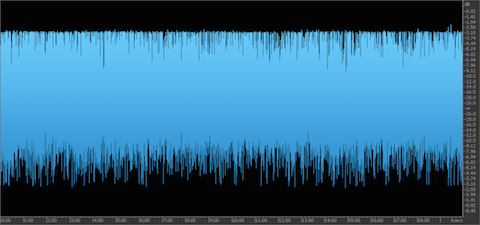
Most loudness meters use a horizontal graph to display Short Term Loudness over time. In the image below we are simulating 4 minutes of audio output. The red horizontal line is the Loudness Target. Since the simulated audio used in this example was not very dynamic, the playback loudness is fairly consistent relative to the Loudness Target. Program Loudness that exceeds the Loudness Target is displayed in yellow. Low level audio is represented in blue.

Each horizontal colored row represents 6 LU of audio output. This is the meter’s resolution.

histrogram

Loudness Radar (click image below for high-res view) uses a circular graphic to display Short Term Loudness. A rotating needle, similar to a playhead tracks the audio output at a user defined speed anywhere from 1 minute to 24 hours for one complete rotation.

LM-480

The circular LED meter on the perimeter of the Radar displays Momentary Loudness, with the user defined Loudness Target (or specification target) visible at the 12 o’clock position. The Momentary Range of the LED meter reflects what is selected in the Settings popup. The user can also customize the shift between green and blue colors by adjusting the Low Level Below setting.

The numerical displays for Program Loudness and Loudness Range will update in real time when metering is active. The meter’s Loudness Unit may be displayed as LUFS, LFKS, or LU. The Time display below the Loudness Unit display represents how long the meter is/was performing an active measurement (time since reset). Lastly the Peak Indicator LED will flash when audio peaks exceed the Peak Indicator setting.

If this is your first attempt to measure audio loudness using a loudness meter, focus on the main aspects of measurement:Program, Short Term, and Momentary Loudness. Also, pay close attention to the possible occurrence of True Peak overs.

In most cases the EBU R128 and ATSC A/85 presets will be suitable for the vast majority of producers. Setup is pretty straightforward:select the standardization preset that displays your preferred Loudness Unit (LUFS, LKFS, or LU’s) and fire away. My guess is you will find Loudness Radar offers clear and concise loudness measurements with very little fuss.

Notes:

You may have noticed the Loudness Target used in the above graphic is -16.0 LUFS. This is a custom target that I use in my studio for internet audio loudness measurements.

-paul.

Articles and Documentation used as Reference:

tc electronic LM2 Plugin Manual

ITU-R BS.1770-3 Algorithms to measure audio programme loudness and true peak audio level

EBU R128 Loudness Recommendation

EBU-Tech 3341 Loudness Metering

Internet Audio: True Peak Compliance …

Wide variations in average (Program/Integrated) Loudness are common across all forms of audio distributed on the internet. This includes audio Podcasts, Videocasts, and Streaming Media. This is due to the total lack of any standardized guidelines in the space. Need proof? Head over to Twit.tv and listen to a few minutes of any one of their programs. Use headphones, and set your playback volume to a comfortable level.

Now head over to PodcastAnswerMan.com, and without making any change to your playback volume – listen to the latest program.

I rest my case.

In fact, there is a 10 LU difference in average loudness between the two. Twit.tv programs check in at approximately -22 LUFS. PodcastAnswerMan checks in at approximately -12 LUFS. I find this astonishing, but I am not surprised. I’m not signaling them out for any lack of quality issues or anything like that. In my view both networks do a great job, and my guess is they have sizable audiences. Both shows are well produced and it simply makes sense to compare them in this case study.

With all this in mind let me stress that at this particular time I am not going to focus on discussing Program Loudness variations or any potential suggested standard. I can assure you this is coming! I will say that I advocate -16.0 LUFS (Program/Integrated Loudness) for all media formats distributed on the internet. Stay tuned for more on this. For now I would like to discuss True Peak compliance that will be a vital part of any recommended distribution standard.

What surprises me more than Program Loudness inconsistency is just how many producers are pushing files with clipped, distorted audio. In many cases Intersample Peaks are present in audio files that have been normalized to 0 dBFS. (For more information on Intersample Peaks please refer to this brief explanation). Producers need to correct this problem before their audio is distributed.

The Tools

One of the most useful features included in Adobe Audition is the Match Volume Processor. This tool includes various options that allow the operator to “dial in” specific average loudness and peak amplitude targets. After processing, the operator can examine the results by using Audition’s Amplitude Statistics analysis to check for accuracy.

mvp-1

Notice in the snapshot above I set the processor to Match To: Total RMS, with a -18.50 dB RMS average target. I’ve also selected the Use Limiting option. I’m able to dial in custom Look-Ahead and Release Time parameters as I see fit. Is there something missing? Indeed there is. Any time you push average levels you run the risk of clipping the source. In Audition the Match Volume/Use Limiting option lacks the capability for the operator to set a specific Peak Amplitude Ceiling. I’ve determined that in certain situations Peak Amplitudes reach a -0.1 dB ceiling resulting in possible clipped samples and True Peak levels that exceeded 0dBFS. Keep in mind this is not always the case. The results depend on the Dynamic Range and available Headroom of any source.

So how do we handle it?

Notice above the Match Volume Processor offers two Peak Amplitude options: Peak Amplitude and True Peak Amplitude. The European Broadcasting Union’s EBU R128 spec. dictates -1.0 dBTP (True Peak) as the ultimate ceiling to meet compliance. Here in the states ATSC A/85 dictates -2.0 dBTP. Since most, if not all audio formats distributed on the internet are delivered in lossy formats, it is important to pay close attention to True Peak Amplitude for both source (lossless) and distribution (lossy) files.

fgm

I advocate -1.0 dBTP as the standard for internet based audio file delivery. True Peak Limiters are able to detect and alleviate the possibility of Intersample Peaks from occurring. It is recommended to pass audio through a True Peak compliant limiter after loudness normalization and prior to lossy encoding. Options include ISL by Nugen Audio, Elixir by Flux, and (the best kept secret out there) TB Barricade by ToneBoosters. If you are running Audition, Match To: True Peak Amplitude and you should be all set.

The plugin developers mentioned above as well as Waves, MeterPlugs, tc electronic, Grimm Audio, and iZotope supply Loudness Meters and toolsets that display all aspects of loudness specifications including True Peak alerts. Visit this page for a list of supported Loudness Meters.

If True Peak detection and compliance is not within your reach due to the lack of capable tools, a slightly more aggressive ceiling (-1.5 dBFS) is recommended for Peak Normalization. The additional .5 dB acts as a sort of safety net, insuring maximum peak amplitude remains at or below -1.0 dBFS. One thing to keep in mind … performing Peak Amplitude Normalization after Loudness Normalization may very well result in a reduction in average, program loudness. Once again changes to the processed audio will depend on the audio attributes prior to Peak Normalizing.

Below I’ve supplied data that supports what I noted above. The table displays three iterations of a test file: Input, Loudness Normalized Intermediate, and final Output. For this test I used the ITU-R BS.1770-2 “Match To” option in Audition’s Match Volume Processor. I pushed the average target to -16.0 LUFS. As noted, this is the target that I advocate for internet and/or mobile audio. This target is +7 LU hotter than R128 and +8 LU hotter than ATSC A/85.

After processing the Input file, the average target was met in the Intermediate file, but True Peak overs occurred. The Intermediate file was then passed through a compliant True Peak Limiter with it’s ceiling set to -1.0 dBTP. Compliance was met in the Output with a minimal reduction in Program Loudness.

data-480

Producers: there is absolutely no excuse if your audio contains distortion due to clipping! At the very least you should Peak Normalize to -1.5 dBFS prior to encoding your lossy MP3. Every audio application on the planet offers the option to Peak Normalize, including GarageBand and Audacity. Best case scenario is to adopt True Peak compliance and learn how to use the tools that are necessary to get it done. If you are an experienced producer or professional, and you come across content that does not comply – reach out and offer guidance.

-paul.

Waves and MaxxVolume

The latest addition to my audio processing toolset is MaxxVolume by Waves. This dynamics processor has been on my radar for the past few years. I was always under the impression that Waves plugins required an iLok account/key. It was for this reason I never bothered to pull down the demo and test it.

A few days ago I noticed that a few online plugin resellers were advertising a price drop for MaxxVolume. I believe the original price was $300. Sweetwater and DontCrack are currently selling it for $149. I decided to purchase a license. By the way prior to doing so – I realized Waves has moved away from the iLok requirement. They now provide a standalone “Waves License Center” (WLC) application that can be used to manage both purchased and demo licenses. Licenses can be transferred to a host machine and/or a standard (FAT32 formatted) USB Flash Drive. You can then move and manage licenses via the Flash Drive or within their proprietary License Cloud.

After making a purchase you simply register the new product on the Waves site, run WLC, login to your Waves account – and move your license(s) from the cloud to your target destination. I must say the process was easy and seamless.

So what is MaxxVolume? The plugin is a four module dynamics processor: Low Level Compressor, Gate, Leveler, and High Level Compressor. All four processing stages run in parallel.

The Low Level Compressor is essentially an expander. So any signal that falls below the set threshold gets compressed upward. It’s controlled by a Threshold fader and Gain fader. The Gate feature is controlled by a single Threshold fader that applies gentile downward expansion affecting any signal that drops below the threshold setting. The Leveler is essentially an AGC (Automatic Gain Control) controlled by a single Threshold fader. Lastly the High Level Compressor is controlled by a Threshold fader and a Gain fader. This compressor functions just like any standard compressor – when the input signal exceeds the threshold it is attenuated. The Gain setting compensates for the attenuated signal.

Waves notes “It’s a Broadcast tool, bringing any program to a fixed destination level; ideal for radio and TV, podcasting, internet streaming, and more.” It took me some time to get a feel for how the four processing stages interact. So far I like what I’m hearing. The AGC is pretty impressive. I’m using Adobe Audition CS6 as my host. The processor works fine in the Adobe environment.

I will say this tool is not your sort of cut and dry loudness maximizer. It may not be suitable for less advanced or novice users. In my view a clear understanding of upward/downward expansion, AGC, and compression is a necessity.

-paul.